- Thus, checking one checkbox does not uncheck the others, as each checkbox is independent of all the others. You can change the Checked Symbol, and to do so, click on the change button.
- Select wingdings2 under font in the popup that appears.
Your Microsoft Word document can be transformed into a checklist by adding checkboxes. Keeping track of completed, actioned, and completed items. Word has many great features, including the ability to insert checklists, especially when creating surveys. So, do you want to add checkboxes in Word to create a checklist for your survey?
It’s your lucky day if you’re looking for such an article that will help you to do so. Here we have mentioned some great ways using which you can easily create or add checkboxes in MS Word to create a checklist. Let’s move forward with the guide and see if any of the methods mentioned below helped you or not.
Why Inserting Check Box in Documents Important?
Using a checkbox allows the user to select one, a few, or none of the options in a list of options. Thus, checking one checkbox does not uncheck the others, as each checkbox is independent of all the others. There are plenty of names for checkboxes, such as check box, tick box, and tick box.
However, in other words, checkboxes are graphical widgets that provide the user with a binary choice, i.e., two mutually exclusive options. In a yes/no question, for example, the user may have to choose between yes (checked) and no (not checked).
How to Insert a Checkbox in Word in Softcopy Document
Using the Developer tab in Word’s menu bar, you can insert a checkbox in a softcopy document (such as surveys and forms that you want respondents to fill out digitally). However, the menu bar has no default Developer tab, unlike File, Home, Insert, Design, etc.
That’s why before moving to the main highlight of today’s article, i.e., create or add checkboxes in MS Word to create a checklist. We will first describe to you how to access the Developer’s tab. So, let’s check out the method to do so,
How to Show the Developer Tab in Word
So, as we have already mentioned earlier that there is no dedicated option using which you can access the developer tab directly. However, to access the Developer tab, you must have to follow these steps:
- First, click on File to reveal the Developer tab.

- The next step is to click Options.

- In the popup that appears, select Customize Ribbon.
- The Developer option can be found under the Main Tabs.
- Once you have clicked OK, you are done.


Well, you are now accessed the Developer’s tab. Therefore, now you are ready to know how to add checkboxes in Word to create a checklist. So, let’s check out the different methods to do so.
How to Create/Insert the Checkbox in your Word Document
Since you are now familiar with how to access the Developer’s tab, you are now able to insert the checkbox in your softcopy of documents such as .doc files. So, let’s check out the steps to do so:
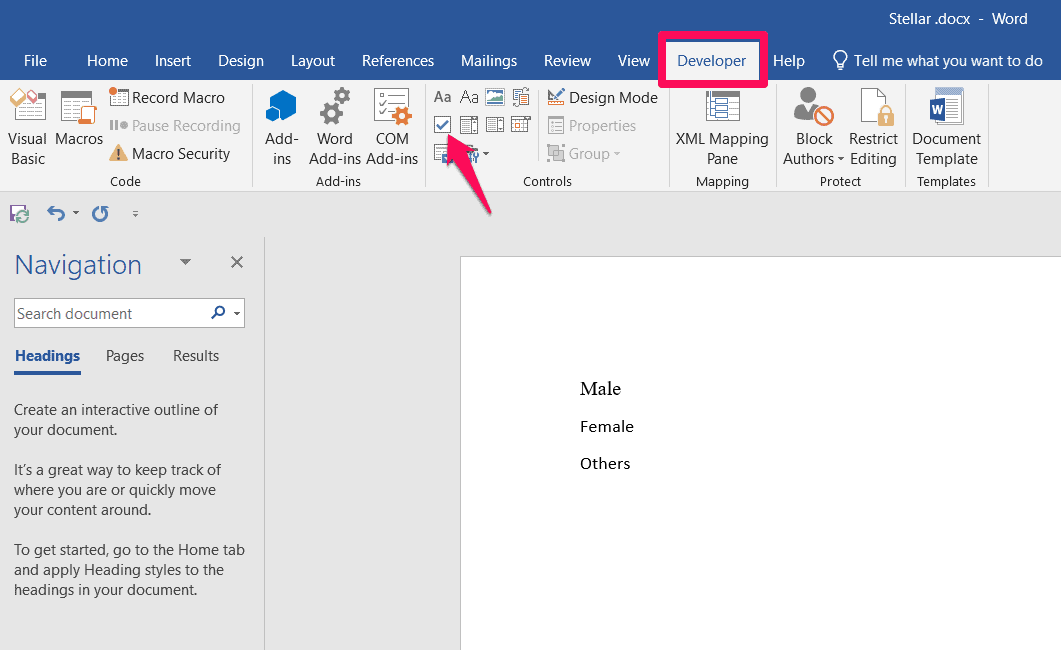
- Firstly, place the cursor where the checkbox should appear.
- In the menu bar, click the Developer tab. In the list of options, you will find Add-ins, XML Mapping Pane, and some others (their names will not be visible until you hover over them).

- Now, make sure you select the one with a checkmark.
- That’s it. Now, it will insert your checkbox.


Can You Change the Icon of the Checked State of the Checkbox?
You can immediately interact with the checkbox after inserting it. The only problem is that when checked, an X appears by default, and you might not want this X, or we say cross sign. So now know how to turn the X into a checkmark.
- Put the cursor right next to the checkbox or select it.
- Access the Developer tab and select Properties.

- When you check or uncheck symbols, you will see the default symbols. You can change the Checked Symbol, and to do so, click on the change button.

- Select wingdings2 under font in the popup that appears. For checked checkboxes, you will see the common checkmark icons. Once you’ve selected one of the icons, click Ok, followed by Ok.


Remove the Bounding Box of the Checkmark
Whenever the checkbox is checked or unchecked or when the cursor is placed on it, the bounding box that appears can also be removed in order to make the checkbox look better and more user-friendly.
- Select the checkbox by placing the cursor over it.
- In the menu bar, select the Developer tab and click Properties.
- You can choose None from the dropdown menu right next to Show as.


How to Insert a Checkbox in Hardcopy Documents
Some documents, such as identification documents or authentication documents, frequently require hard copies. Physical copies may be the only option in such cases when digital copies aren’t sufficient. You do not have to fumble around with the Developer tab to insert a checkbox into printed documents. For this purpose, you may instead define a custom bullet point.
- On the menu bar, make sure the Home tab is selected.
- Then, to access the Bullets dropdown menu, click on it.
- Now, define a new bullet by clicking Define new bullet.

- In the popup window, select Symbol.
- Make sure Wingdings2 is selected as the font.

- You can select the checkmark icon and hit the Ok button followed by Ok.


Is There Any Way to Create a Shortcut to Add an Interactive Checkbox in Word
It’s unnecessary to go into the Developer tab whenever you want to add checkboxes in Word. Instead, you can create a shortcut to insert the checkbox on your Word document. So, here are some crucial steps that you need to follow in order to create a shortcut.
- It is important to make sure the checkbox is displayed as a bounding box. We have already mentioned in this article how to remove the bounding box. Therefore, if you don’t know about that, you can refer to that para above.
- Access the File tab located in the menu bar after selecting the checkbox.
- Select Options from the menu.
- In the popup that appears, click on Autocorrect Options under Proofing.

- The checkboxes should be filled in for several options. Ensure Replace text as you type is also checked.
- To insert checkboxes, type in the shortcut under Replace and click Add. You will need to click Ok followed by Ok.

- That’s it. Now, you do not have to perform the whole steps; instead, you directly start typing the Word that is entered in step number 6 and press the space bar.


Conclusion
A variety of forms can be created with Microsoft Word, including digital forms, surveys, to-do lists, and printable forms. There might be a need to include a checkbox so your respondents can choose certain options in these forms.
Well, that’s what we have already explained in this guide. Therefore, we hope that you now know how to insert checkbox in Word to create a checklist. But, in case you have any doubts or queries, comment below and let us know.
READ NEXT:


")
