- Starlink no signal received error is a common issue due to various factors like bad weather, obstructions, network/server downtime, or a dirty dish
- Ways to fix the error include checking for satellite coverage, rebooting Starlink, monitoring weather conditions, clearing obstructions, cleaning the dish, and updating software
- Contacting Starlink support may be necessary if the issue persists, and following the guide should help resolve the error within 30 minutes.
Starlink has been around for quite some time now. With more days in service, users are now better able to find problems that are already occurring. One such error is the Starlink no signal received error. If you regularly face this problem or are suddenly facing it today, don’t worry.
Starlink users are often met with drastic issues that are typically fixed with time or after following a few steps. In this guide, we will show you how you can fix the Starlink no signal received error, what it means, and what causes it.
What is the Starlink No Signal Received Error and What Causes It?
The Starlink no signal error, as the name suggests, is the problem when your Starlink satellite is not able to connect to the internet because there is no signal. Without signal, there’s no internet and hence no use of Starlink.
The Starlink no signal received error typically means that you will have no internet connection and you will face issues even when trying to connect. The reasons behind this are many, but some of the potential ones are:
- Bad weather
- Obstructions that block the signal from satellites
- No Network or Starlink server down
- Dirty dish
These are some of the most common reasons. In the next section, we will learn to fix them one by one.
How to Fix Starlink No Signal Received Error 2025
Here are 6 ways to fix Starlink’s “no signal received” error. Make sure to follow these fixes in the order they are mentioned, and don’t skip any.
1. No Satellite Coverage
In 2025, Starlink’s coverage has grown massively, even in remote and polar regions. If you’re still getting the Starlink no signal received error, it’s less likely due to lack of satellites and more likely a local issue.
📌 Tip: Visit the Starlink Coverage Map and check if your area is under active service or a known downtime zone.
2. Reboot Your Starlink
Rebooting Starlink is the first step towards fixing Starlink’s no signal received error. If you are facing this error regularly but waiting for it to get fixed, you are probably wrong. Right now, you should go ahead and reboot your Starlink.
Unfortunately, Starlink does not provide clear instructions on rebooting either the Satellite, the mast, or the router. As a result, here are the steps involved in rebooting:
- If you want to reboot your Starlink in the easiest way possible, simply pull out the main plug.
- Wait for five minutes and then put it back in.
- If you are looking for a systematic way, open the Starlink app.
- Next, tap on Settings and click on Reboot.
The next method is an instantaneous method and doesn’t solve problems. If you want to fix problems, pulling the plug and waiting for some time is the best fix. However, if rebooting doesn’t solve your problem, follow up with the next fix.
3. Check Your Weather
Weather is nature, and you can not do anything against it. However, it is of general concern that if the weather is bad, the Starlink no signal received error can be inevitable. This stands true if you notice it is raining, snowing, or there are clouds outside.
If that’s the case, you cannot do anything but wait until the weather gets clear. Once the weather is clear, your Starlink might automatically connect or you can again reboot for convenience.
4. Check For Obstructions
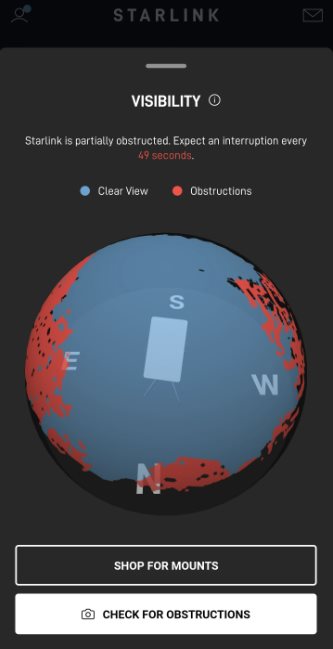
The next thing you need to do if Starlink no signal received has become regular is to check for obstructions. With obstructions, your Starlink may find it difficult to connect with the Satellite constellation, resulting in poor internet connection.
Checking obstructions is easy. You just need to open the Starlink mobile app and tap on Obstructions. If the page shows more than 10%, then no signal received error should be normal. In that case, you should try to mount your Starlink on a higher altitude. If obstructions is not your problem, follow up with the next fix.
5. Clean the Starlink Dish
While this may sound a bit conventional, sometimes, cleaning the Starlink dish or satellite can do the trick in fixing signal not received error. However, you should know that this is a tedious process if you are not handy or flexible enough.
Before doing, make sure to unplug your Starlink. In this method, you will have to climb your roof or lower your dish, depending on your Starlink’s mounting option. When you have the Starlink dish in your hand, use some isopropyl alcohol and a cotton microfibre cloth to watch the outer surface.
Make sure that the liquid does not get inside the dish. Even if it enters, you don’t need to worry. Alcohol will evaporate after a certain period of time.
6. Check For Software Issues
Starlink dishes update automatically, but sometimes they get stuck on old firmware, especially after power outages or long uptimes.
- Open the Starlink app
- Go to Advanced > Software
- Check if your version is outdated (2025 versions look like 6f3a2…release)
- If outdated, unplug the dish for 10 minutes and plug it back in
A fresh reboot can help Starlink pull the latest firmware and resolve hidden bugs that may be causing signal loss.
7. Use Starlink App’s Real-Time Obstruction Scanner
In 2025, the Starlink app now includes an advanced obstruction scanning feature that uses your phone’s camera. If you’re still relying on old-school guesswork, you might be missing a hidden tree, pole, or wall.
- Open the Starlink app
- Tap Obstructions > Scan Environment
- Use your camera to scan the area where your dish is pointed
- If the app shows >10% obstruction, that’s likely the cause of the error
- Mount your dish higher or reposition it to a spot with clear sky visibility (100° or more) for best results.
8. Make Sure Your Dish Type Matches Your Environment
In 2025, Starlink offers different types of dishes, and not all of them work equally well in every condition.
- Standard Gen 2 Dish – Good for homes and normal climates
- High Performance Dish – Better for snow, storms, and rural zones
- Flat HP Dish – Used on RVs, boats, and for mobile setups
If you’re using a Standard Dish in a harsh climate, you may need to upgrade to a High Performance model to avoid signal issues in bad weather.
9. Double Check Network Setup (Bypass Mode, Ethernet)
If you’re using bypass mode or a custom router, your router settings could be blocking the signal, not the dish.
- Starlink app says “Connected,” but no internet
- Third-party router settings haven’t been updated
- You’re using an outdated or broken Ethernet Adapter
In this case, check:
- Is the Starlink router in Bridge or Bypass mode?
- Are you using a compatible Ethernet adapter?
- Is DHCP enabled on your third-party router?
Even though your dish is getting a signal, misconfigured networking can make it look like Starlink has no signal when it’s really a local network issue.
10. Reach Out to Starlink Support (Now Easier Than Ever)
If nothing else works, it’s time to get help.
In 2025, Starlink support has improved and now includes live chat in the app (in select countries).
- Open the Starlink app
- Tap Support > Dish Issues > No Signal
- Wait for a live agent or leave a support ticket
The support team can run remote diagnostics and let you know if it’s a hardware issue, software bug, or just a known satellite outage.
How Long Does It Take For Starlink to Receive Signal?
In general, your Starlink will receive a signal immediately as you set up your Starlink for the first time. You can also experience this if you keep looking at the dish. When connected for the first time, your dishy will find satellites, establish a connection, and the internet will start working.
However, when you get the signal not received error, it can be a long process, and it seems unpredictable to understand when Starlink will receive the signal. If you have already waited for a long time, it is now time to contact Starlink support and let them know about the problem. In general, if you receive the Starlink no signal received an error and follow our guide carefully, your error should be solved, and Starlink will receive a signal within 30 minutes.
READ MORE:


