- Users can bypass their Starlink router by enabling bypass mode, which disables the router and Wi-Fi functions, allowing a third-party router to take over.
- Bypass mode is essential for the rectangular Starlink model, while other models allow for complete removal of the router for third-party router connection.
- To bypass the Starlink router, users need a Starlink Ethernet adapter and a third-party router like TP-Link or D-Link, with step-by-step instructions provided for setup and configuration.
For users who need a lot of advanced networking and WiFi options, using their own third-party router with Starlink may be a better option. This is why a lot of users want to bypass their Starlik Router.
Enabling bypass mode on the Starlink router allows for this functionality by disabling its own router and Wi-Fi functions. Thus, allowing the third-party router to take over. However, since the Starlink router also serves as the dish power supply, it cannot be removed completely from the Starlink kit.
In this guide, we will provide you with instructions on how to bypass the Starlink router and the necessary accessories needed to use a third-party router. Let’s begin.

Why Do You Need to Bypass Starlink Router?
If you have already made up your mind to bypass the Starlink Router, think before you do so because once you bypass it, you can only go back to the original router after your Factory Reset it.
Moreover, the bypass mode is only required for the Standard rectangular Starlink model, which has an integrated router and dish power supply. The original round dish, High Performance (Business) dish, Flat High-Performance, and RV In-motion dish do not require bypass mode because you can completely remove the Starlink router and replace it with a third-party router.
In the case of the round dish, simply remove the Starlink router and connect your third-party router to the Starlink power supply Ethernet port. On the High Performance and Flat High-Performance models, use the provided Starlink Ethernet cable to connect your own router to the power supply.
How to Bypass the Starlink Router
If you want to bypass a Starlink router, obtaining the Starlink Ethernet adapter is necessary. This adapter provides access to an Ethernet port, which is a requirement for connecting an aftermarket router to the Starlink system.
You can check out our guide to know how you can buy a Starlink ethernet adapter. The Ethernet Adapter is a separate accessory that is needed for this purpose, and can be seen in the guide linked above.
More importantly, you need a third-party router such as a TP link or D Link. We mentioned these two because they are the most well-known brands and are supported everywhere.
Step 1: Connect the Router to Starlink
The first step is to connect a third-party router with Starlink. However, to connect a third-party router to Starlink, you will need to first connect the Starlink Ethernet Adapter.
To start with, unplug the Starlink cable from the bottom of the router and plug in the Starlink Ethernet Adapter. After that, plug in the Starlink cable to the connector on the Ethernet Adapter and then wait for a few minutes to allow the dish to boot back up and verify that Starlink is online.
After that, use the Ethernet cable that came with your third-party router to connect it to Starlink. Remember, one end of the Ethernet cable will go into the Starlink Ethernet Adapter, and the other end will go to the Internet or WAN port on your third-party router.
Step 2: Configure the Third-Party Router
If you have recently purchased a router, you need to configure it in order to use with the Starlink. The setup process differs from manufacturer to manufacturer. Here we will be using an Asus Router. Yours can be anyone depending on your needs. However, the steps remain almost the same.
To set up the Asus router, we will log on to router.asus.com. You can use 192.168.1.1 to log into your Router’s admin page and configure it.

There are no necessary or specialized settings required. You just have to change the password and rename it. Also, make sure that the WAN connection type is Automatic.
Once the third-party router is configured, ensure that you have internet access by connecting to it. At this point, you will notice two Wi-Fi networks: the Starlink Wi-Fi and the Wi-Fi network from your third-party router.
However, having two routers connected to one internet source means you have a 2 NAT configuration. This not a problem either. Therefore, the next step is to enable bypass mode on the Starlink router.
Step 3: Enable Bypass Mode on Starlink
Now that you have paired the third-party router and Starlink router, it is now time to enable bypass mode. If you are well versed with the Starlink application, you should have no problem doing it.
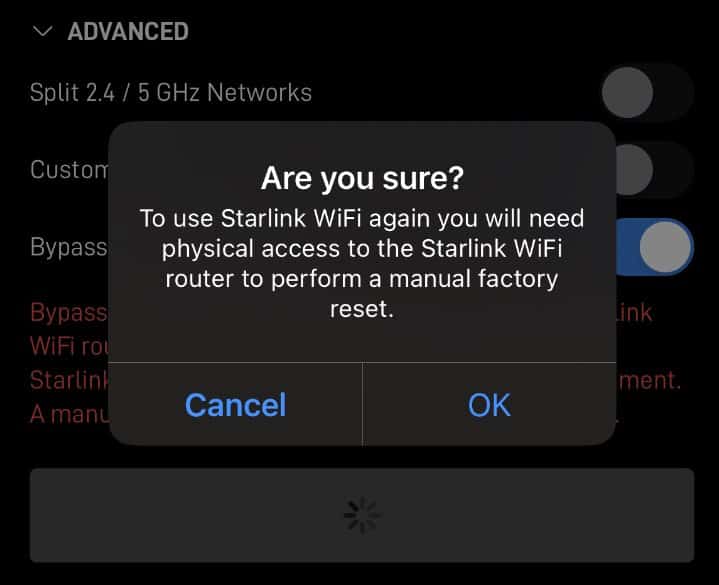
Remember that you were seeing 2 WiFi signals? Connect to Starlink original and then access your Starlink App. Go to WiFi settings, click on Advanced, and toggle Bypass Mode.
It will prompt you to confirm your decision, press Yes. That’s it. Your Starlink is now bypassed with a Third-Party router using the same Starlink internet.
How to Manage Starlink in Bypass Mode?
You can easily manage Starlink even in Bypass mode by connecting to the Third-Party router. Remember, your Starlink router doesn’t need to be controlled now because every setting will be accessible from the third-party router.
However, if you wish to manage the original Starlink, it can also be done by using the Wi-Fi network by simply logging into dishy.starlink.com.
The Bottom Line
Well, that’s all we have here about how you can bypass Starlink. We hope this guide has helped you. If you still have any queries or doubts, make sure to comment below.
ALSO READ:
- How to Update Starlink Firmware 2023 Latest Version List
- How To Contact Starlink Customer Support
- Starlink Setup And Installation Guide Detailed
- Starlink Down: Is Starlink Down Right Now | Starlink Outage
- How to Factory Reset Starlink Router
- Best Starlink Mounting Options: Detailed DIY Guide
- How To Buy, Sell, And Transfer Used Starlink Dish
- Why Are My Starlink Speeds So Slow and How to Improve it
- Starlink High-Performance Dish For In-Motion Upgrade Option
- How To Switch Starlink From Residential to RV

")


")


")