- Increasing FPS in Call of Duty Warzone is crucial for better gameplay and target acquisition, with most players seeing improvements with high FPS.
- Optimizing graphics settings on PC, including using DLSS technology for NVIDIA RTX cards and adjusting post-processing effects, can significantly boost FPS.
- Disabling full-screen optimization, updating drivers, and deleting temporary files can further enhance performance and stability in Warzone.
In order to be a good player in shooter games, frames per second are critical. By increasing your Warzone FPS, you will be able to react better to things in-game and hit more targets. And the majority of players see improvements when they play with high frames per second.
Also, you’ll get the best experience on the PC if you have a good set-up and run the game well. So, it’s no secret that increasing your FPS makes a significant difference in Call of Duty Warzone.
But, taking on the challenges of Call of Duty Warzone can be challenging on a PC. However, it’s still possible to get an excellent framerate even if you don’t have top-of-the-line equipment. You will, however, have to make some sacrifices.
You’ll need to tolerate less flashy graphics if you want Warzone’s best FPS. It is because both the effects and graphics are demanding on your PC. So, if you tone down the graphics, you will get better frame rates. This guide covers everything you need to know about optimizing your Call of Duty Warzone FPS.
Best PC Settings For Call Of Duty Warzone To Boost FPS
Maintaining high graphics quality and best performance simultaneously might not be a good idea unless you have a high-end GPU and monitor.
Performance should always take precedence over graphics quality when playing shooters like Warzone or Battle Royale.
And performance may also be affected by disabled post-processing effects or SSR disabled post-processing. And there are many other settings you can alter a bit to get better FPS. Let’s check them out one by one.
Use DLSS Technology
DLSS is available if your graphics card is NVIDIA RTX. It is a new feature and was recently added to Warzone.
And, if you’re willing to sacrifice some of your visual quality for more frames, it can make a huge difference.
DLSS lowers the resolution of Warzone while making it appear that it’s running at a high resolution. And although the technology is quite hard to understand. But it achieves the desired results.
So, you can increase your frames with DLSS if you can deal with a slightly worse-looking Warzone.
For Warzone to support DLSS, follow these steps:
1. Start the game.
2. Then, click on the Options tab.
3. Select the Graphics tab.
4. And locate the post-processing effects.
5. Then, choose Ultra Performance for NVIDIA DLSS.
Content patches can also reduce Warzone’s performance by accident. But, this is rare.
Also, a newly added asset could cause players to encounter performance problems. In those cases, you are unlikely to be able to restore your frames to what they once were using standard troubleshooting methods.
Community hubs and Twitter are often the places to go for cases like this. In such cases, those who cannot stand frame drops may have to wait for an additional fix to come out from the developers.
Disable Full-Screen Optimization
Full-Screen Optimization negatively impacts your performance when enabled. In addition, the feature causes inconsistencies in FPS, and it takes a century to minimize the game.
Additionally, you are notified of useless Xbox Applications every time you try to minimize the game. As a result, they pile up in the background and subsequently consume CPU and RAM resources.
This is seen by some gamers as a flaw. But, Microsoft claims that Full-Screen Optimization gives better performance.
Anyhow, you must disable it in Warzone if you want to get good Performance.
Follow these steps to disable full-screen Optimization:
1. Launch Battle.net. Select Call of Duty Warzone. Right-click on Options. Then. Click “Show in Explorer“.
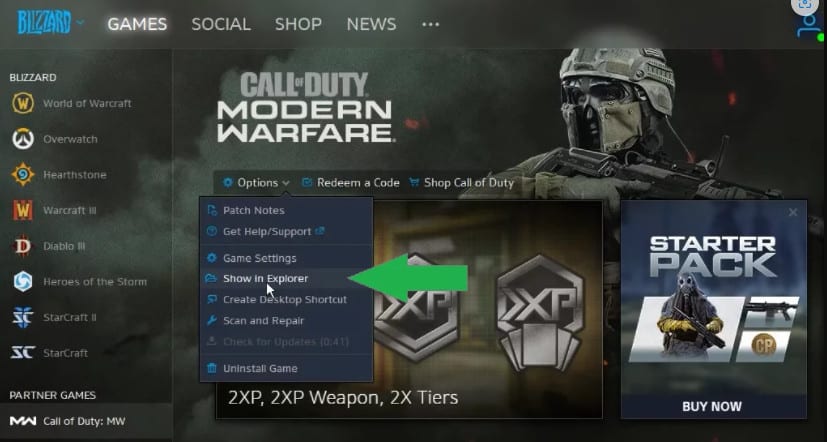
2. The Folder contains two Modern Warfare Applications. And, both of them require the same settings. Here, we will only give an example of one. But, the process is the same for the latter.
3. Right-click the Modern Warfare Launcher. Select Compatibility. Then, click Disable “Full-Screen Optimization“.
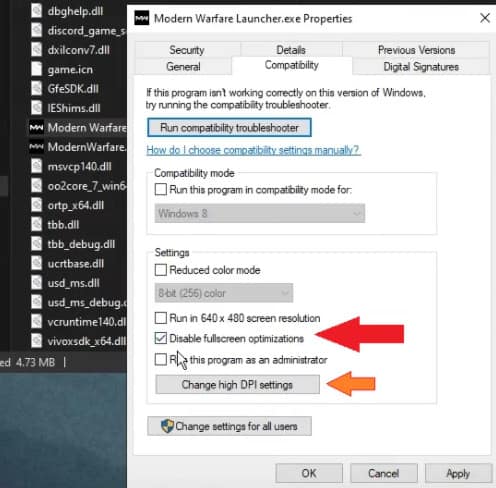
4. Next, click Change high DPI settings. Make sure the Application performs scaling by checking “Override high DPI Scaling Behaviour“.

It is the most important aspect of optimizing the Warzone Applications. And, it significantly improves performance.
Delete Temp Files
If you empty the recycle bin, you think you will completely clean your PC of useless files. But, in the Windows Drive, there are also Temp files that can hold up some space.
And, also they are difficult to find. Thus, it is useless to play Warzone on an SSD if there are files that are unnecessary like these.
Also, these files are often infected with viruses, causing severe instability on your drive. So, always make sure they are removed.
Here’s how to do so:
1. Click on Start. And, type Run.

2. Enter ‘%temp%‘ once the window is open. Then, press OK.

3. Now, select all files in the Temp folder by pressing Control + A. Right-click the selected file. Then, click Delete.

You can also get similar results by performing a Disk Cleanup in addition to removing %temp% files. This is a simple process.
All you need to do is right-click the drive where Warzone is installed. Now, go to the properties tab to clean up your disk.
You will be able to enjoy the warzone at full speed by using either of these methods.
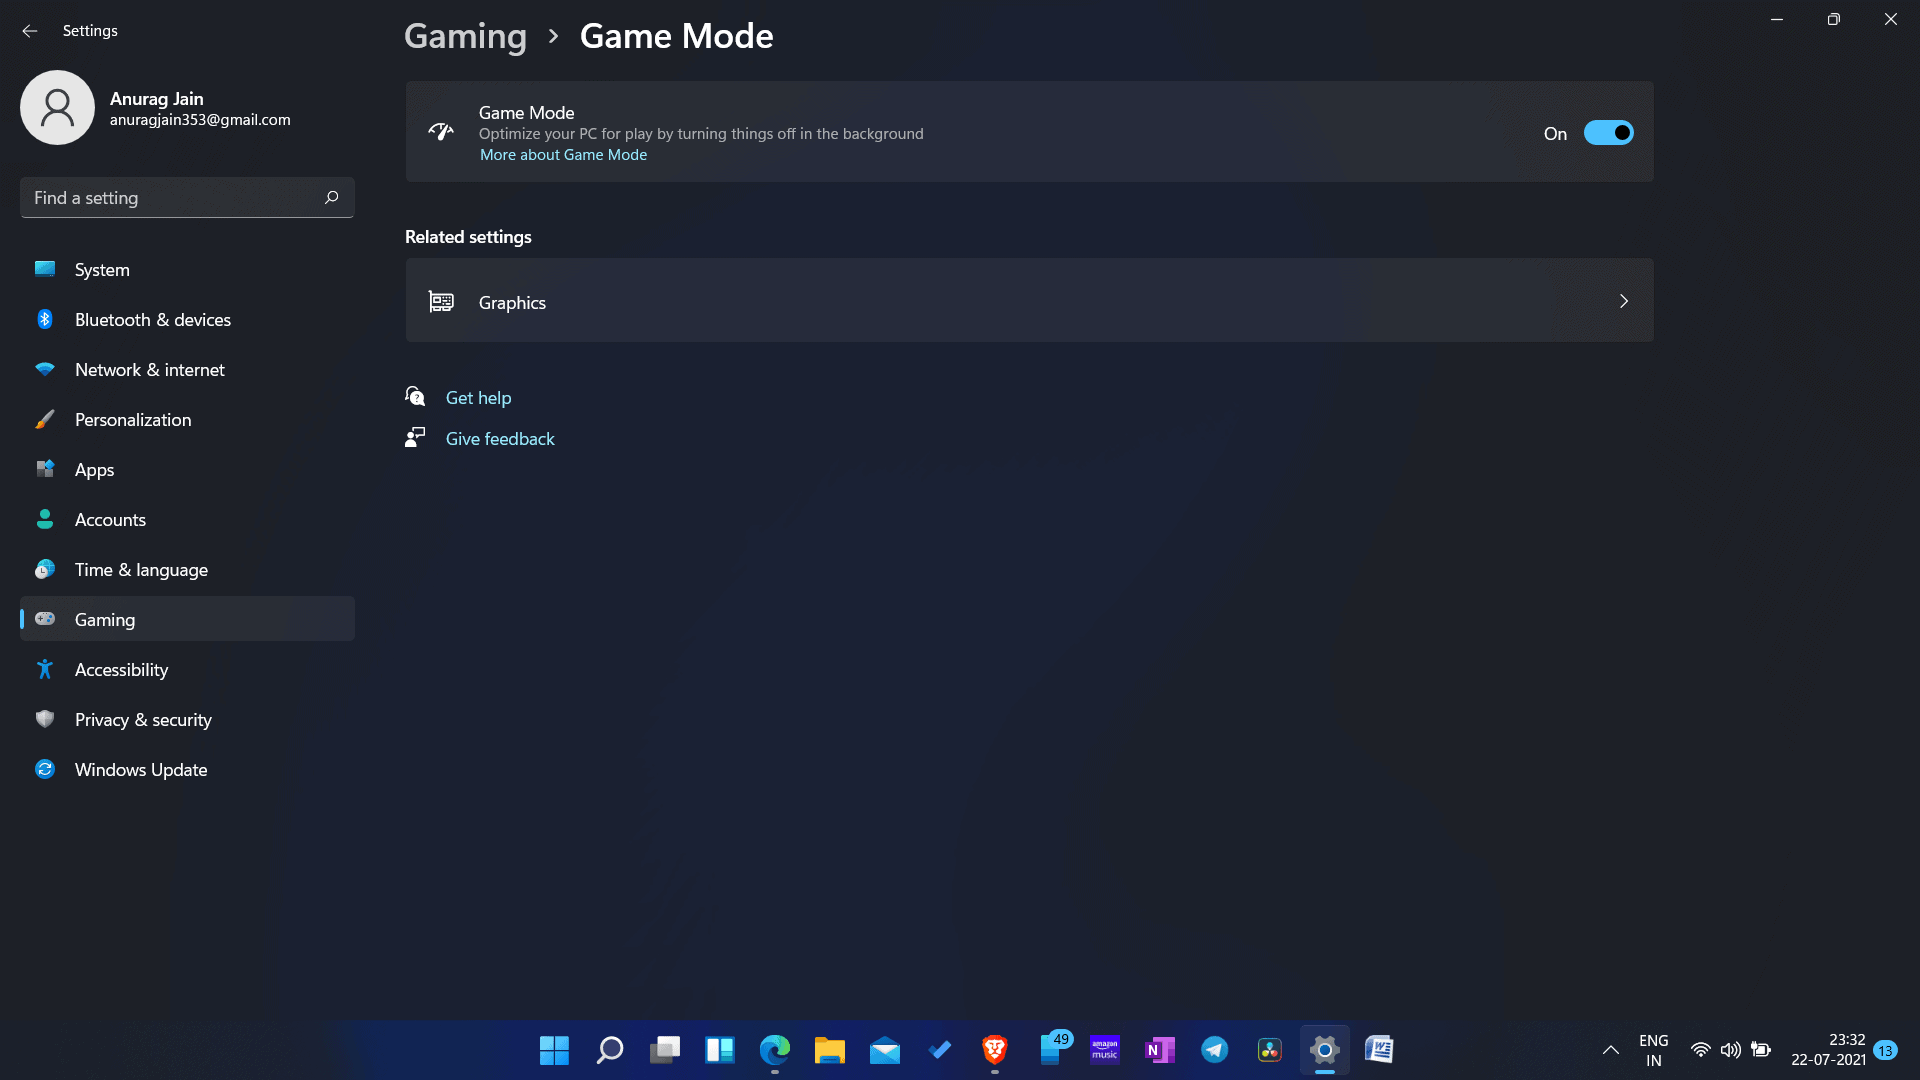
Try Enabling Game Mode
Microsoft has one feature that works exceptionally well for gamers. And, by activating Game Mode, all unnecessary applications will be closed automatically so that your game can make full use of your hardware.
Additionally, it also disables notifications and prevents Windows from automatically updating.
And, for optimal performance, it prioritizes the Graphics Card and Processor. And, other features are also available in the Game mode. So, the Game mode must always be enabled.
Here is how to do so:
1. Click on Start. Enter Game Mode.
2. Enable it once it has been opened.
That’s it.
Set High Graphics Priority
Windows 10 has a Graphics Settings feature that allows you to change the GPU Priority for a specific game. It is a very useful feature. You can dramatically improve your Warzone performance with it.
Just go to the Graphics Settings of Warzone. And, set it to High priority. Then, save the changes. Afterward, your Graphics Card will always run at full speed, regardless of any limits.
Thus, FPS will increase and performance will improve when playing Warzone. Here is how to do so:
1. Click on Start. Search for Graphics Settings.

2. Then, click on Browse. Select Call of Duty Warzone and add it. And, select High Performance under the graphic preferences.

That’s it.
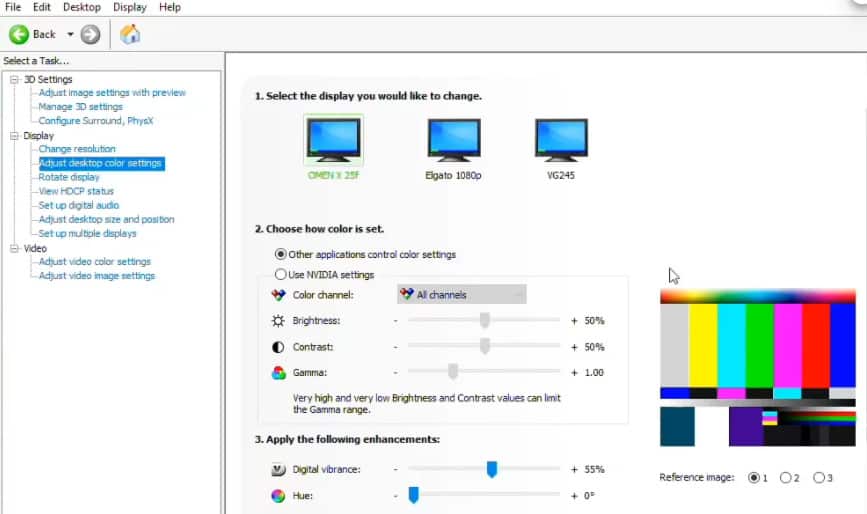
Best Nvidia Settings For Warzone
To begin with, make sure you have the latest Nvidia drivers installed before you explore the settings. GeForce Experience allows you to update your drivers or you can download them manually.
After that, you should launch Nvidia Control and proceed as described below.
1. Click on the Preview tab to adjust the image settings. You can adjust the settings by dragging the slider under Performance.

2. Performance and Graphics Meta will be altered over here. After that, the PC will now focus on providing 100% performance.
At the same time, quality will be compromised. However, you can expect crisper graphics. Additionally, we will further enhance it by adding some color tweaks to cover up this part.
3. So, click on Adjust Desktop Color Settings. Then, adjust it as shown in the image.
Disable Hardware Acceleration
Battle.net applications run in the background when you launch Call of Duty Warzone. And, these Applications use a significant amount of CPU and Memory. So, the FPS is not stable when playing the game.
Therefore, in order to avoid unnecessary background applications and software, you always have to ensure that they’re not running.
There should be no other application on the PC so that the game takes full advantage of the CPU and memory. In addition to this, Hardware Acceleration must also be disabled in every application you run.
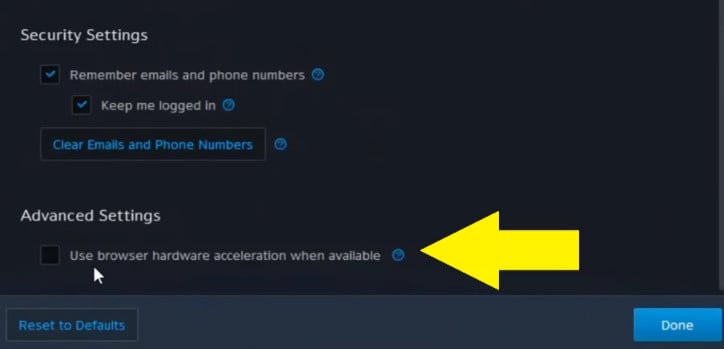
Follow these steps in order to disable warzone client hardware acceleration:
1. Launch Battle.net. Hover over the arrow icon below the Blizzard logo and right-click. Then, select Settings.
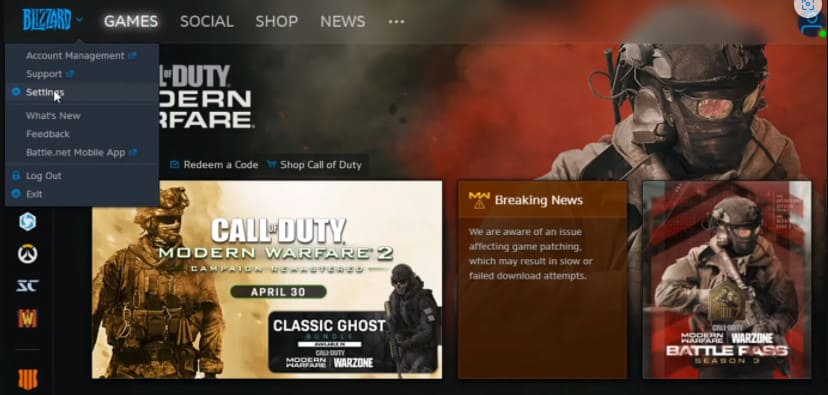
2. And, select General from the Settings menu. In both settings, select Exit Battle.net.

3. Now, go to the bottom. Then, turn off “Use Browser Hardware Accelerators when available.”
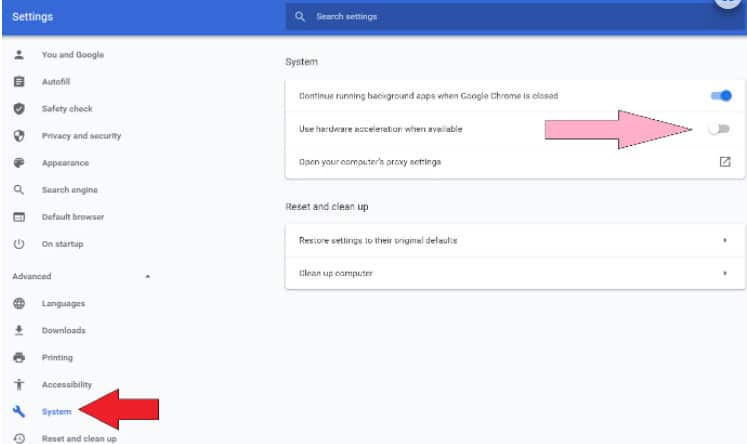
You can also disable hardware acceleration in Google Chrome by following these steps:
1. Launch Google Chrome. Go to the Settings page. Then, select Advanced.
2. Now, disable “Use Hardware Acceleration when available” under the System tab.
Discord’s hardware acceleration can also be turned off by following the steps below:
1. Log into Discord. Select Settings.
2. Go to Appearance under App Settings. Then, turn off Hardware Acceleration.

3. You will be prompted to restart your computer by Discord.

Disable Unnecessary Applications
Disabling unnecessary elements is the purpose of this method. Our hardware shouldn’t be burdened by extra applications while we play games.
So, while we play Warzone, we should not receive any notifications despite enabling Game Mode. There have been complaints from users that, despite the feature being enabled, notifications continue to pile up in the background, causing inconsistent performance.
Here’s how to disable them.
Disable unnecessary applications running in the background by:
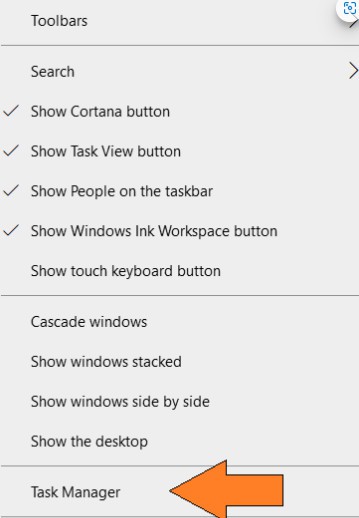
1. Right-click on the taskbar. Select Task Manager.
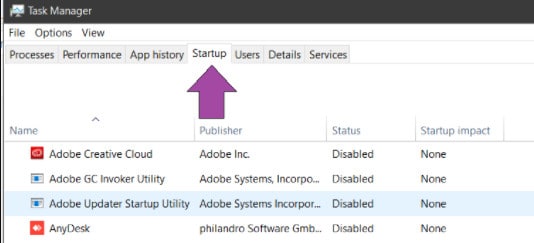
2. Go to startup. Turn off all high-priority applications. You can also disable medium-priority applications.
This will not only help you get a better FPS and improve the stability of Warzone. You will also experience faster boot times and a more responsive Windows 10.
Now, follow these steps in order to disable unnecessary services:
1. Click on the Start button. Search for Run and open it. Type MSConfig into the box. Press OK.

2. Click on the services tab. Tick Hide all Microsoft services. This is to keep the important ones from being disabled. Afterward, you can disable those that are not needed.
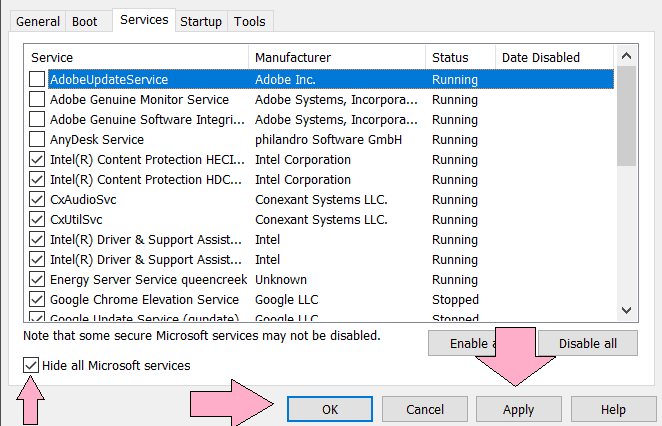
And, don’t forget to click apply. Save your changes by clicking ok.
Update Drivers
It’s not a guarantee that your drivers won’t have performance problems in the future, even if they work just fine now.
And, there are Warzone patches specifically tailored for newer GPU drivers that can lower your frame rate if you are using an older one.
So, your number one defense against this is to keep your drivers updated. You will also receive the newest security patches and bug fixes when you keep your drivers updated.
This is useful if you play other games besides Warzone. In addition, you can also take advantage of new features that your GPU manufacturer has introduced to enhance your gaming experience. However, you will have to check your GPU settings to enable them.
Disable Enhance Pointer Precision
Hardware Acceleration is similar to Enhance Pointer Precision. However, this feature has more negative effects than you might think.
Your mouse’s speed and DPI are consistently changing when Enhance Pointer Precision is enabled. Therefore, it uses a significant amount of CPU and Memory power to perform this action.
And, aside from the fact that it affects performance, it has also other negative aspects. For example, if you like playing FPS games and are competitive.
You will never be able to adjust the mouse speeds in your muscle memory if you use Enhance Pointer Precision.
It is because the sensitivity will change every time you play. This will never stop. So, the gameplay will be wildly inconsistent as a result. But the sad part is that this is an unnoticeable feature.
But, luckily you can disable it. Just follow these steps:
1. Click on Start. Search for Mouse Settings.
2. Select Additional Mouse Options.
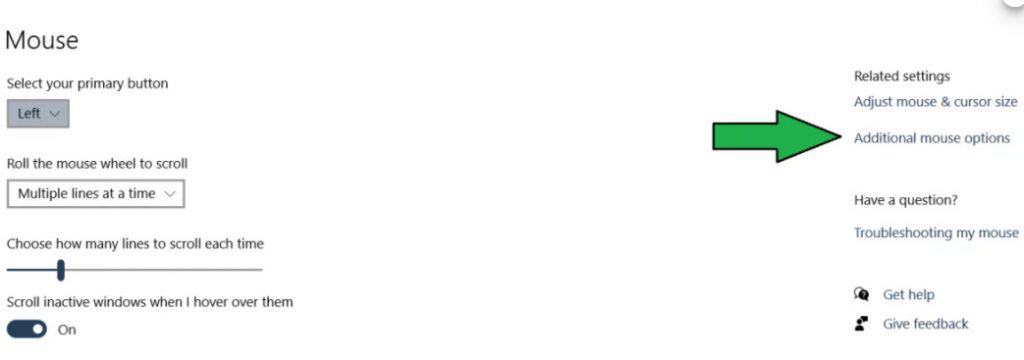
3. Select the Pointer Options tab. Uncheck Enhance Pointer Precision. Don’t forget to click Apply and OK.
Best Video Settings
In-Game Graphics is the final and most important step. The focus of this section is on high frames per second and performance.
If you reduce the load on your GPU, it will be able to produce higher frames. And, this will prevent drops that might occur when the GPU is overloaded.
You can use these settings for better Warzone FPS.
Display Mode: Fullscreen. Although, switching between tabs while gaming may be easier with windowed options. Fullscreen, however, uses all the GPU’s resources to display whatever is on your screen.
So, when you play in windowed mode, your GPU consumes more resources rendering your desktop and other open programs.
Render Resolution: 100. In order to gain more FPS, you should lastly increase the render resolution. By reducing this option, you will see a significant increase in frame rates.
However, your game will become blurry as a result. If other changes on our list do not increase your frames, then going below 100 is recommended.
Screen Refresh Rate: This setting should be matched with your average frame rate if you can’t match the refresh rate of your monitor.
Display Resolution: Make sure your monitor’s resolution matches it. If nothing else works, you can also reduce this setting.
You will get lower resolutions by lowering this setting. And, you can even stretch it in some configurations.
Aspect Ratio: Automatic
V-Sync: Disabled. Although frame synchronization does not affect performance. But, the input lag will increase if it is enabled.
And, low input lag is essential when playing games like Warzone. Because milliseconds can determine whether you go to Gulag or remain in the game. So, it is better to keep it disabled.
Frame limit: Anything but uncapped. No matter what type of gaming PC you have, your system may overheat if you don’t set a frame limit.
And, this may cause you to drop frames in critical situations. So, your system will work to protect your frames instead of going berserk when you lock your frames.
Texture Resolution: Low. The VRAM of your GPU heavily influences this setting. And, even though its effect on FPS is minimal, it is recommended to keep it at a low level.
Texture Filter Anisotropic: Normal. The effects of anisotropic filtering on FPS are negligible unless your GPU is over a decade old.
This setting reduces the blurriness of certain textures in the game. And, any setting lower than normal should only be used if you desperately need a couple more frames.
Particle Quality: Low. We recommend keeping your GPU at low settings even though setting particle quality to high shouldn’t be too taxing.
Bullet Impacts and Sprays: Enabled. There is virtually no impact on performance from this setting. But, enabling it may also reveal clues you might otherwise overlook.
Tessellation: Disabled. In terms of performance, tessellation has a minimal effect as well. You still get a couple of frames more with it disabled. It’s hardly noticeable.
Shadow Map Resolution: Low. Shadow settings are enabled by most battle pros. This allows them to identify enemies who might be hiding.
But, when it comes to performance, they are also one of the most resource-intensive settings. So, disabling them or keeping them low will get you the best framerate.
Cache Spot Shadows: Disabled
Cache Sun Shadows: Disabled
Particle Lighting: Low. It is hard to tell the difference between higher and lower settings. And, you will get a couple more frames if you choose low.
DirectX Raytracing: Disabled. Raytracing is a relatively new technology. It is one of the most demanding settings that will tank your frame rate even if your GPU supports it.
Ambient Occlusion: Disabled. It’s easy to tell the difference between having ambient occlusion on and off, but it’s a highly resource-consuming setting.
So, if you need more frames, you should keep them disabled.
- Screen Space Reflection: Disabled
- Anti-Aliasing: Disabled
- Depth of Field: Disabled
- Filmic Strength: 0
- World Motion Blur: Disabled
- Weapon Motion Blur: Disabled
- Film Grain: 0
Conclusion
COD Modern Warfare and Warzone should perform better if you optimize the settings correctly. The Custom Framerate Limit can also be customized to the above-mentioned settings. You can select the Custom option for it.
You can also choose Automatic Sync for Aspect Ratio. However, your native aspect ratio can also be used. Also, you should disable automatic sync every frame VSync if your monitor displays a wide 16:9 aspect ratio.
And, if you want to reduce aliasing in the scene, you can switch to Particle Quality High. Also, you can set Anti-Aliasing to SMAA 1X when editing post-processing effects. It can also be turned off.
So, depending on your preferences, you can always change the settings. Also, make sure that your PC can handle loading videos quickly. It is because the excessive visual effects can be distracting.


