- Many users experiment with dual booting Windows 11 and Windows 10, seeking ways to achieve this setup easily.
- Before dual booting, ensure data backup, download Windows 10 media creation tool, and keep your device charged during the process.
- Upgrade Windows 10 to 11, create separate partitions for each OS, create a bootable USB for Windows 10, and follow steps to install Windows 10 alongside Windows 11.
Many users like to use two operating systems on the same computer simultaneously with a dual boot configuration. After Windows 11 was introduced as a preview build, many users started experimenting with dual-booting Windows 11 and Windows 10. Many users are interested in how to dual boot Windows 11 and Windows 10. It’s not hard to set up a dual-boot system. If your PC is compatible with Windows 11, you can do it easily.
How to Dual Boot Windows 11 and Windows 10
You’ve come to the right site if you’re seeking ways to dual boot Windows 11 and Windows 11. Let’s get right to it with the step-by-step procedure.
What To Know Before You Dual Boot Windows 11 With Windows 10?
Before you have a dual boot setup, you need to know a few things.
- First, ensure that you have a backup of the data on your PC. This is to prevent any data loss during the process. Many times dual booting can result in data loss, and having a backup can prevent that.
- Download the Windows 10 media creation tool.
- Also, ensure that your laptop is charged or your PC is connected to a power source during the process.
Process To Dual Boot Windows 11 and Windows 10
Now that you have all the things ready, we can continue with the process of having a dual boot setup. Let’s discuss how you can use dual boot Windows 11 and Windows 10 together.
Upgrade Your Current Windows 10 To Windows 11
Firstly, you will have to upgrade your Windows 10 to Windows 11. Windows 11 have been released as a preview build, and you can upgrade Windows 10 to Windows 11. We have already discussed how you can upgrade Windows 10 to Windows 11. You can check our article on that to upgrade your Windows 10 to Windows 11.
Have Separate Partition For Windows 11 And Windows 10
You need to have a separate partition for Windows 11 as well as Windows 10. Different partition for a different version of Windows ensures that you don’t clutter the files on both the system. To create a separate partition, follow the steps given below-
- Open the start menu on your PC, and then search for disk management and then open it.
- In disk management, select any disk. You will first have to shrink it. To do so, right-click on the disk that you selected, and then click on shrink volume.

- Now enter the amount of space that you want to shrink. You will have to enter the storage in MB. Once done, click on shrink. The storage that you shrank will be marked as unallocated space.
- Select the unallocated space, and right-click on it. Now click on New Simple Volume to create a new partition.
- You will be headed to the new simple volume wizard. Follow the on-screen instructions to create a new partition.

You will have a separate partition on which you can install Windows 10. Keep the partition on which Windows 11 is installed and the partition on which you want to install Windows 10 separate.
Create A Bootable USB
After you have created a separate partition, you can create a bootable USB for Windows 10. We are here creating a bootable USB because we have already upgraded to Windows 11, and we will install Windows 10 for the dual boot. You can create a bootable USB in Windows 10 by following the guide to creating bootable USB media in Windows 10.
Installing Windows 10
Now you will have to install Windows 10 alongside Windows 11. Ensure you do not install Windows 10 over Windows 11 but alongside it. Given below are the steps to install Windows 10.
- Plug in the Windows 10 bootable USB media on your PC. Shut down your PC.
- Press the power button to turn it on, and while it is turning on, access the boot menu. You can do so by pressing the F1, F2, F10, F12, DEL, or Esc keys. This may depend on the manufacturer. You can check how you can access the boot menu for your manufacturer online.
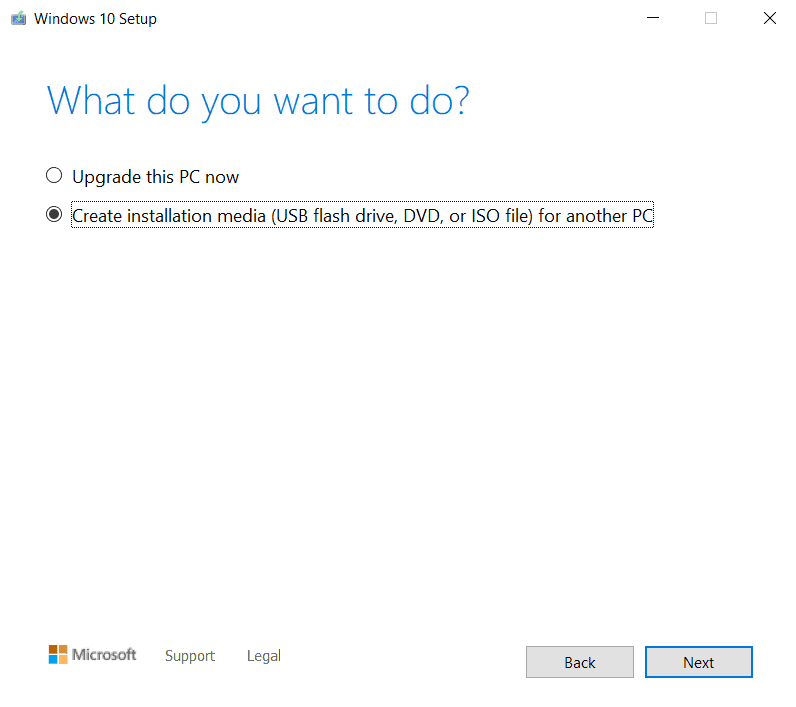
- In the boot menu, select the USB drive. You will be headed to the Windows 10 setup.
- Next, select the language, input method, and time and currency format. Once done, click on next.

- Begin with the installation process.
- Select the edition of the Windows, and then click on next.
- You will be asked to agree to the terms and conditions.
- Next, you will have to select the installation type- upgrade and custom. As we have to install Windows 10 alongside Windows 11, select the Custom: Install Windows Only (advanced) option.
- Next, you will be asked to select the partition on which you want to install Windows 10. Select the partition you created earlier. Once done, click on next.
- Continue with the process, and Windows 10 will be installed alongside Windows 11.
- Your PC may install several times during the process. Once done, you will have to set up Windows 10. You will have successfully dual-boot Windows 11 with Windows 10.
You will have the option to boot into Windows 10 and Windows 11 whenever you restart your PC.
READ MORE:
- Fix Desktop Keeps Crashing In Windows 11
- How to Create Task Using Windows 11 Task Scheduler
- Get Tabs on Windows 11 File Explorer
Final Words
You will be able to dual-boot Windows 11 and Windows 10 if you follow the steps above. We hope you find the information in this article useful. If you need assistance dual-booting Windows 11 on Windows 10 or vice versa, please let us know in the comments.

")


")

