- If Dolby Atmos is not working in Windows 11, it may be due to issues with unsupported or corrupted audio drivers and the Dolby applications. Resetting or reinstalling Dolby Access may help.
- Running a security scan to remove malware, using the built-in Windows audio troubleshooter, or rolling back to older audio drivers can also fix the issues. Users can follow detailed steps for these methods.
- As a last resort, users can reinstall audio drivers from scratch. Disconnecting the internet, using tools like Display Driver Uninstaller (DDU), and manually installing the drivers should solve persistent issues.
Many Windows 11 users have reported that Dolby Atmos not working in the latest Microsoft operating system. We have to identify the culprit in Windows 11, and it could be the Dolby dedicated program or the audio drivers. Users have shared that Dolby audio is not working, and the sound output is not immersive. None of the users have a clue on why the audio system is not producing 3D sound. We have to look at many devices, drivers, and programs to resolve the Dolby Atos issue.
Why is Dolby Atmos Not Working with Windows 11?
We don’t want the readers to come back to the search engine and search for new solutions now and then. Take time to learn about Dolby Atmos not working error, and it might ring a bell in your mind. You can stop the audio software from failing again in the Windows machine, and never have to worry about the persisting problem.

Unsupported Drivers
Unfortunately, many Windows machines fall into the unsupported category. Microsoft didn’t promise the unsupported hardware further software support in the future. In short, the existing Windows 10 drivers might fail to function properly. The in-house developers are moving towards the future, and newer build versions will have new features somewhere down the line. New features require stable driver support from the manufacturer, and your machine may miss out.
Corrupted/Unstable Drivers
Windows 11 is the latest edition, and it came out a few months back. It will take a long time for the hardware manufacturers to release a stable driver for the masses. You might be running an unstable or corrupted driver, and I have shown you a way to reinstall the audio driver.
Dolby Program Issues
Dolby has packed dedicated programs to control the supported hardware. You have Dolby Audio, Dolby Access, etc. There might be a problem with the dedicated program itself, and you have to reinstall the app.
Unstable Software
Microsoft prompts the users to install new software updates from time to time. The new updates carry patches, fixes, and improve the security system. I shared interesting information about the Windows Update, so make sure to read the solution below.
Windows Threats
There is one threat that interferes with the Windows features. Malware is notorious for interfering with the features in the system. We have to flush the malware from the machine, and it is possible with the help of antivirus programs.
You can’t solve the Dolby Atmos not working problems by following the official solution. I request everyone stop using third-party tools to resolve the Windows audio issues because you don’t need them.
Fix Dolby Atmos Not Working in Windows 11
Follow the Dolby Audio solutions in order, and I arranged them to counter multiple problems along the way.
Reset Dolby Access
Reset Dolby Audio or Dolby Access in the Windows PC, and you can do it in the latest edition. The dedicated program will remove customized settings from the dashboard and restore the default settings. You may have to re-configure the devices since the added connections data was deleted while resetting the program.
- Open “Settings” in Windows 11.
- Choose “Apps” from the selection.

- Click on “Apps & features” from the list.

- Find Dolby Access, then click on the three-dot setting.

- Choose “Advanced options” from the revealed menu.

- Scroll down and click on the “Reset” option.

- Click on the “Reset” button.

- Let Windows reset the program.

- A tick shows up right beside the “Reset” button.

The tick mark indicates success.
- Launch Dolby Access.

The audio program works flawlessly, and you can test the sound output to confirm the resolution.
Reinstall Dolby Access
Microsoft Store has taken the Store seriously, and they have redesigned the app management structure. Now, you can download, install, and reinstall popular programs from the MS Store. Dolby Access is available on the Store and you don’t need to download additional apps from the official site. Let me show you how to remove and reinstall Dolby Access on Windows PC. I’m skipping the uninstallation part since anyone can do it by following the traditional method.
- Open the “Microsoft Store” from the search bar.
- Search for Dolby Access from the search bar and view the listing.
- Click on the “Install” button.

You don’t have to sign in Microsoft account since you have connected the account during the
Windows setup process.

- Let Microsoft Store download the packages from the server.

- Click on the “Open” button.

- Open the “Dolby Access” program from the search bar.

- The program launched successfully.
Test the audio enhancer, and play some music to confirm the resolution.
Run Security Scanner
Your PC may have threats like viruses, malware, spyware, or something far worse. We should flush them out and perish the threats from the system. I don’t know how the malware entered your Windows PC, but I know how to get rid of them. Choose a paid security solution, and remove the malware. I will show you how to remove malware in the Windows machine if you don’t have a paid security solution.
Microsoft bundles the operating system with Windows Malicious Software Removal Tool. We will use the MRT software to remove the malware from the system.
- Open the RUN application by pressing Windows Key + R keys.
- Type “MRT” and click on the “OK” button.

- A new window pop-up on the screen, and click on the “Next” button.

- Choose the “Full scan” and click on the “Next” button.

You shouldn’t choose any other option and let MRT scan the entire drive.
- Let MRT scan the entire drive.

You have to wait patiently and do not interrupt the scanning process.
Leave the Windows PC alone till the scanning process finish.
- Click on the “Finish” process.

There is nothing wrong with working in the background, but I don’t recommend you to do it. Let MRT finish scanning the drive and let the machine stay idle.
Run Audio Troubleshooter
Windows 10/11 has a built-in troubleshooter that scans the audio devices installed in the system. You can identify the problem in the audio system and let Windows take care of it. Let me show you what to choose and how to run the audio troubleshooter on Windows PC.
- Open Windows “Settings” from the search bar.
- Choose “Troubleshoot” under System.

- Click on the “Other troubleshooters” option.

- Find “Playing Audio” from the list.

- Click on “Run” to start the scanning process.

- A new window appears and begins the scanning.

- Choose the audio device and click on the “Next” button.

- Choose one solution.

I don’t have any problems with the Dolby Audio or Dolby Access, so I got a different result on the screen.
- Close the troubleshooter.

The troubleshooter has resolved many network and audio problems in the past. You can rely on the Windows built-in sound testing algorithm, and t may resolve the issue.
Roll Back Audio Drivers
The latest audio drivers might be incompatible with the Dolby technology. Windows 11 is the new edition, and the audio driver could be having issues in the operating system. You have an option to roll back the drivers to an earlier version, and it may resolve the issue. Let me show you how to revert to an earlier audio driver version in Windows.
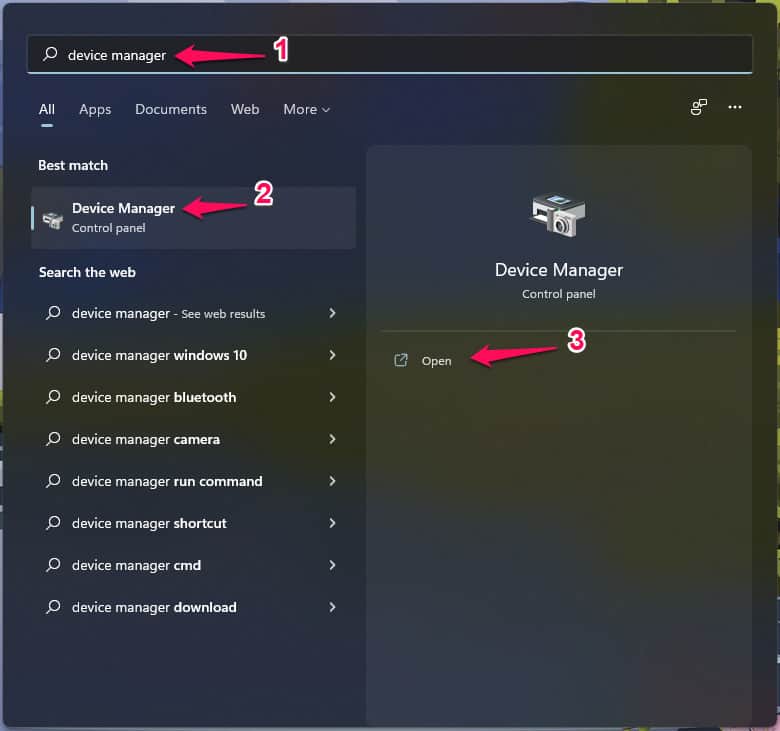
- Open “Device Manager” from the start menu.
- Find “Sound, video, and game controllers” from the device list.

- Choose the audio device, and I selected Realtek (R) Audio since they are the vendor.

- Right-click the mouse and choose “Properties” from the drop-down menu.

- A new window appears, and click on the “Driver” from the top menu.

- Click on the “Roll Back Driver” button.

- Another window appears on the screen, and select a valid reason, then click on “OK” to revert the drivers.
Your Windows PC restarts and rolls back the audio driver. However, my Windows machine had the button grayed out.
Reinstall Audio Drivers from Scratch
I have solved many driver-related problems in the past, and this is the method I selected every time. I recommend the readers reinstall the drivers if the “Roll Back Driver” button is grayed out. There is a risk involved while reinstalling the audio drivers if you are a novice user. You can let Microsoft update the audio drivers automatically, but I don’t recommend it.
Download Audio Drivers
You have to visit your laptop/motherboard vendor website and download the supported drivers. If you haven’t found the hardware information and drivers from the official site, abort the mission.

Download DDU
You have to download Display Driver Uninstaller from the official site. I’ve been using DDU for a long time that resolved audio and GPU driver issues. Extract the DDU ZIP file in the local storage, and keep it ready. Disconnect internet connectivity in Windows PC, and prevent Microsoft from updating the audio components.
Boot Safe Mode
Windows don’t load the audio drivers in the safe mode, and that’s how you remove the driver remnants from the PC.
- Open Windows “Settings” from the search bar.
- Go to “Recovery” from the System.

- Click on “Restart Now” under the ‘Advanced startup‘ menu.

- A pop-up appears, and click on the “Restart now” button.

Do not panic when the system goes into recovery mode because you are on the right path.
Uninstall Audio Drivers
Still, the Dolby Atmos not working in Windows 11, try to extract the DDU package, and you have to extract the 7-ZIP file to access the executable file.
- Run DDU as administrator.
- Select device type and select “Audio” from the drop-down menu.

- Choose audio vendor name, and I selected Realtek.

- Click on the “Clean and restart” button.

- Watch the DDU remove audio drivers and restart the system.

You don’t have to do anything to get out of safe mode because DDU boots the system back to normal mode.
Reinstall Drivers Manually
Extract the downloaded drivers from the official manufacturer’s website. Reinstall the audio drivers manually, and I won’t be covering this part since the installation instructions haven’t changed in ages.

You can let Microsoft install a supported driver from the servers if you have messed up somewhere. Restore the Wi-Fi or LAN connectivity in the machine so Windows Update can do the job for you.
Conclusion
I have shown you multiple ways to restore audio issues when Dolby Atmos is not working in Windows 11. You have to understand the difference between Dolby Audio and Dolby Atmos. A software bug might be ruining the audio experience. You have to wait for a while, so the Microsoft and audio vendor can release an update to resolve the bug/glitch/compatibility issues.
RELATED GUIDES:


")
")