- Windows 11 already includes powerful built-in storage cleanup tools. Third-party cleaner apps are unnecessary and often risky.
- Cleanup Recommendations is the fastest way to recover large chunks of space by identifying unused apps, old files, previous Windows installations, and cloud-synced data.
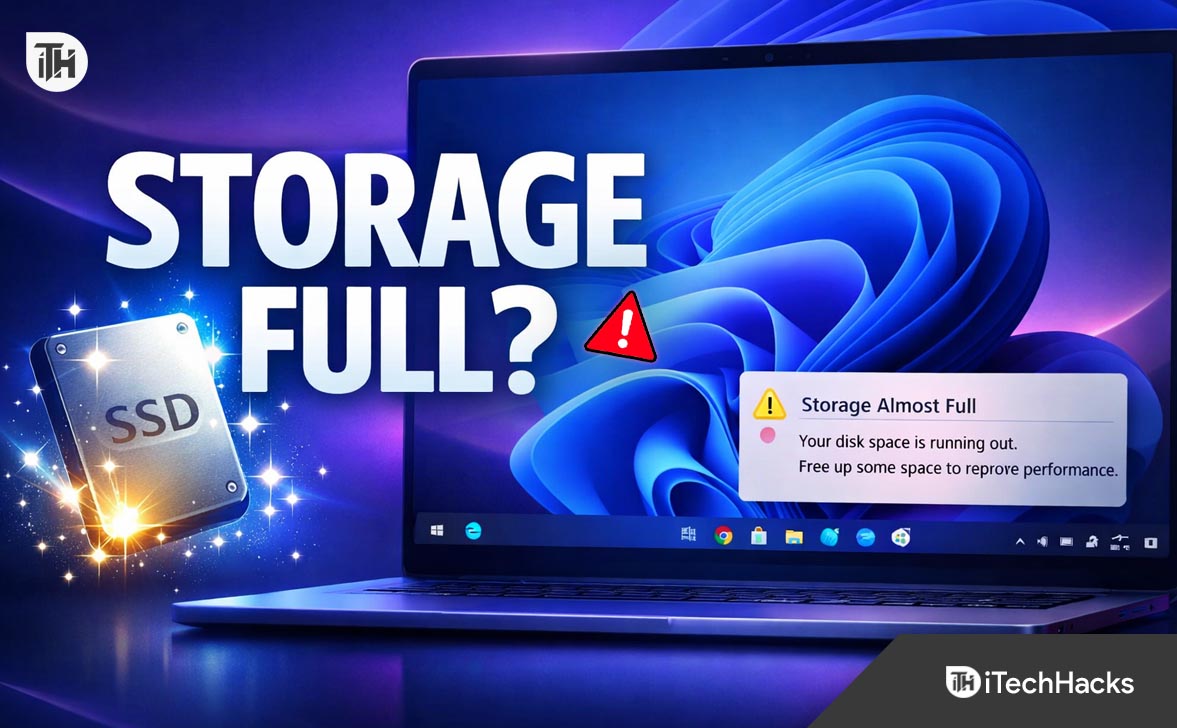
Running out of disk space is one of the most frustrating experiences for a PC user. You try to save a document, download a game update, or install a new app, only to be hit with that dreaded “Low Disk Space” warning. Your computer slows down, apps crash, and productivity grinds to a halt.
Fortunately, Windows 11 has significantly improved its storage management tools compared to its predecessors. You no longer need third-party “cleaner” apps that often do more harm than good. Microsoft has built powerful, safe cleaning utilities directly into the Settings menu.
Best Ways to Free up Space on PC for Windows 11/10
Whether you are trying to reclaim a few gigabytes for a Windows Update or clearing out terabytes of old data, this guide will walk you through the most effective methods to free up storage space on Windows 11.
Part 1: The Automated Solution (Storage Sense)
Before we start deleting files manually, we should configure Windows 11 to take out its own trash. Microsoft introduced a feature called Storage Sense, which acts as an automated housekeeper for your hard drive.
What is Storage Sense?
Storage Sense monitors your system for “junk” files—temporary installation files, error logs, and items sitting in your Recycle Bin—and deletes them automatically based on a schedule you define.
How to Configure It
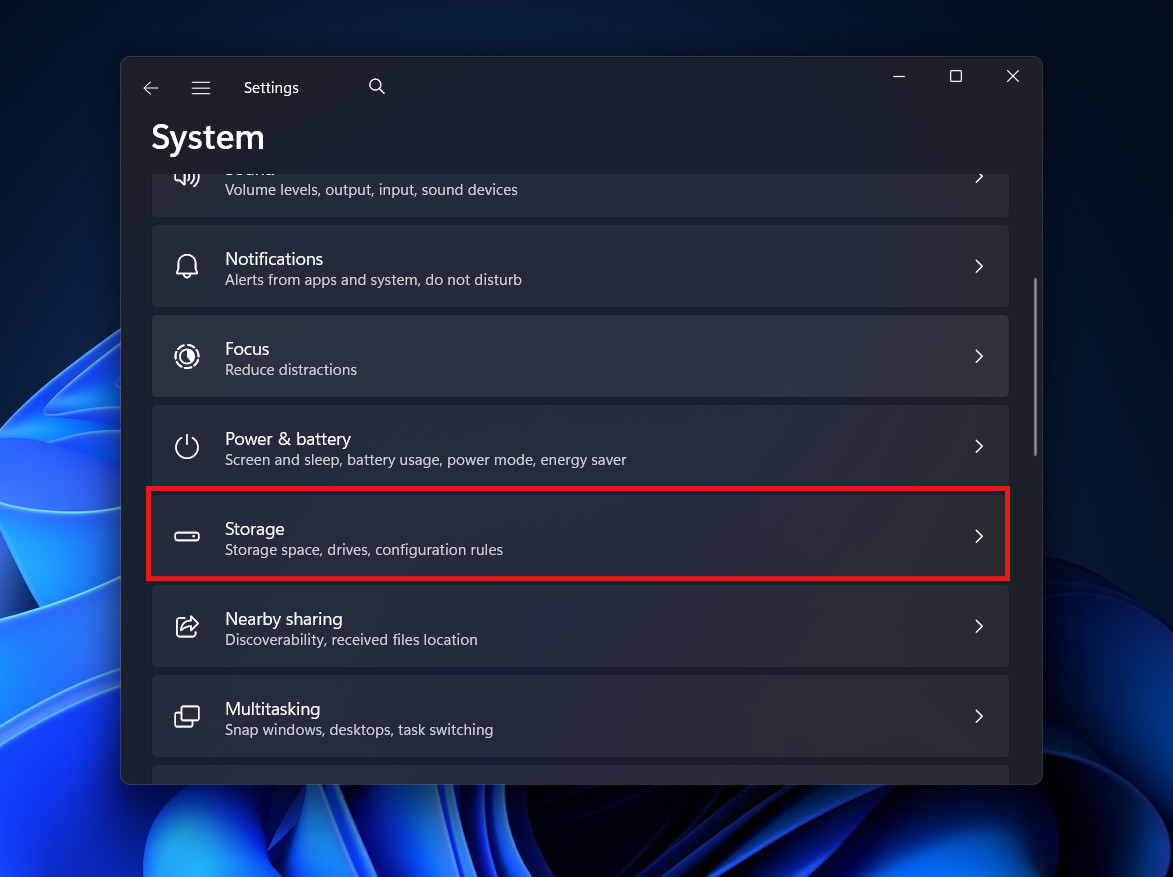
- Open Settings: Press Windows Key + I to open the main Settings menu.
- Navigate: Go to System > Storage.

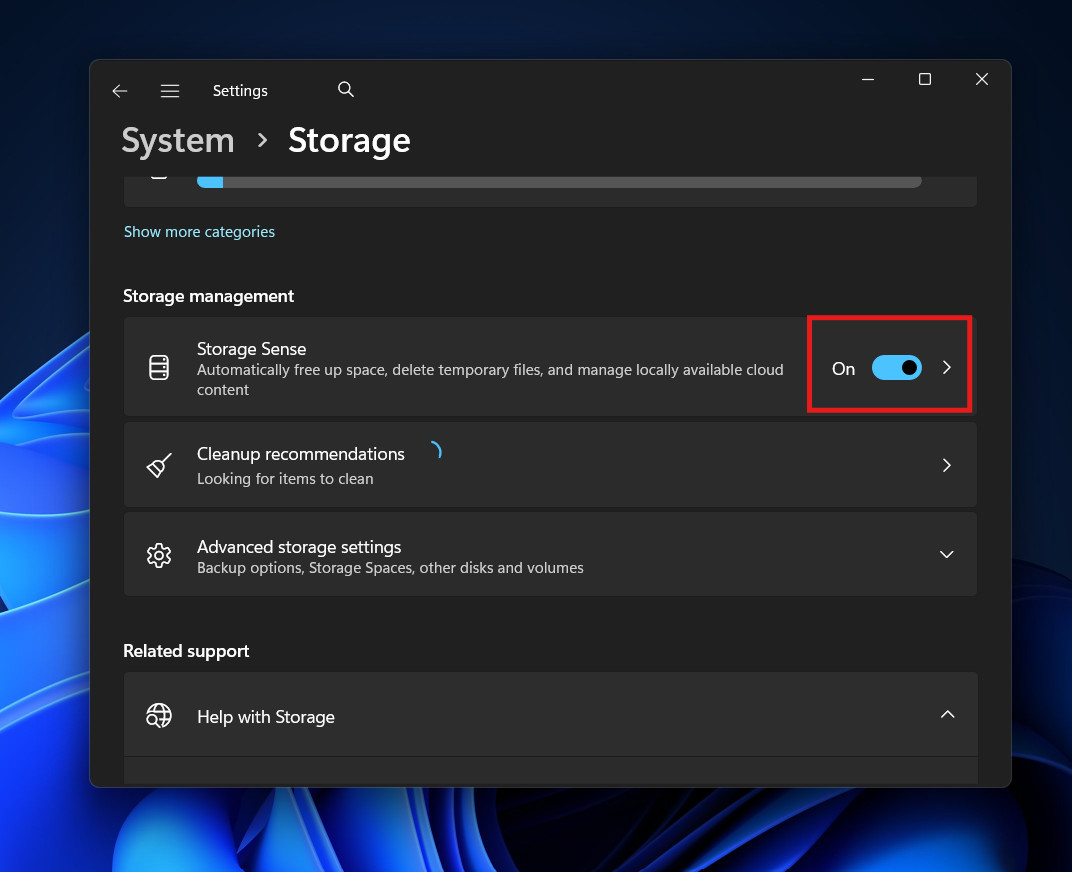
- Toggle On: Under the “Storage management” section, flip the switch for Storage Sense to On.

- Deep Configuration: Click on the arrow next to the toggle to open the detailed settings.
- Cleanup Schedule: Set “Run Storage Sense” to “During low free disk space.” This ensures the tool doesn’t run unnecessarily but kicks in exactly when you need it.
- Recycle Bin: Set “Delete files in my recycle bin if they have been there for over…” to 30 days. This is a safe safety net.
- Downloads Folder: Warning! By default, keep this set to “Never.” Many users use their Downloads folder as a permanent storage location for PDFs and installers. Only change this if you treat “Downloads” as a temporary dumping ground.
By setting this up once, you ensure that your Recycle Bin and Temp folders never grow out of control again.
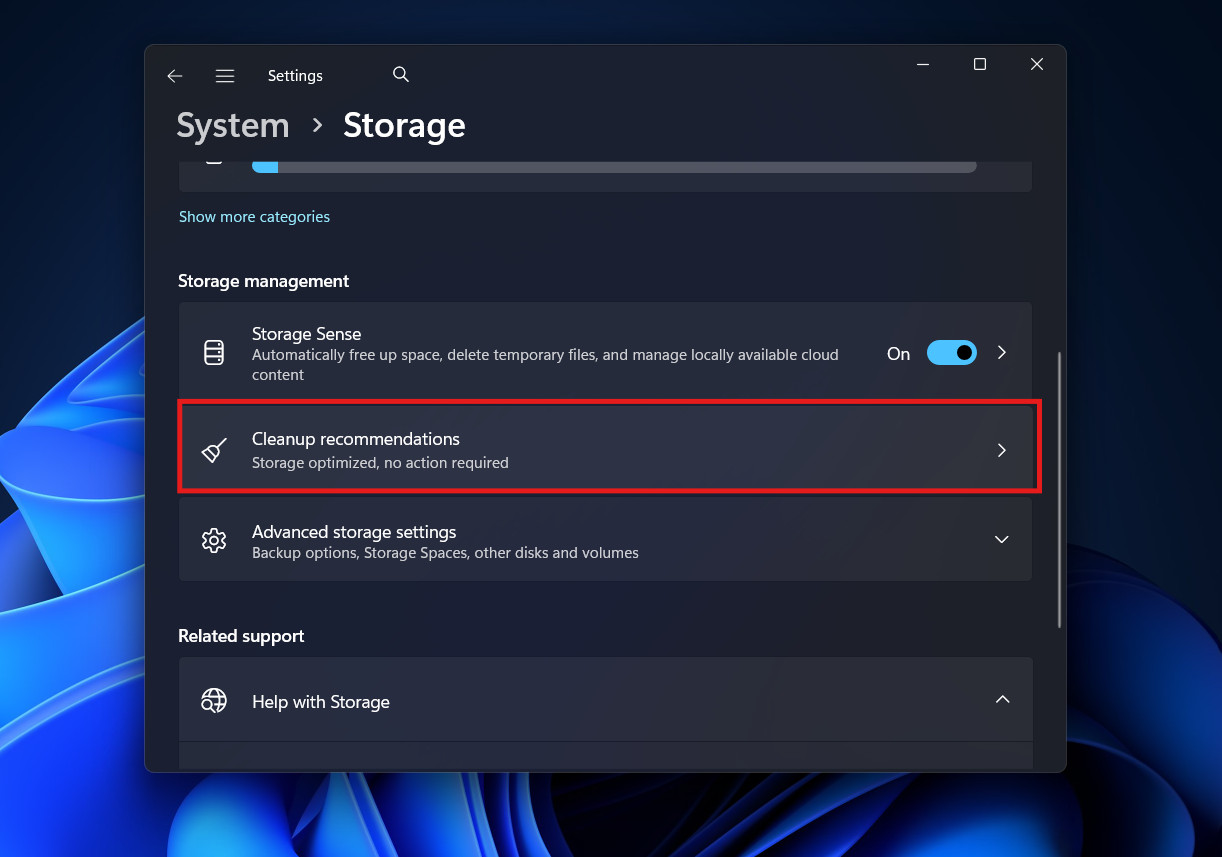
Part 2: The “Cleanup Recommendations” Tool
If Storage Sense is the housekeeper, Cleanup Recommendations is the specialized audit. This tool scans your drive for “low-hanging fruit”—files that are taking up significant space but likely aren’t needed.
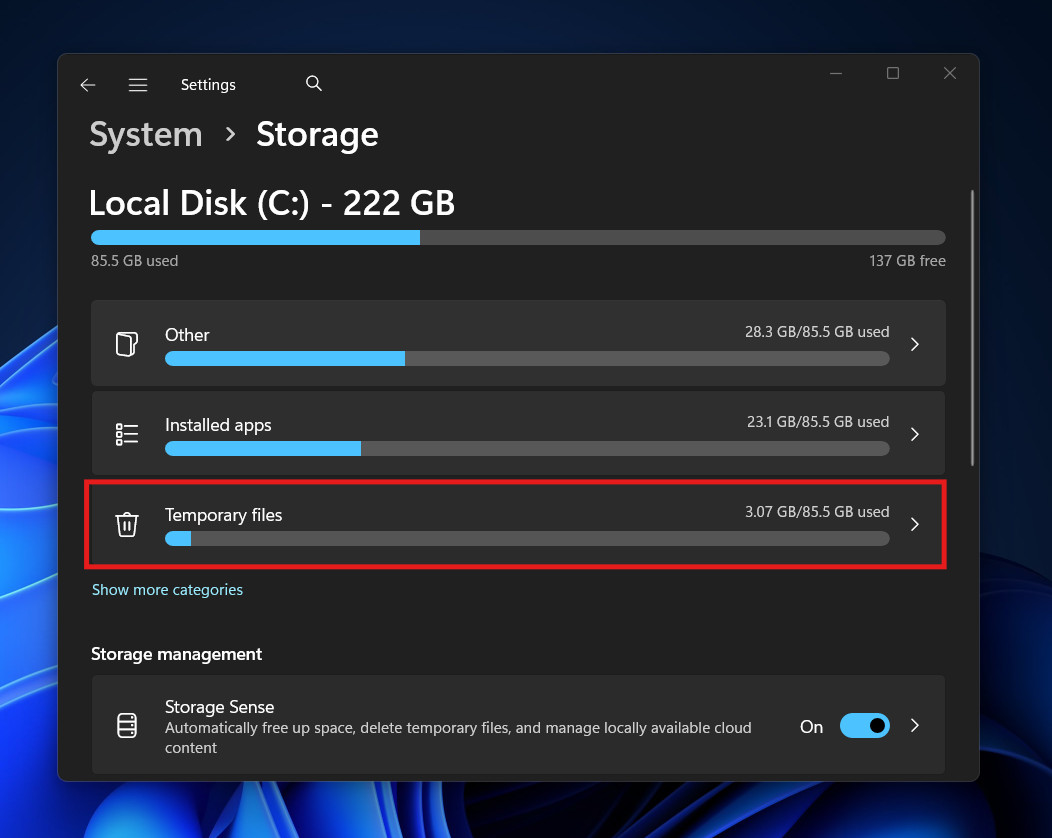
- Go to Settings > System > Storage.
- Click on Cleanup recommendations.

- Windows will categorize waste into four buckets:
A. Temporary Files
This is usually the biggest win. It includes:
- Previous Windows Installations: If you recently updated Windows, the OS keeps a copy of the old version (often 10GB–20GB) in a folder called Windows.old in case you want to “roll back.” If your PC is working fine, delete this.
- Downloads: (Again, be careful here).
- Recycle Bin: The digital trash can.
B. Large or Unused Files
This scanner looks for files you haven’t opened in a long time. It is excellent for finding that 4GB movie file you downloaded three years ago and forgot about, or the installer for a program you already installed.
C. Files Synced to the Cloud
This is specific to OneDrive. It identifies files that are already safely backed up to the cloud and suggests deleting the local copy to save space. You can still see the file in Explorer, but it will only download when you double-click it (Files On-Demand).
D. Unused Apps
This lists applications you haven’t launched in months. If you see a game you finished last year or a trial version of software you never bought, check the box and click Clean up.
Part 3: Deep Cleaning Temporary Files
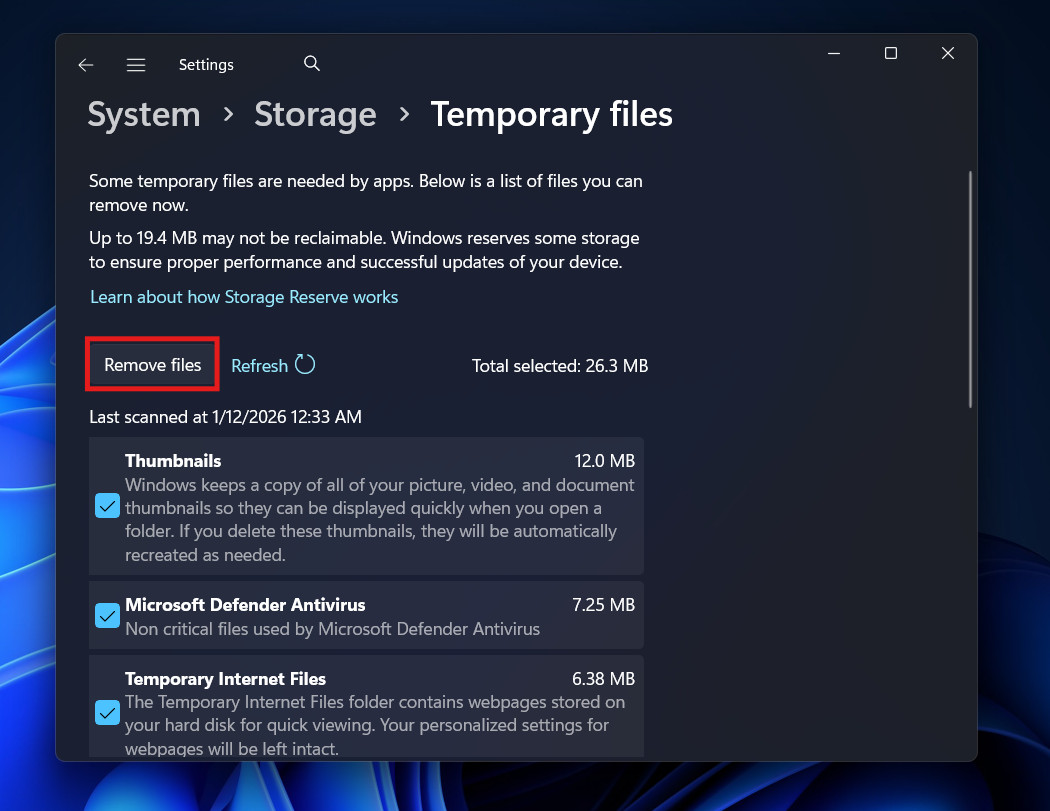
Sometimes the automated recommendations miss things. For a thorough scrub, we need to dig into the classic Temporary Files menu.
- Go to Settings > System > Storage.
- Click on the bar labeled Temporary files. (It will show a number, e.g., “15.4 GB”).

- You will be presented with a checklist. Here is what each item means and whether it is safe to delete:
- Windows Update Cleanup: (Safe & Highly Recommended). As mentioned, this clears old update files. It is often the largest source of reclaimable space.
- Delivery Optimization Files: (Safe). Windows Update uses a peer-to-peer system to download updates from other PCs on your network to save bandwidth. These are the cached files for that process.
- DirectX Shader Cache: (Safe). These are files created by your graphics card to speed up game load times. If you delete them, they will simply be regenerated the next time you play the game. Safe to delete to clear corruption.
- Thumbnails: (Safe). The tiny images Windows generates to preview your photos in folders. If you delete them, Windows will just regenerate them (slightly slowing down folder browsing for a second) the next time you open the folder.
- Temporary Internet Files: (Safe). Cache from Edge and Internet Explorer.
- Select everything you are comfortable removing and click Remove files.

Part 4: Managing Large Apps and “Bloatware”
Games and professional software are the biggest storage hogs. A single installation of Call of Duty or Flight Simulator can take up 150GB+.
- Go to Settings > Apps > Installed apps.
- Filter: Click the “Sort by” dropdown and select Size (Large to small).
- Audit: Look at the top 10 apps.
- Uninstall: If you don’t use it, remove it.
- Move: If you have a secondary drive (like a D: drive), click the three dots (…) next to the app. If the “Move” option is available, you can migrate the app to the other drive without reinstalling it. This is a lifesaver for gamers.
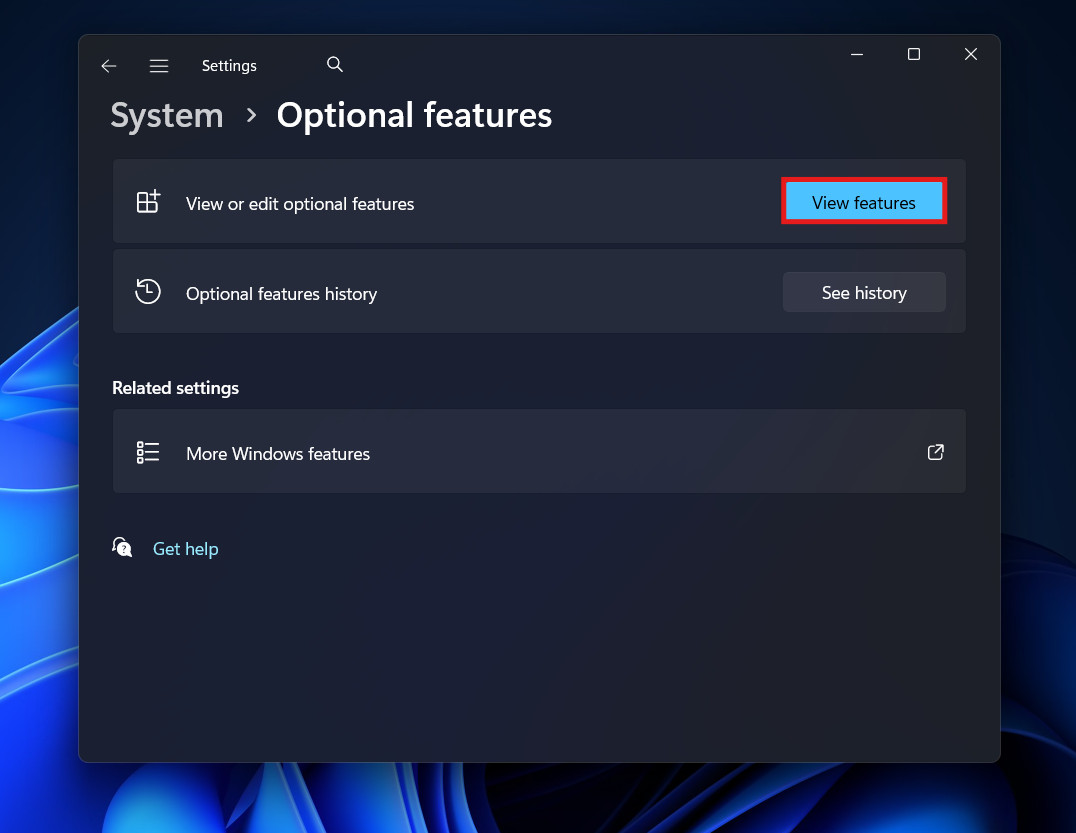
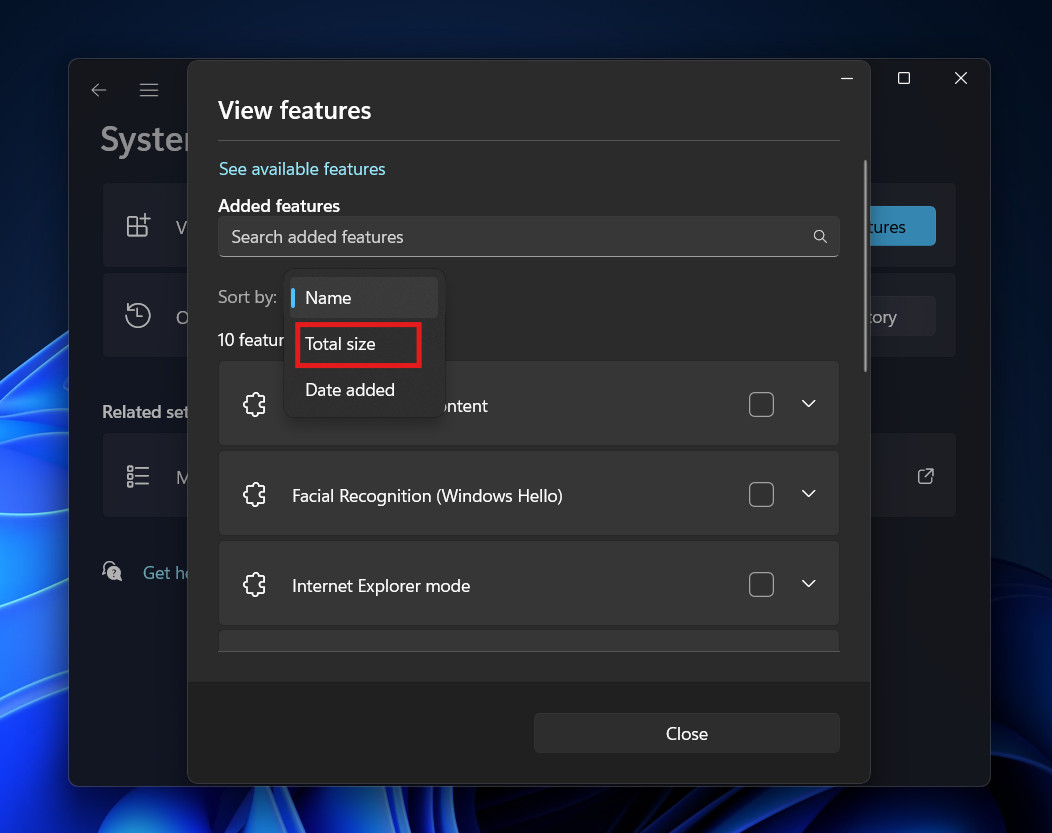
Optional Features
Windows comes with features you might not need (Media Player, Internet Explorer Mode, Print Management).
- Go to Settings > System > Optional features>View Features.

- Sort by size.

- If you don’t use features like Windows Sandbox or specific language packs (e.g., Japanese IME typing if you only speak English), you can uninstall them here to save a few hundred megabytes.
Part 5: Advanced System Tweaks (Power Users Only)
If you are technically inclined and desperate for space, you can modify how Windows handles system memory. These files are often massive and hidden by default.
1. Disable Hibernation (hiberfil.sys)
What is it? When you hibernate your PC, Windows saves everything in your RAM to the hard drive so it can wake up instantly. This file is usually equal to 40-75% of your total RAM. If you have 32GB of RAM, this file could be 20GB! The Trade-off: You lose the ability to use “Hibernate.” Your PC will boot up slightly slower (from a cold shutdown). How to do it:
- Open Start, type cmd.
- Right-click Command Prompt and select Run as administrator.
- Type: powercfg -h off and press Enter.
- The hiberfil.sys file is instantly deleted, and you regain the space immediately.
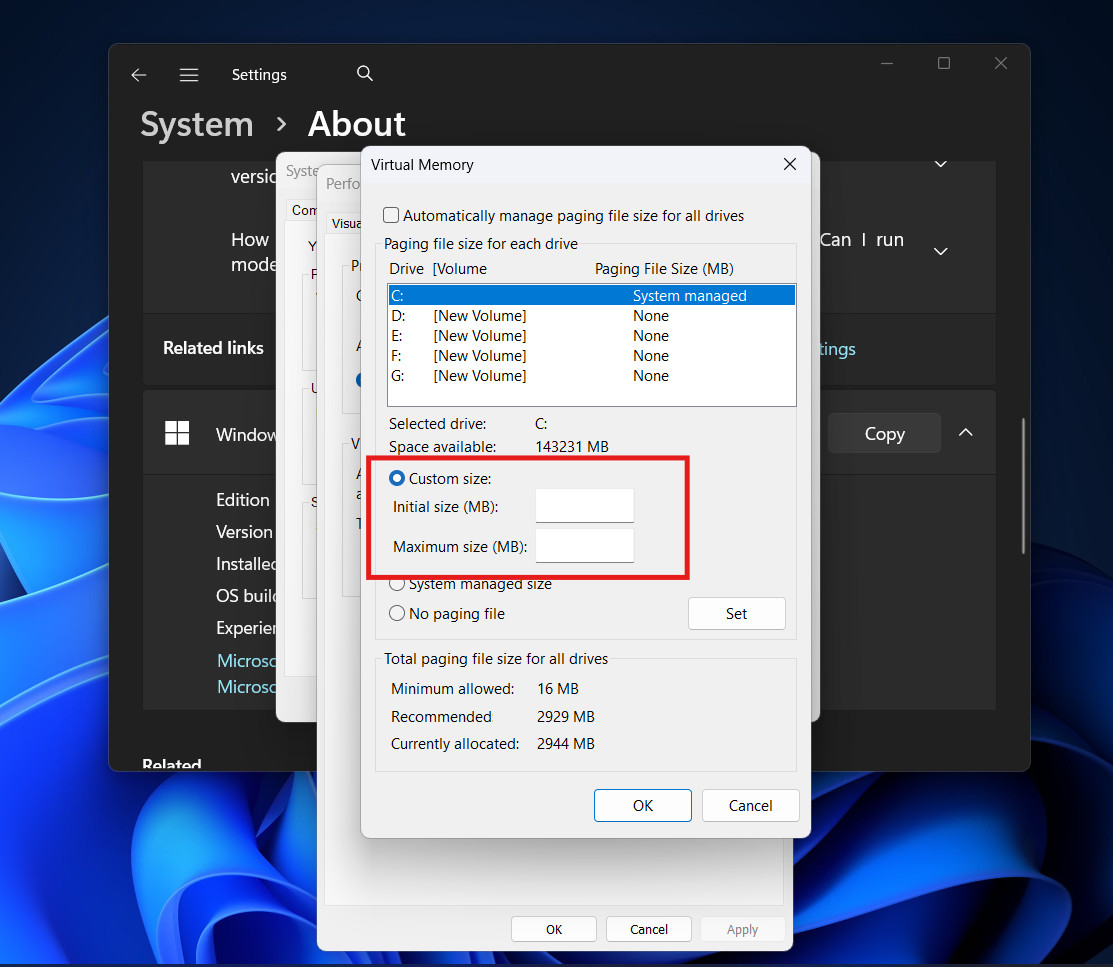
2. Tame the Page File (pagefile.sys)
What is it? This is “Virtual Memory.” When your RAM is full, Windows uses this file on your hard drive as temporary RAM. By default, Windows manages the size, often reserving 10GB+ unnecessarily. How to do it:
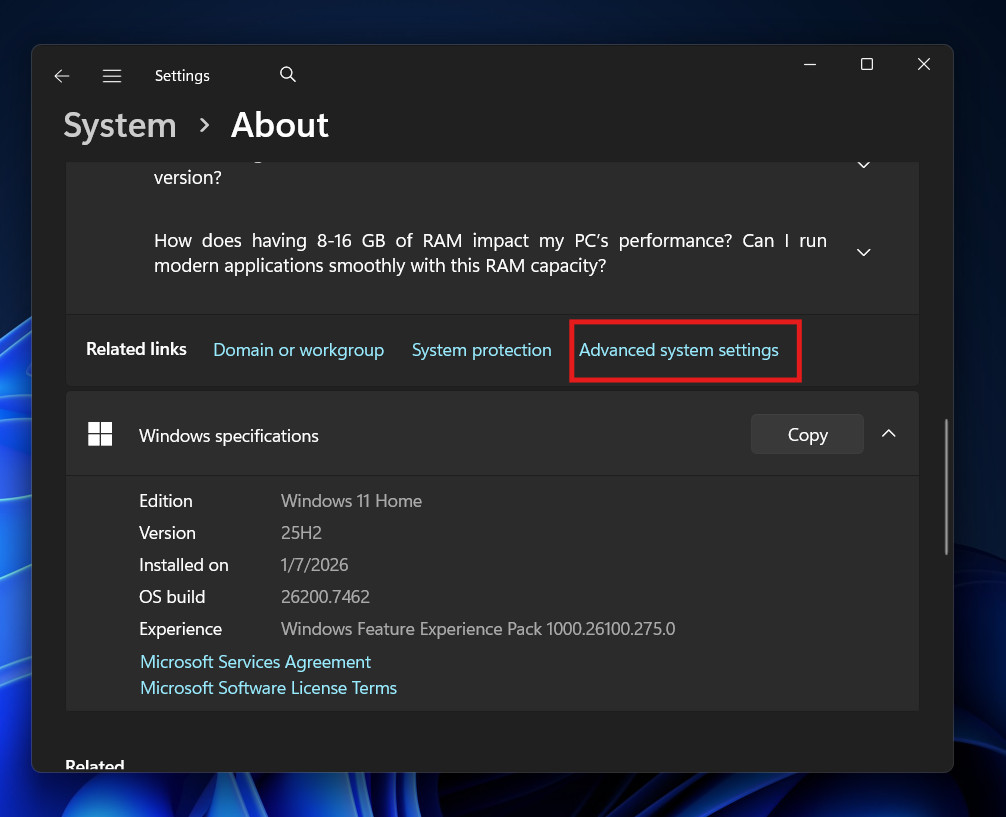
- Open Settings > System > About > Advanced system settings.

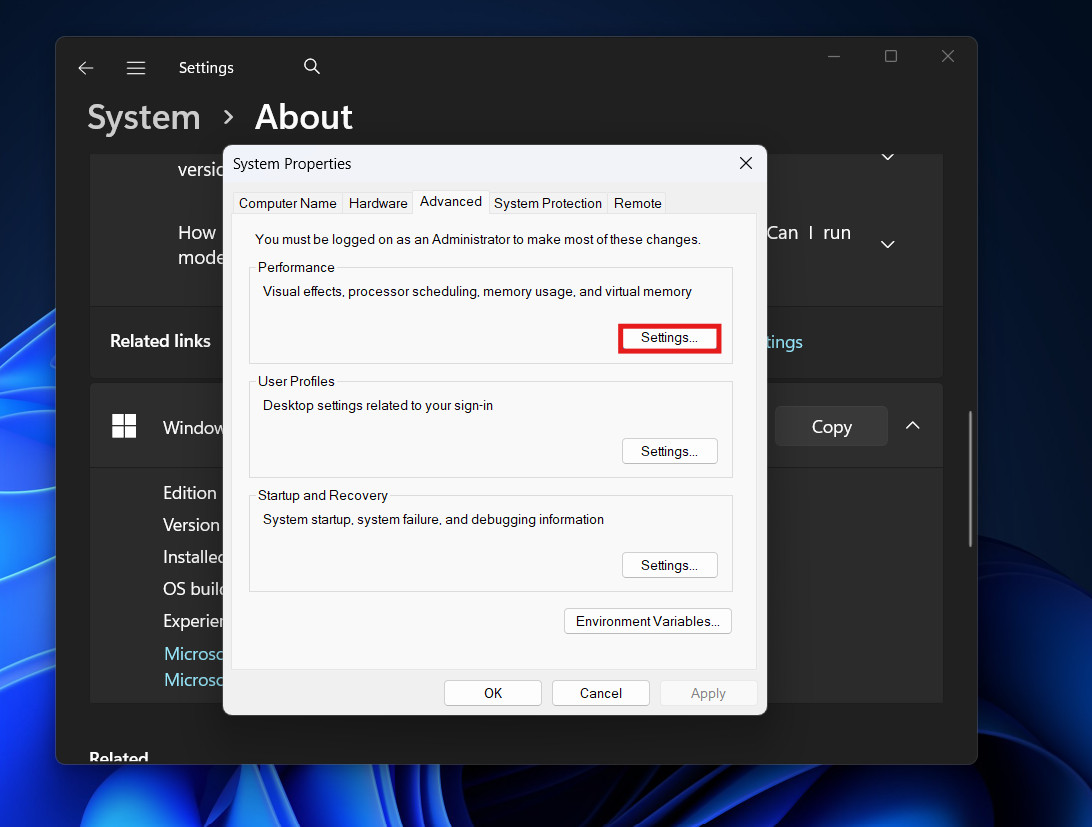
- Under the Advanced tab, click Settings (Performance).

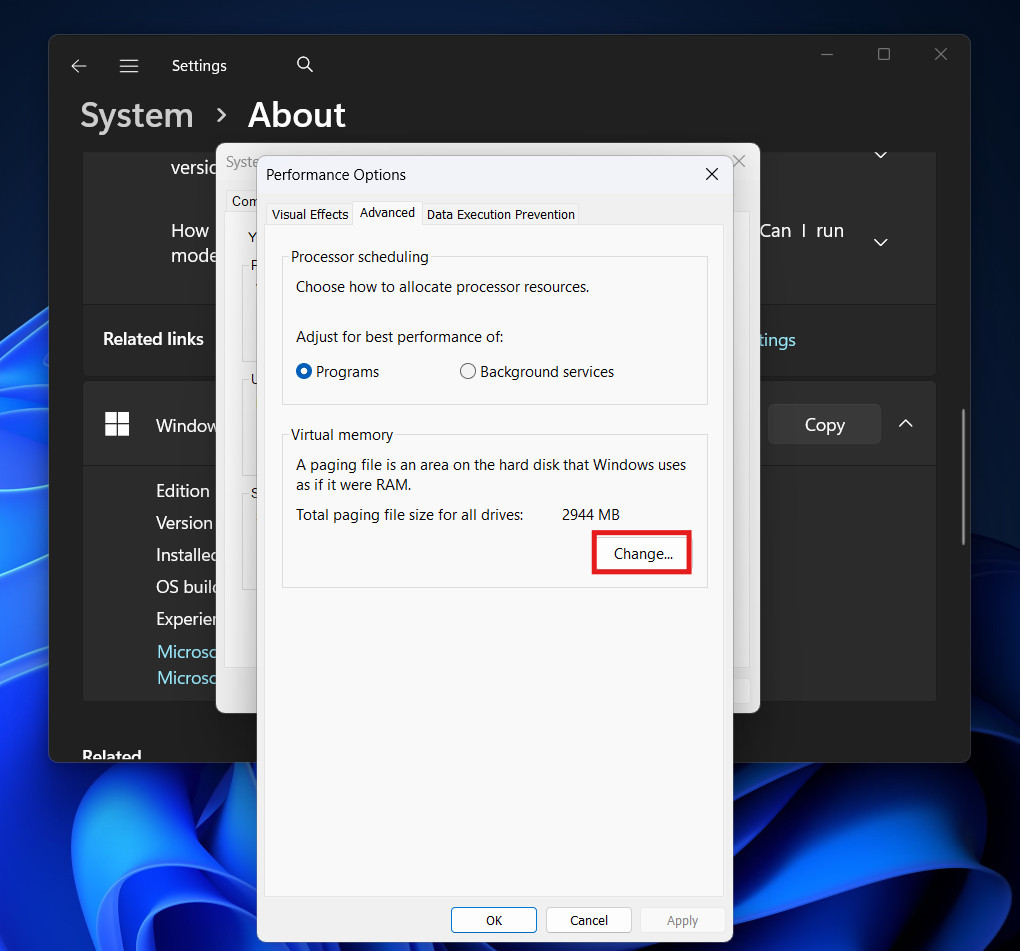
- Go to the Advanced tab > Change (Virtual memory).

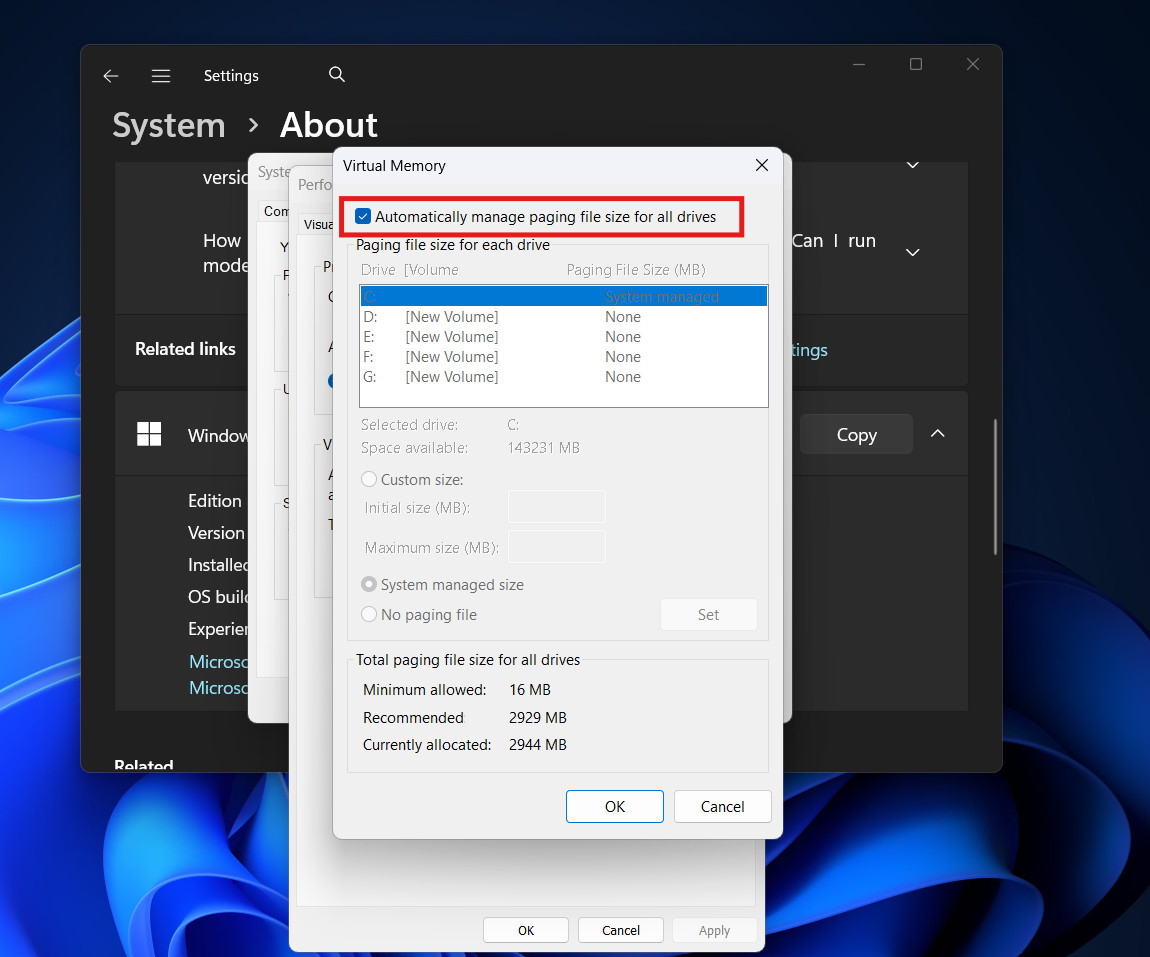
- Uncheck “Automatically manage paging file size.”

- Set a Custom size. A safe lower limit is usually 2048MB (2GB), but be careful. If you set this too low and run heavy apps, your programs will crash. Only tweak this if you really know what you are doing.

3. Compact OS
This is a lesser-known feature that compresses the Windows operating system binaries themselves. It can free up 2GB to 4GB.
- Open Command Prompt as Administrator.
- Type: compact.exe /compactOS:always and press Enter.
- Windows will take a few minutes to compress system files. You likely won’t notice any performance difference on a modern CPU.
Part 6: Managing OneDrive “Files On-Demand”
For many Windows 11 users, OneDrive is the silent storage killer. By default, it might be downloading “Always keep on this device” copies of your photos and documents.
You can keep your files in the cloud but remove the local weight:
- Open File Explorer.
- Navigate to your OneDrive folder.
- Right-click on a large folder (like “Pictures” or “Documents”).
- Select Free up space.
- Windows will delete the local data but keep the file visible. The icon next to the file will change from a green checkmark (local) to a blue cloud (online only).
- When you need the file, just double-click it, and it will download instantly.
Part 7: System Restore Points
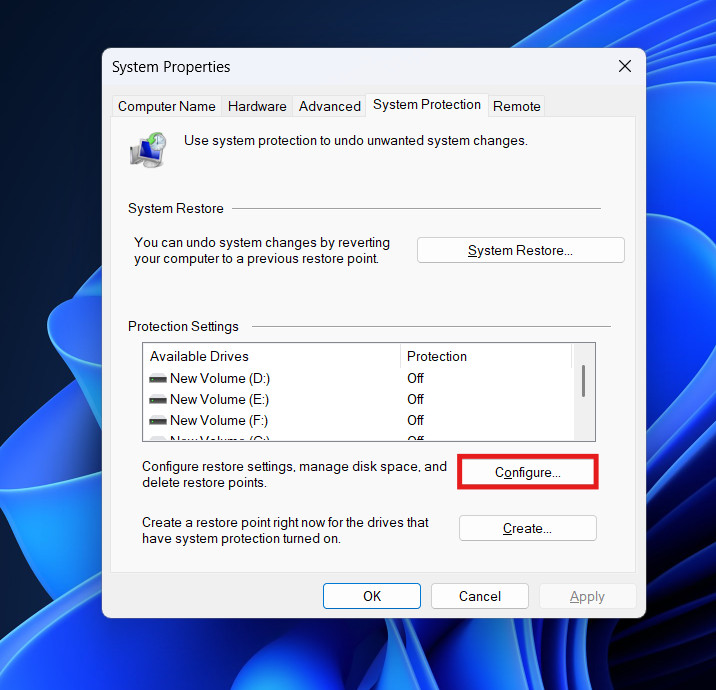
Windows creates “Restore Points” before major updates. These are snapshots of your system files. While useful, they can accumulate and eat up huge amounts of space (sometimes 5-10% of your drive).
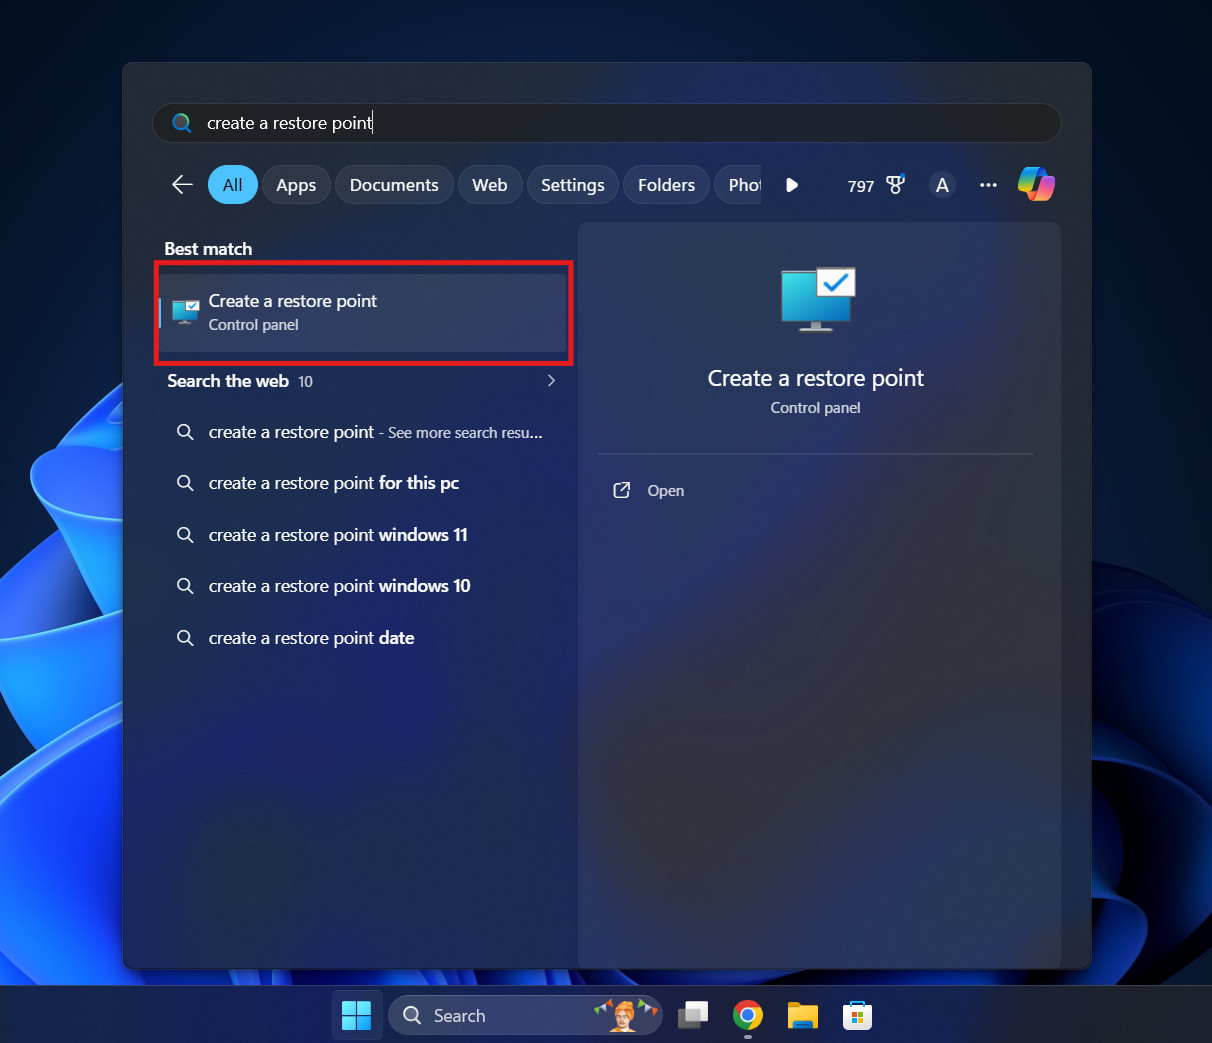
- Click Start, type Create a restore point, and open it.

- Select your C: drive and click Configure.

- Adjust the Max Usage: Drag the slider down. Allocating 1% or 2% (usually 5GB-10GB) is usually enough for one or two restore points.
- Delete: If you are desperate, you can click the “Delete” button to remove all previous restore points (except the most recent one). Warning: This limits your ability to recover from a system crash.
Conclusion
Freeing up storage space on Windows 11 is about maintenance, not magic. By understanding where the data lives, whether it’s hidden in the AppData cache, sitting in the Recycle Bin, or reserved by the hiberfil.sys file—you can take control of your drive.
By following this guide, you can transform a cluttered, sluggish red-bar drive into a clean, high-performance workspace, ensuring your Windows 11 experience remains smooth and responsive.
ALSO READ:


")
 Error: Full Fix Guide")


