- Understanding Virtual Memory in Windows 11: Windows utilizes RAM for loading program files, but virtual memory helps by transferring lesser-used files to the hard drive, preventing memory shortages and boosting PC performance.
- How to Change Virtual Memory Size: Access System Properties, go to Advanced System Settings, adjust virtual memory settings by selecting custom size and specifying values, and then restart the device to apply changes.
- Importance of Virtual Memory in Windows 11: Increasing virtual memory size can enhance RAM performance, but it's crucial to follow the recommended guidelines and consider hardware upgrades like SSD and RAM for optimal results.
Virtual memory is a critical component that allows you to remove and store less often used changed pages from RAM to the hard drive. Your PC will prioritize RAM for the processes you use the most with this functionality enabled. This will help your computer run faster. Your system will not run out of memory if you use this option. It is not difficult to change the virtual memory size in Windows 11, and you may do so quickly. This article will help you in changing the size of virtual memory in Windows 11.
What is Virtual Memory in Windows 11?
Nowadays, Android smartphones have a new feature called “Memory Expansion” up to 2 GB. Windows is a modern operating system, and they have tweaked the software over the years to lift off the resources burden. Windows utilizes RAM to load program files, file explorer files, and other temporary data.
In most cases, you don’t have to meddle with the configuration because Windows by default manages it keeping the hardware in mind. The software will calculate the RAM, Storage, and CPU raw power to lift off the extra files in the virtual memory.
The feature is called “Page Filing” that Windows is using to transfer the program files in the hard drive to lift off the load on RAM. You can increase the virtual memory from 4GB to 8GB, and it is worth it if Windows is not able to handle the function efficiently.
Remember, Windows is putting the load on the hard drive, and if your machine has a slower mechanical drive, then I won’t recommend increasing the virtual memory size. Consider upgrading the RAM and switch to SDD because these two components will unleash the true potential of the hardware in the machine. Yes, an SSD and physical RAM will make your machine smoother than before, so consider upgrading the internal components.
Let’s discuss how you can change the virtual memory size in Windows 11.
Change the Virtual Size Using System Properties
Microsoft didn’t abandon the traditional interface, and that’s what we are going to set the virtual memory size. You need administrator privileges to make changes in the system, so switch to the admin account.
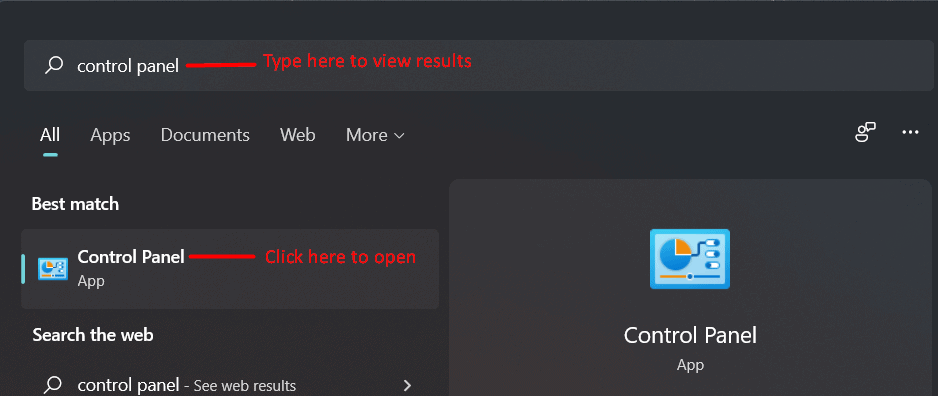
- Click on the “Windows” icon to get started.
![]()
- Type “Control Panel” in the search bar, and then hit “Enter” on your keyboard.
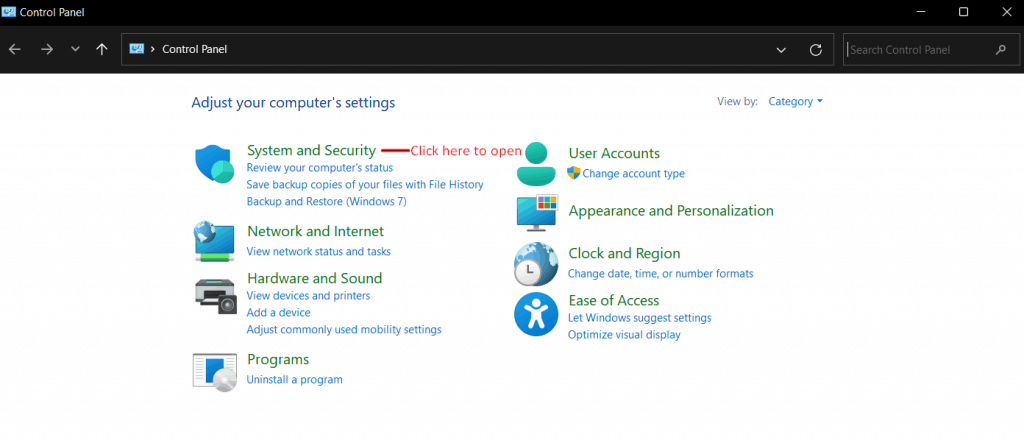
- Click on “System and Security” to view the new interface.
- Click on “View amount of RAM and processor speed” available in the “System” option.

- Click on “Advanced system settings” available in the “Related links”.

- Click on the “Settings” option available in the “Advanced” section.

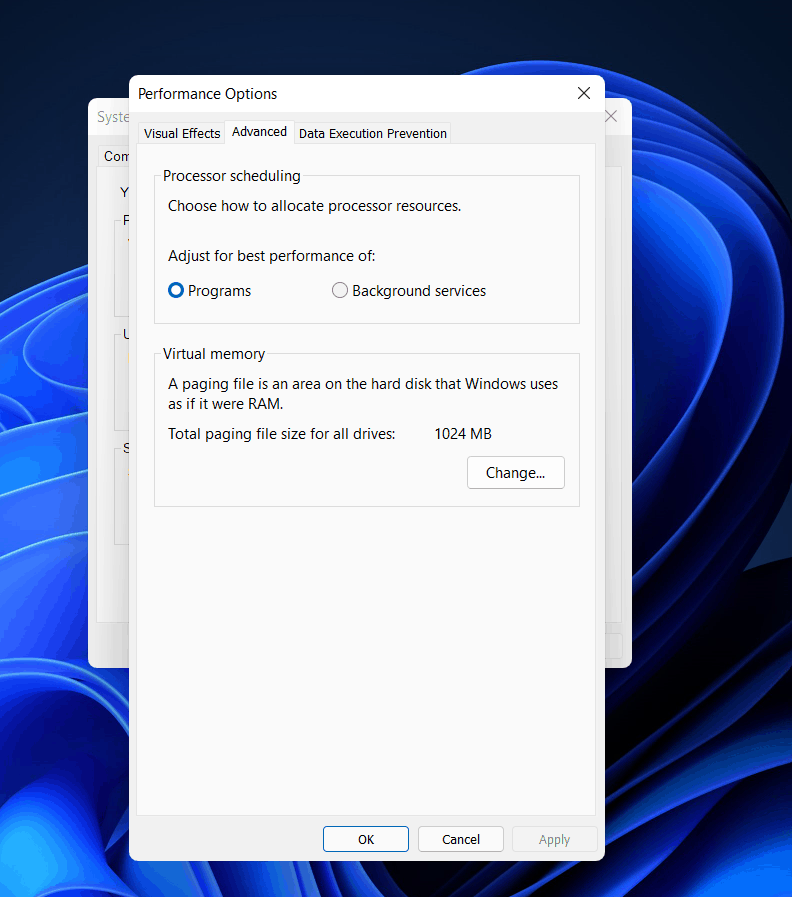
- Click on the “Advanced” option to view more.

- Click on “Change”.

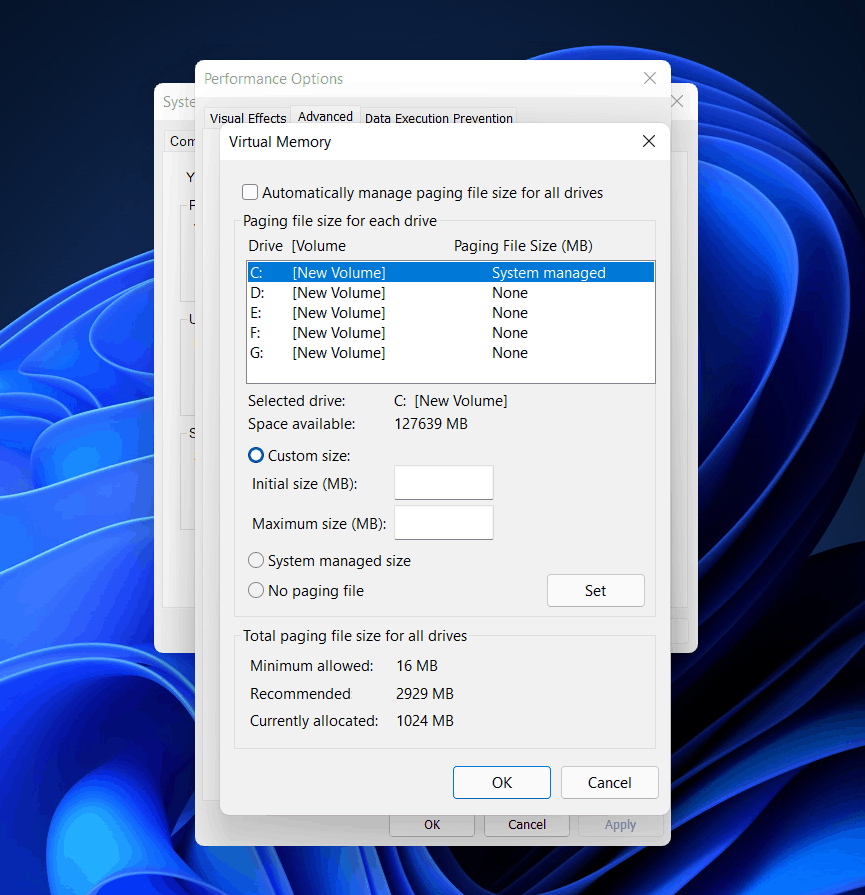
- Uncheck “Automatically manage paging file size for all device” then select the drive or partition.

- Select “custom-size” then change the values according to the requirement.

- Click on “SET” then hit “OK”.

Restart your machine to apply the changes.
Let me show you the calculation, so you can figure out the ideal memory size for page filing.
- 1GB = 1024MB
- 2GB = 2048MB
- 3GB = 3072MB
- 4GB = 4096MB
Change the maximum size to a desired value such as 4096MB but make sure to consider SSD & RAM upgrade.
Change the Virtual Size using Advanced System Settings
Let me show you another way to increase the virtual size more simply.
- Click on the “Windows” icon to get started.
![]()
- Type “Advanced system settings” in the search bar, then press the “Enter” key.

- Click on the “Settings” option under the “Advanced” section.

- Select the “Advanced” option to view more.

- Click on “Change”.

- Uncheck “Automatically manage paging file size for all device” then select the drive or partition.

- Click on “custom-size” then change the values according to the requirement.

- Click on “SET” then hit “OK”.

Restart your machine to apply the changes.
Change the Virtual Size in About Section
New Windows users may have problems accessing the Control Panel and search options. Microsoft is moving essential tools in Settings, and you may no longer find the option in Control Panel. Let me show you how you can access advanced options in the Settings window.
- Click on the “Windows” icon to get started.
![]()
- Type “Settings” in the search bar, then hit “Enter” on your keyboard.

- Scroll down and click on the “About” option available in the “Section” section.

- Click on “Advanced system settings” available in the “Related links”.

- Click on the “Settings” option available in the “Advanced” section.

- Click on the “Advanced” option to view more

- Click on “Change”.

- Uncheck “Automatically manage paging file size for all device” then select your desired storage.

- Click on “custom-size” then change the values according to the requirement.

- Click on “SET” then hit “OK”.

Restart your machine to apply the changes.
Change The Virtual Memory Size in Windows 11
As we have already discussed how crucial virtual memory can be, let’s discuss how you can change its size. Given below are the steps mentioned to help you change the virtual memory size in Windows 11.
- Open the setting of your PC. You can do this by searching for settings in the start menu and then opening it, or you can press the Windows + I combo to open the settings.
- Make sure you’re in the settings system section. Open the system section from the left sidebar if you aren’t already there.
- Now in the System section, click on about, and then click on advanced system settings. This will lead you to an advanced tab in the system properties.

- Click on settings under the performance. This will open performance options.

- Now go to the advanced tab in the performance options.
- The virtual memory section is located here. Under virtual memory, select the Change option.
- By default, automatically manage paging file size for all drives option will be selected. Uncheck it.
- Now, select the partition, and then select the custom size option.
- Now specify the initial size as well as the maximum size in MB. Once done, click on set. Click on OK to close the window.
- After doing so, restart your system to apply the changes.
Virtual memory size is unique for all devices, and it cannot be generalized. One must use one and half times the total memory available for the initial size. Whereas, for the maximum size, one must use three times the memory available for it.
After doing so, the performance of your PC will increase. This will allow RAM to store apps you work on frequently, whereas storing the lesser-used apps in virtual memory.
Virtual RAM Memory Windows 11
Moreover, you can anytime revert the changes whenever you want to. All you have to do is, follow the above steps again, and “tick” the automatically manage paging file size for all drives, which you previously unchecked, and then restart your device.
Even if you have a lot of system memory, it’s not a good idea to disable virtual memory in Windows 11. When you disable the paging file, some applications may stop operating, some system features may fail to function properly, and you may see strange behavior.
Visit the following articles for more helpful guides and answers to frequently asked questions about Windows 11:
- How To Setup Remote Desktop In Windows 11
- How to Create Task Using Windows 11 Task Scheduler
- How To Speed Up Windows 11 and Optimize Performance
- 10 Ways to Fix Srttrail.txt BSOD Error in Windows 11
- How to Change DNS Server on Windows 10, 11, macOS, Android, and Other OS
Final Words
That concludes the method for expanding virtual memory size in Windows 11. If your PC’s performance is poor, you can alter the virtual memory size in Windows 11. This will undoubtedly aid in improving your PC’s performance.


")

Good write-up but I wish you would talk about contiguous disk space and how a fragmented page file might slow you down.