- Hardware-accelerated GPU scheduling in Windows 11 reduces latency and enhances PC performance by letting the GPU manage memory and graphic-intensive tasks.
- To enable this feature, users can use the Settings app or Registry Editor on Windows 11 for easy activation.
- Additionally, users can disable hardware-accelerated GPU scheduling through the Settings app to revert the changes made to the system.
Hardware-accelerated GPU scheduling is a feature in Windows 11 with which you will be able to reduce the latency as well as enhance the performance of your PC. This feature allows the GPU to manage its memory. With Hardware Accelerated GPU scheduling turned on, the CPU offloads some high-priority tasks to your GPU. This lets the GPU manage more graphic-intensive tasks. This reduces the load on your CPU thus increasing your performance.
So how you can enable hardware-accelerated GPU scheduling in Windows 11. You can easily enable this feature on your PC with the help of the Settings app or through the Registry Editor as well.
Turn Windows 11 Hardware Accelerated GPU Scheduling on or Off
In this article, we will be discussing how you can enable hardware-accelerated GPU Scheduling in Windows 11.

Enable Hardware-Accelerated GPU Scheduling Using Settings
The very first way to enable Hardware-accelerated GPU scheduling on Windows 11 is by using the Settings app. To do so, follow the steps given below-
- Press Windows + I key combo to open the Settings app.
- Head to the System tab in the Settings app.
- Now on the right side, click on the Display option.

- Next, click on the Graphics option under the Related Settings section.

- On the next screen, click on the Change Default Graphics Settings option.

- Now, turn on the toggle for Hardware-accelerated GPU Scheduling.
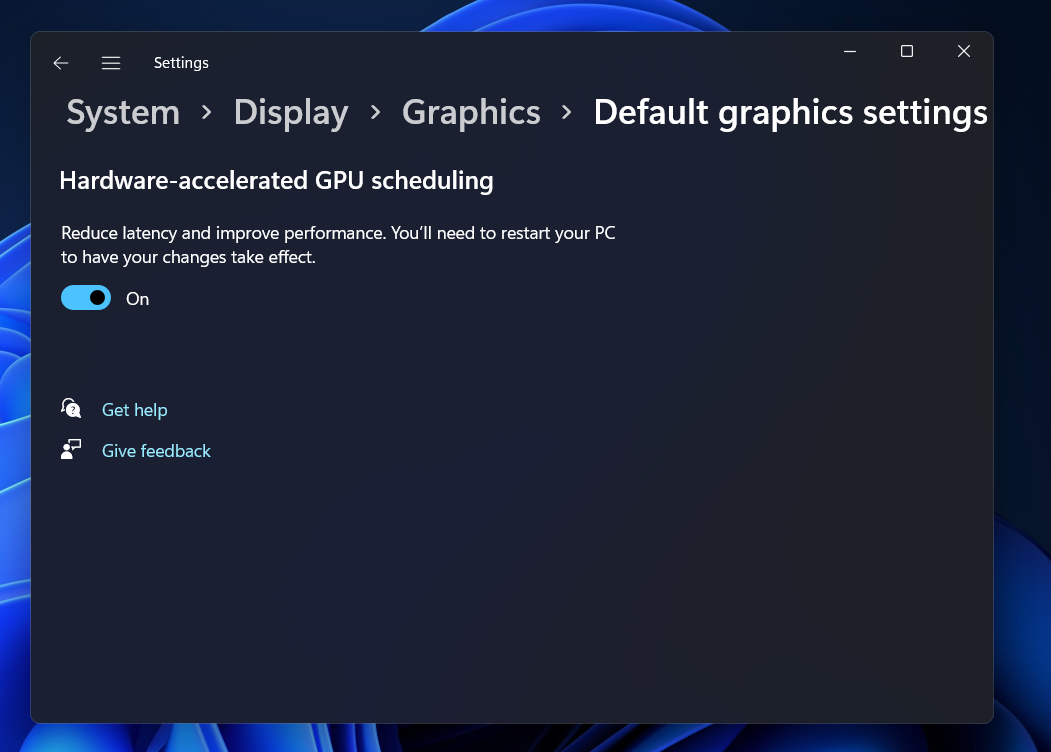
- Once done, restart your PC to save the changes.
Enable Hardware-Accelerated GPU Scheduling Using Registry Editor
Another way to enable hardware-accelerated GPU scheduling is by using the Registry Editor. Given below are the steps to enable this feature on your Windows 11 PC with the help of the Registry Editor-
- Click on the Start icon on the taskbar to open the Start Menu. In the Start Menu, search for Registry Editor and click on the very first option to open it.
- In the Registry Editor, head to the following path-
-
- HKEY_LOCAL_MACHINE\SYSTEM\CurrentControlSet\Control\GraphicsDrivers
- On the left sidebar, right-click on the GraphicsDrivers folder, and then click on New and then on DWORD (32-bit) value.

- Name the new key you created as HwSchMode.
Note- You should only create this key if this is not present by default.
- On the right side, double-click on the new key you created to edit it.
- Here, change the Value Data from 0 to 2 and click on OK.

- Close the Registry Editor and restart your PC to save the changes. This will enable the hardware-accelerate GPU scheduling using Registry Editor.
How To Disable Hardware-Accelerated GPU Scheduling In Windows 11
You can easily disable the hardware-accelerated GPU scheduling in Windows 11 using the Settings app. To do so, follow the steps given below-
- Press the Windows key and then search for Settings. Click on the very first option from the search result to open the Settings app.
- On the right side of the System tab, click on the Display option.
- Under the Related Settings, click on the Graphics option.
- Next, click on the Change Default Graphics Settings.
- Here, turn off the toggle for the Hardware-accelerated GPU Scheduling to disable it.

- Restart your PC and you will be good to do.
Conclusion
This is how you can enable hardware-accelerated GPU scheduling in Windows 11. We have discussed two ways to enable this feature in Windows 11. Moreover, we have also discussed how you can disable this feature on your PC.
FAQs
What Is Hardware-Accelerated GPU Scheduling?
Hardware-accelerated GPU scheduling is a feature in Windows 11 allowing the CPU to send high-intensity graphic-related tasks to the GPU to enhance the performance of the PC.
How Do I Turn On Hardware-Accelerated GPU Scheduling?
You will be able to turn on Hardware-accelerated GPU scheduling using the Settings app or the Registry Editor. Follow the steps in this article to enable this feature.
How Do I Turn Off Hardware-Accelerated GPU Scheduling?
If you no longer want to use hardware-accelerated GPU scheduling in Windows 11 then you will be able to disable it from the Settings. You can follow the steps mentioned in this article to disable hardware-accelerated GPU scheduling.
RELATED ARTICLES:


")


")