- DNS Server is essential for website access, but a DNS server not responding error can occur in Windows 11 due to various reasons.
- Restarting the router, running the internet troubleshooter, disabling the antivirus, flushing the DNS, changing DNS server settings, and removing DNS server addresses are effective ways to fix the error.
- Following these steps can help resolve the DNS server not responding error in Windows 11 and ensure smooth browsing experience.
DNS (Domain Name System) Server is the directory of the websites you visit. It stores the domain name of the websites you visit. The DNS server ensures that the websites you have previously visited quickly load onto your PC. However, at certain times you may face a DNS server unavailable in Windows 11. This may be due to the server not being available, some issues with the server, antivirus conflicting with it, and various other reasons. Facing this error isn’t big of an issue, as you can easily fix it.
Fix DNS Server Not Responding Error in Windows 11
If you are facing the DNS server unavailable in Windows 11, then follow the steps given below to fix the issue.

Try Restarting Your Router
The very first thing that you can try doing is restarting your router. Many times the problem can be caused due to some issue with the router, therefore, you may prefer restarting it. Restart the router, and then check if you still get the issue or not.
Try Running The Internet Troubleshooter
Running the internet troubleshooter can also help you diagnose the problem and most probably fix it. Windows troubleshooters are built-in tools to help analyze the issue you are facing and also fix it. To run the internet troubleshooter, follow the steps given below-
- Head to the Settings of your PC by pressing the Windows + I key combo.
- In the System tab in the Settings, search for Troubleshoot and open it.
- Here click on Other Troubleshooters. Click on the Run option beside the Internet connections option.
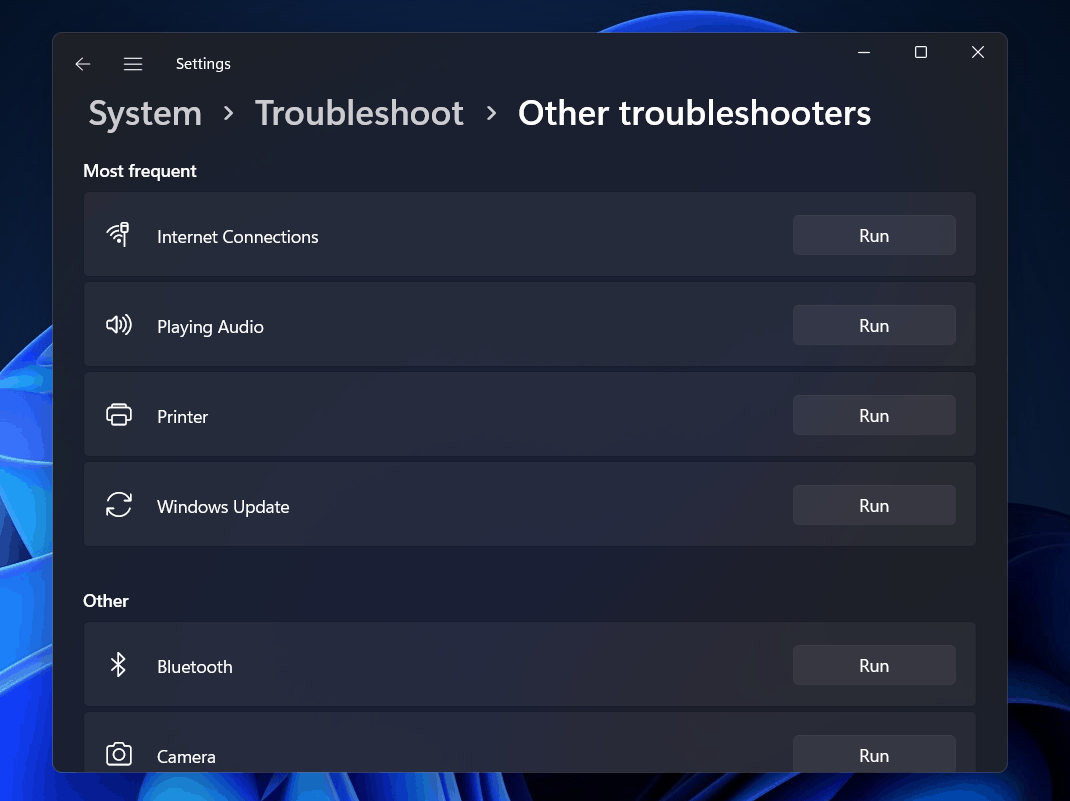
- Now follow the on-screen instructions to run the internet troubleshooter.
Disable The Antivirus
If you are facing this issue, then this may be because of the antivirus conflicting with the network connectivity. You can try disabling the antivirus temporarily and then check if you get the error or not.
However, if you still face the error, then try uninstalling the antivirus software. If this fixes the issue, then the problem was caused due to the antivirus software on your PC.
Flush The DNS
You can also try flushing the DNS. DNS entries get corrupted if you do not refresh them or flush them for a very long time. Corrupted DNS entries may then cause the DNS server unavailable in Windows 11 issue. This can be solved by flushing the DNS. To flush DNS, follow the steps given below-
- In the Start Menu, search for Command Prompt. Right-click on the Command Prompt, and then click on Run as administrator.
- In the Command Prompt, type the following commands one by one, and execute them-
-
ipconfig /flushdns -
ipconfig /release -
ipconfig /renew
-
- This will flush the DNS, and then the issue will be solved.
Disable Proxy Server
Proxy Server enabled on the PC can also cause the issue. To disable the Proxy Server, follow the steps given below-
- In the Start menu, search for Internet options and open it to open the Internet properties.
- Here click on the Connections tab and then click on the LAN settings button.
- Now check the Use a proxy server for your LAN under the Proxy server section.

- Click on OK to save the changes.
Manually Change The DNS Server
If you are facing the DNS Server unavailable issue, then you can try manually changing the DNS server. To manually change the DNS server, follow the steps given below-
- Press the Windows + R key combo, and then in the Run dialog box type ncpa.cpl and then hit Enter.
- Here, select your current network. Right-click on it, and then click on Properties.
- Here select the Internet Protocol Version 4 (TCP /IPv4) and then click on Properties.
- In the next window that opens up, select the Use the following DNS server addresses.

- Now enter the Preferred DNS server as 8.8.8.8 and enter the Alternate DNS server as 8.8.4.4 and click on OK.
This should most probably fix the issue for you. If the issue is still not solved, then you can move to the next step.
Remove DNS Server Addresses
If the issue is still not solved, then you can try removing the DNS Server Addresses. To remove DNS Server Addresses, follow the steps given below-
- Head back to the Internet Protocol Version 4 (TCP /IPv4) Properties as we did in the above steps.
- Here, click on Advanced. This will lead you to the Advanced TCP/IP Settings window.
- Here head to the DNS tab by clicking on it.
- Select the DNS Server under the DNS server addresses, in order of use: section.

- After selecting the DNS server, click on Remove to remove the DNS server.
This should most probably solve the DNS server unavailable in Windows 11 issue for you.
RELATED GUIDES:
- How to Change DNS Server on Windows 10, macOS, Android
- Fix Copy and Paste Not Working in Windows 11
- How To Change Display Refresh Rate On Windows 11
- Fix: This PC Doesn’t Currently Meet Windows 11 System Requirements Error
Final Words
These were some steps to help you fix the DNS server unavailable in Windows 11. Following the above steps, you will be able to solve the issue that you were facing with the DNS server.


")


")