- Deleting an Instagram account on iPhone involves a step-by-step guide, including opening the app, going to the profile page, accessing Help Center, Managing Your Account, and finally deleting the account permanently.
- Upon deletion, Instagram removes all account information such as photos, videos, comments, and followers, but data may still be stored for up to 90 days for possible restoration.
- An alternative option is to deactivate the account temporarily instead of permanently deleting it, allowing users to take a break from social media without losing their account.
Do you want to delete the Instagram account on your iPhone? It is possible that, at times, we might want to delete our Instagram account permanently, but we couldn’t figure out how to do so.
It is recommended that you follow this dedicated article until the end if you wish to permanently disable or disable your account, as it provides a step-by-step guide.
However, you cannot simply delete your account; you must do many things in order to do so. It’s time for us to get started with our guide on how to delete an Instagram account on iPhone, so let’s not waste any more time talking.

When You Delete an Instagram Account, What Happens?
Instagram deletes all the information associated with your account, including photos, videos, comments, likes, and followers, when you delete your account. Upon deleting your account, Instagram will shut down your account and make your data inaccessible, but the platform won’t begin deleting it internally until 30 days after you request deletion.
According to Instagram, the data associated with your account may take up to 90 days to be completely deleted. There is a chance that you will still be able to access some of your data after this time period has expired as part of the platform’s backups.
You can deactivate your account if you don’t want to delete Instagram account permanently on iPhone. If you would like to take a break from social media, that option is available without completely deleting your account.
How to Delete an Instagram Account Permanently on an iPhone
The steps you need to follow to delete your Instagram account temporarily on your iPhone are listed below. Hence, if you do not wish to take a long break from Instagram, just follow these steps:
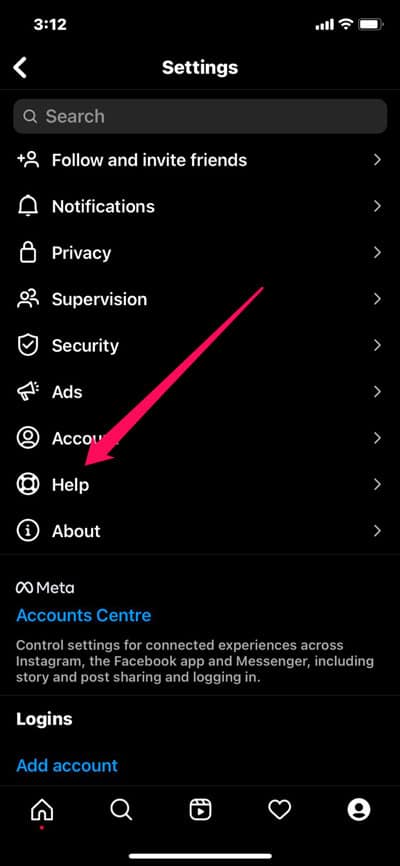
- On your iPhone, open the Instagram app.
- Go to your profile page and click Settings.
- Click Help, then click Help Center.

- Then, click on the Managing Your Account link.
- Click the Delete Your Account link.
- Select the “How do I delete my account?” option, and then click the Delete Your Account page link.
- If you want to delete your account, you will have the option of explaining why you are doing so. Choose the closest answer from the list.
- Once you’ve entered your password, click Permanently delete my account to delete your account permanently.


How To Disable Your Account Temporarily Using Web-Browser
Follow these instructions to delete your Instagram account on iPhone. So, if you don’t want to take a long break from Instagram, follow these steps:
- Using your web browser, open Instagram and log in.
- Go to Profile and select Edit Profile.
- After that, scroll down, and right-click on Temporarily Disable My Account.
- Next, select an answer and explain why you took action.
- You’re done. When you select your answer, you will see the option to deactivate your account. Now you just need to re-enter your password and hit Temporarily Disable Account to disable the account.
Some Frequently Asked Questions – FAQs
Is There Any Way to Get My Account Back After Deletion?
Officially, it’s impossible to regain control over your account after it’s permanently deleted. There is, however, a workaround method that swears by several users, as explained below.
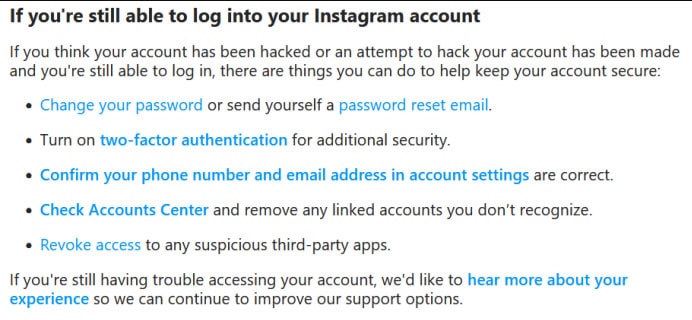
To summarize, you need to notify Instagram that your account has been hacked, as we have above. Here’s how.
- The first step is to type your username or email address and select the Get help signing in option on Instagram’s page.
- Click on Trouble logging in.

- To proceed, choose My account has been hacked and follow the prompts.

- After that, click hear more about your experience.
- Within a few hours, Instagram will send you an email with the results of your application. Your username, email address, and verification code will eventually be needed to perform this process, as will the images you uploaded to the account.

Can Instagram keep my data for a long time after I delete my account?
It takes Instagram up to 90 days to completely delete your account. Consequently, Instagram may still be storing information about your account on its servers after 90 days.
It also states in Instagram’s Data Policy that the company may retain information about your account after 90 days. For legal reasons or if the company violates its Terms of Service, the company may retain information.
When will Instagram delete your account?
You will lose access to your Instagram account after 30 days if you follow the deletion process outlined above, and your account will become invisible to others. Backup data, however, may not be deleted for 90 days.
It is less known how long it takes Instagram to delete inactive accounts, spam accounts, or bot accounts reported for abuse. Throughout Instagram’s system, completely inactive and bot accounts are periodically deleted. Except for Instagram, no one is entirely sure how often or under what circumstances these deletes occur.
Do I have the option of deleting my child’s account?
Your child’s Instagram account cannot be deleted without the user’s login information, at least not without the user’s permission. Using the above instructions, you can delete your Instagram profile only if you are the account owner, as per Instagram’s account deletion policy.
From Author’s Desk
When you perform the above instruction, your account will delete after 30 days. You will have your account information deleted from the Instagram database after 90 days, as well as your posts and other items. Hence, you do not need to worry anymore! However, please do not attempt to log in during this timeframe.
So, now that you know how to delete your Instagram account permanently on your iPhone, that’s all we have for you. We hope you found this guide helpful. Moreover, feel free to ask any questions in the comments section as well.
RELATED GUIDES:


