- Windows error sign may appear when unable to use or experiencing slow internet, due to failure to detect network's proxy settings
- Fix the error by checking, resetting TCP/IP, uninstalling antivirus software, performing SFC and DISM scans, resetting internet settings, restarting network adapter, changing DNS settings, modifying proxy settings, and running network troubleshooter
- Follow step-by-step instructions to troubleshoot and resolve the issue, ensuring stable internet connectivity.
When connecting to a network, you might see a yellow warning sign on your Wi-Fi name in the system tray. This error sign may occur when you’re unable to use your internet or when it is really slow. This error may prevent you from using the internet. You may encounter this error when Windows could not automatically detect the network’s proxy settings. If you face this error, then there is nothing to worry about.
Fixing Windows Could Not Automatically Detect This Network’s Proxy Settings Error
In this article, we will be discussing how you can fix ‘Windows could not automatically detect this network’s proxy settings error.
Fix 1: Check The Proxy Server Settings
You should firstly check the proxy settings of your network. If the Proxy Server settings are hampered, you may encounter ‘Windows could not automatically detect this network’s proxy settings’ error.
- Press the Windows + R key combo to open the Run dialog box.
- In the Run Dialog Box, type the command inetcpl.cpl and click on OK. This will take you to the Internet Properties window.

- Head to the Connections tab, and then click on the LAN settings button.
- Now check if your proxy settings are all fine or not.
Fix 2: Reset TCP/IP
Another thing that you can do is reset the TCP/IP and then check if you still face the ‘Windows could not automatically detect this network’s proxy settings’ error or not.
- In the Start Menu, search for CMD. Right-click on the command prompt and then click on the run as administrator.
- In the command prompt, type the command, netsh int ip reset resetlog.txt, and hit Enter.

- Once done, restart your PC, and you should now no longer face the issue.
Fix 3: Uninstall The Antivirus Software
You might also face this issue due to antivirus software on your PC. Having a third-party antivirus is a safe side to protect your PC from viruses. However, Windows Defender is much more powerful and useful now than ever, so you can rely on that and not install third-party antivirus on your system.
You can try uninstalling antivirus software o your PC and then check if you still face the issue or not. If you do not face the issue after uninstalling the software, then probably the antivirus software was conflicting with your internet.
Fix 4: Perform SFC Scan
Another thing that you can do is perform an SFC scan. You may often encounter the ‘Windows could not automatically detect this network’s proxy settings’ error due to corrupted system files. You should prefer performing an SFC scan and then check if you still face the error or not.
- In the Start menu, search for CMD. Right-click on the command prompt and then click on the run as administrator.
- In the command prompt, type the command SFC /scannow and hit Enter.
- This will scan your PC for any corrupted files, and it will be fixed. Don’t close the command prompt until the process has been completed.
Fix 5: Perform DISM Scan
If SFC Scan doesn’t help you fix the issue, then you can perform a DISM scan. To perform a DISM scan, follow the steps given below-
- Run the command prompt as administrator, as you did in the above method.
- In the command prompt, type the command DISM /Online /Cleanup-Image /restorehealth and hit Enter.
- Wait for the process to complete, and your issue will be solved.
Fix 6: Reset Your Internet Setting
You should try resetting your internet settings and then check if you still face the issue or not. To reset your internet settings, follow the steps given below-
- Press the Windows + R key combo.
- Now in the Run dialog box, type inetcpl.cpl and click on OK.
- You will be headed to the Internet Properties window. Click on the advanced tab and then click on restore advanced settings.

- Once done, click on Apply and then OK.
Fix 7: Restart Network Adapter
If you still face the same issue, you should try resetting your network adapter, and your issue will probably be solved. To restart your network adapter, follow the steps given below-
- In the start menu, search for Control Panel and open it.
- In the control panel, click on Network and Internet and then click on Network and Sharing Center.
- Here click on Change adapter settings in the left sidebar.

- Now look for your network connection here. Right-click on it, and then click on Disable.
- After doing so, re-enable the network. This should solve the issue for you.
Fix 8: Obtain DNS Server Address Automatically
You can enable ‘obtain DNS server address automatically,’ and the issue will be fixed. To enable ‘obtain DNS server address automatically,’ follow the steps given below-
- Head to the Network and sharing center like you did before. Now click on the change adapter settings in the left sidebar.
- Now locate your network connection. Right-click on it and then choose properties.
- Next, select Internet Protocol Version 4 (TCP/IPv4) and then click on properties.
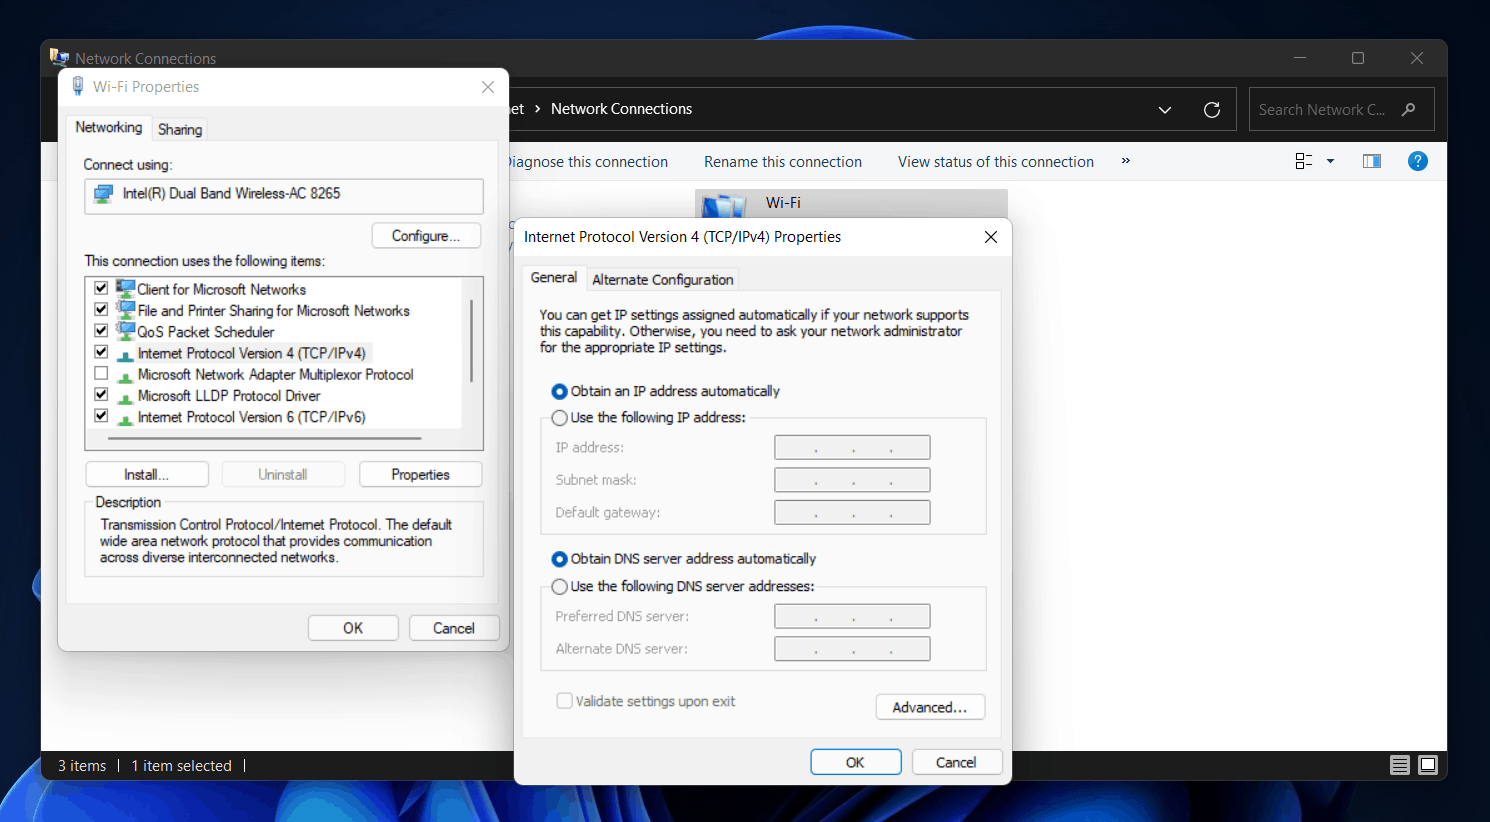
- Select obtain DNS server address automatically and then click on OK.
Fix 9: Change Proxy Settings
If you still encounter the issue, then you should try changing the proxy settings. To change the proxy settings, follow the steps given below-
- Open the Settings app by pressing the Windows + I key combo.
- Next, click on Network & Internet section.
- Here click on the Proxy option, and then enable the automatically detect settings.

After you do so, you will not be facing the issue anymore.
Fix 10: Run Network Troubleshooter – Windows Could Not Detect This Network’s Proxy Settings
Even after following the above steps, if the issue is not solved, you should run a network troubleshooter. To run a Network troubleshooter, follow the steps given below-
- In the start menu, search for troubleshoot settings and open it.
- Here click on other troubleshooters. Here select network adapter, and then click on Run the troubleshooter.
- Windows troubleshooter will scan your PC for the issue, and it will be fixed.
RELATED GUIDES:
- How To Install and Setup Cortana In Windows 11
- How To Fix Windows Update Error 0x80070490 in Windows 11
- Service Host SysMain High Disk Usage In Windows 10
Final Words
That’s how you can fix the ‘Windows could not automatically detect this network’s proxy settings error. We hope this article helps you solve the issue you were facing.


")


