- Graphics card renders images for resolution and graphics on PCs, which may have single or dual GPUs, including dedicated and integrated cards.
- To check graphics card in Windows 11, use Task Manager to monitor performance, Device Manager to view hardware devices, Display Settings for single GPU, DirectX Diagnostic Tool for GPU details, and CPU-Z for specifics like GPU name and board manufacturer.
- Following steps in each method will help identify the graphics card on your Windows 11 PC for game compatibility and troubleshooting.
A Graphics card is a device on your PC that is used to render images for better resolution and graphics. Your PC may come with a single GPU or graphics card or with two GPUs. Your PC may include only one dedicated graphics card, integrated graphics card, or maybe even both. Many times you may want to check what graphics card is there on your PC. You may need it to check whether the game you are trying to play is compatible with your PC or not. There are various ways to check which graphics card is there on Windows 11 PC. If you are looking for various ways to check graphics cards on your PC, this article is for you.
How to Check Graphics Card In Windows 11
In this article, we will be discussing how you can check graphics cars in Windows 11.

Checking Graphics Card Through Task Manager
You can check what graphics card your PC has using the Task Manager. Not only is Task Manager useful with monitoring CPU resources and ending the process, but you can also check what graphics card Windows 11 PC has used the Task Manager. To check graphics card in Windows 11 through task manager, follow the steps given below-
- In the Start menu, search for Task Manager and open it.
- In the Task Manager, head to the Performance tab.

- Scroll down to find GPU here. If you have one single GPU, then you will see only one GPU listed there. However, if there are two GPUs, it will be shown as GPU 0 and GPU 1.
- Click on GPU0 to check the model of the GPU0, and click on GPU1 to check the GPU 1.
Using Device Manager To Check The Graphics Card
You can either use Device Manager to check what graphics card is there on your PC. Device Manager shows you a list of all the devices and hardware connected to your PC. To check graphics card in Windows 11 using the Device Manager, follow the steps given below-
- In the Start Menu, search for Device Manager and open it.
- Here from the list of hardware, expand Display adapters by double-clicking on it.
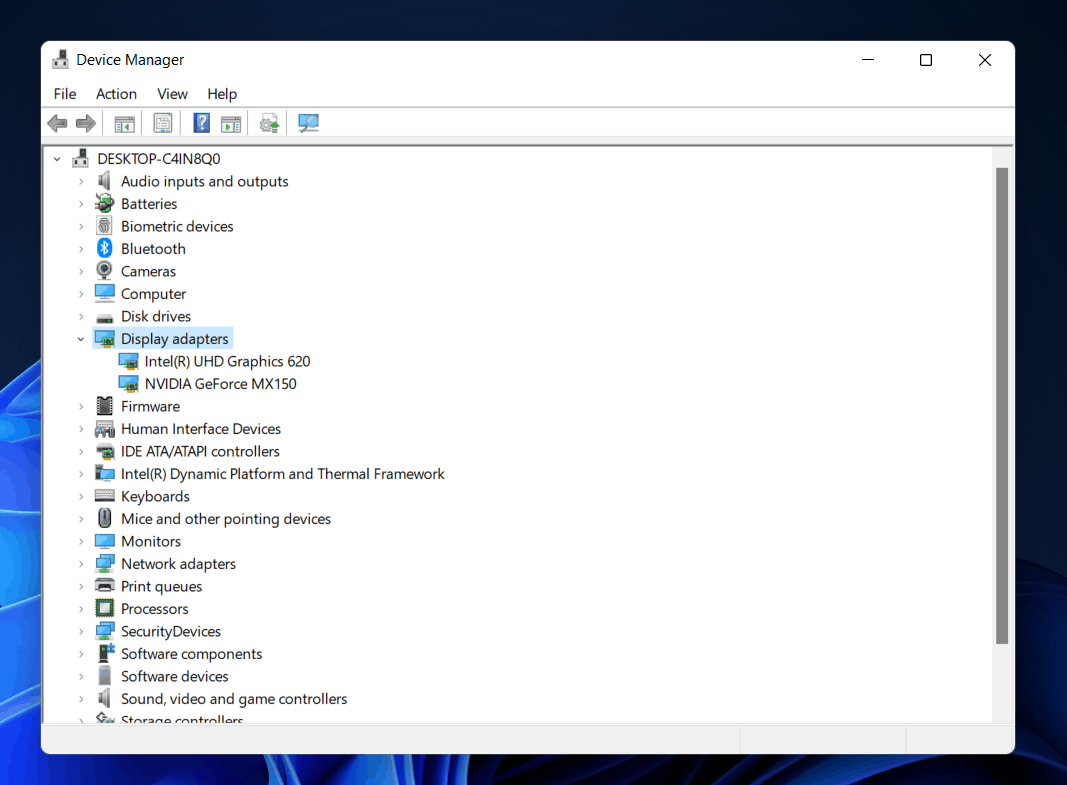
- This will show you a list of all the graphics card connected to your PC. Generally there will be only one graphics card which can be either integrated or dedicated, but you may also find two graphics card which indicates dedicated and integrated graphics card.
Using Display Settings To Check Graphics Card
You can also use Display Settings to check graphics cards. However, this may only work for a single graphics card on your PC. If your PC has two graphics cards, then it may show only one of them. To check the graphics card from Display Settings, follow the steps given below-
- Open the Settings of your PC by pressing the Windows + I key combo.
- You will be default be headed to the System tab on the Settings. If you are not already on the System tab, then click on it from the left sidebar.

- In the System tab, click on Display, and then click on Advanced Display in Display. Here you will see Internal Display, under which you will see Display 1. You will get to know the graphics card on your PC.
Checking Graphics Card Via DirectX Diagnostic Tool
You can also check graphics cards using the DirectX Diagnostic Tool. To check graphics card using the DirectX Diagnostic tool, follow the steps given below-
- Press the Windows + R key combo to open the Run dialog box.
- In the Run Dialog Box, type dxdiag and click on OK or hit Enter to open DirectX Diagnostic Tool.

- Head to the Display tab in the DirectX Diagnostic Tool and you will get to know the model of the graphics card under the Device section beside the Name. However, if you are having a multi-screen setup, then there will be multiple display types like Display 1 and Display 2. Moreover, you can also check other information, including the Chip type, device type, total memory, and such.
Using CPU-Z To Check Graphics Card
You can either use CPU-Z to check the graphics card on your PC. To check the graphics card using CPU-Z, follow the steps given below-
- Firstly, download the CPU-Z from the official website and install it on your PC.
- Open the CPU-Z application on your PC. In the CPU-Z, head to the Graphics tab.
- Here you will see display device type, GPU name, board manufacturer, size, and various other things.
RELATED GUIDES:
- How To Clear Windows 11 Search History and Remove Recent Activities
- How To Fix The Windows 11 DNS Server Unavailable Error
- Fix Hotkeys (Fn Keys) Not Working On Windows 11 Laptop
Final Words
That’s how you can check graphics cards on Windows 11 PC. Following the above steps, you will check what graphics card is there on your PC.


