- Driver updates are important for device performance but can lead to compatibility issues
- Rolling back NVIDIA drivers on Windows 11 is possible through the Device Manager
- If the rollback option is unavailable, manually downloading and installing the previous driver version is an alternative solution.
Though updating the drivers to the latest version is always the best choice, it ensures your device works properly without any issues. However, this may not always be the case with driver updates. Well, driver updates can also bring issues to your PC. For instance, the latest version of the driver might not be compatible with your hardware, or it can have big, which can cause issues.
If you encounter such issues soon after the driver update is installed, you must roll back the driver. This allows you to revert to the previous version of the driver installed on your PC. If you want to roll back NVIDIA Drivers on your PC, this article will help you.

How To Roll Back NVIDIA Drivers On Windows 11
This article will discuss how to roll back NVIDIA drivers on Windows 11
Roll Back NVIDIA Drivers Through Device Manager
When you update the driver, Device Manager will allow you to roll back to the previous version. You can use Device Manager to roll back NVIDIA drivers on Windows 11. To do so, follow the steps given below-
- Press Windows + X key combo, and then click on Device Manager from the menu that opens up. This will open Device Manager on your PC.

- Now, double-click Display Adapters to expand the list.

- Right-click on your NVIDIA graphics drivers from the graphic driver list and then click on Properties.

- In the NVIDIA drivers properties window, click on the Driver tab and then on Roll Back Driver.

- You will be asked why you want to roll back the driver; select a reason from the list to continue ahead.
- Wait for the process to complete, and your PC will roll back the drivers.
Manually Download And Install The Older Version Of The Driver
The Roll Back Driver option in the Device Manager may be grayed out, and you may be unable to revert to the previous version of the driver. In this case, you must manually download the older version of the NVIDIA graphics driver from the official website and install it on your PC. To do so, follow the steps given below-
- Firstly, you will have to uninstall the driver. Open the Start Menu on Windows 11, search for Device Manager, and press Enter to open it.
- Now, expand the Display Adapters list by double-clicking on it.

- Here, right-click on your NVIDIA drivers and then on Uninstall Device.

- Now, click on Uninstall to confirm uninstalling the device. Once the driver has been uninstalled, you can continue manually downloading and installing the driver.

- Click on this link to head to the driver download page of Nvidia.
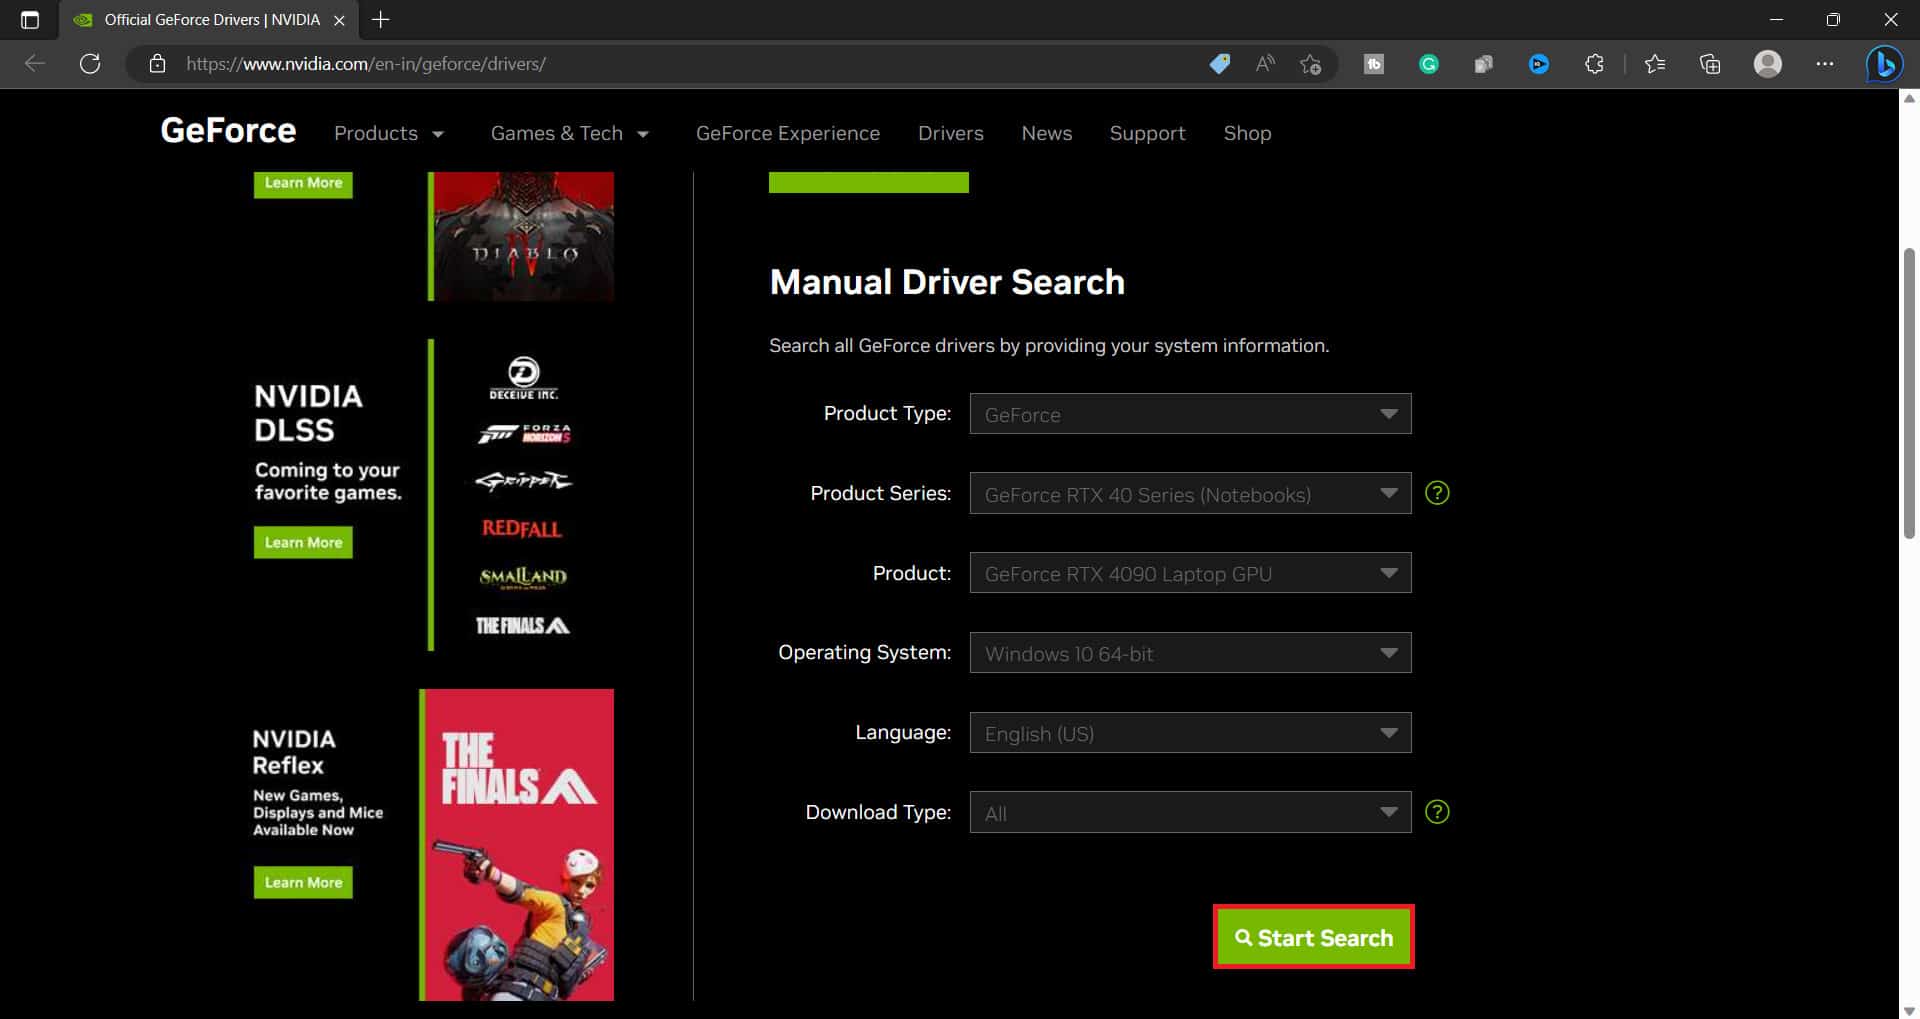
- Here, enter your hardware details, including the product type, product series, product name, OS, language, Windows Driver Type, and Download Type. Once you have entered these details, click on Start Search.

- You will see all the versions of drivers for your graphics card, along with the date they were released. Click the Get Download button next to the driver you want to download.

- Once the driver is downloaded, head to the location where the file is saved. Double-click on the installer to run the installation wizard.
- Follow the on-screen instructions to install the driver on your PC.
- After the process is complete, you will have to restart your PC.
Conclusion
You will have successfully reverted to an older version of the graphics driver on your PC through the above steps. There are two ways to roll back NVIDIA drivers on Windows 11: roll back from the device manager or manually install the older version of the NVIDIA driver. We have discussed both ways in the article above; you can follow them to revert to the older version of the NVIDIA graphics driver on Windows 11.
FAQs
How Do I Uninstall NVIDIA Graphics Driver On Windows 11?
To uninstall NVIDIA Graphics Driver on Windows 11, follow the steps given below-
- Open Device Manager on your PC.
- Expand Display Adapters list.
- Right-click on your graphics driver and then click on Uninstall Device.
- This will uninstall the NVIDIA graphics driver on your PC.
What Will Happen If I Uninstall NVIDIA Graphics?
When you uninstall the NVIDIA graphics driver, your PC will switch to the default graphics driver. But as soon as you restart your PC or install the update, the NVIDIA graphics driver will be reinstalled on your PC.
ALSO READ:
- How to Fix NVIDIA Control Panel Not Showing in Windows 11
- How to Fix Nvidia GeForce Experience Error Code 0x0003
- NVIDIA Canvas Online | Can You Use NVIDIA Canvas Online
- Fix You Are Not Currently Using A Display Attached to An Nvidia GPU
- How to Install and Setup Nvidia RTX Voice on GeForce GTX GPUs
- Best Nvidia Tesla V100 Volta VS Nvidia Tesla T4 GPU

