- MAC address is a unique identifier for devices used on the internet or local networks, with many changing it for anonymity.
- To change the MAC address of an Android device, methods exist both with and without rooting, allowing for permanent or temporary changes.
- Rooted methods involve using apps like BusyBox, while unrooted methods can be done using terminal emulator apps for temporary changes.
Well, you’ve come to the right place if you’re looking for a comprehensive guide on how to change the MAC Address of your Android device, both with and without rooting it. A smartphone’s MAC address is a unique identification number. Many people use this trick to access the internet anonymously. This is used by almost every security researcher for various tests. As a result, we’ve compiled a list of the top three methods for changing your MAC Address.
What is MAC Address?

MAC stands for Media Access Control, and the mac address of your device is a unique ID consisting of 12 characters. This Mac address is unique for every device. Mac address is used to identify a device on the internet or if connected to a local network such as a WiFi, etc.
If you change your Mac address, the unique ID of your device will be modified. You might need to change your Mac address may be because your device has been blocked on a particular router you have been using to access the internet by someone our side another reason. But, the solution remains the same, which is to change the Mac address of your device.
Also Read: 192.168.1.1 Login Page, Username, Password, and WiFi Settings
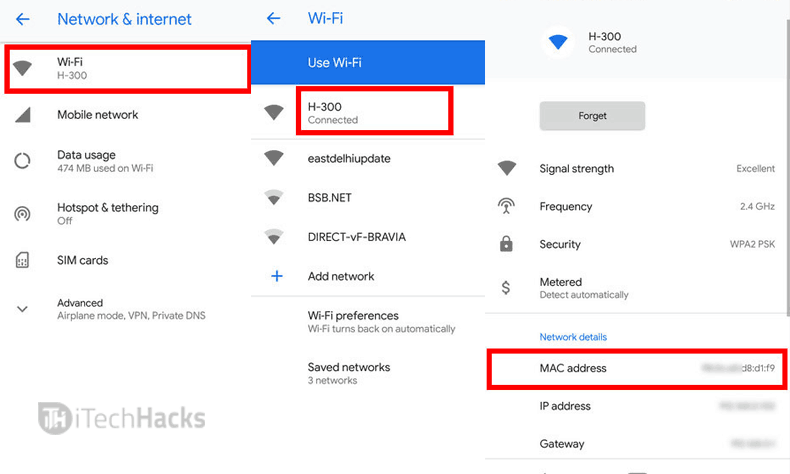
How To Check your Device MAC Address?
To see your MAC Address first on your Android device, you have to follow the below steps.
Step 1: Tap on ‘Menu‘ On your Android
Step 2: Then you need to open ‘Settings.’
Step 3: Then at the end, you will find an option i.e., ‘About device.‘
Step 4: Then there you can see your device’s MAC Address.‘
OR
Open dial pad and enter *#*#4636#*#*. This secret code will open a screen with the phone, usage, and Wi-Fi information.
How To Change the MAC Address of Android Device?
There are many methods that you can execute to change the MAC address of your Android device. But, we are going to mention the simplest and the easiest methods which can do the same task for you.
There are some methods that require your device to be rooted while, there are some methods which, do not require your device to be rooted. Hence, below we are going to list the methods which require your device to be rooted and also the methods which do not require your device to be rooted.
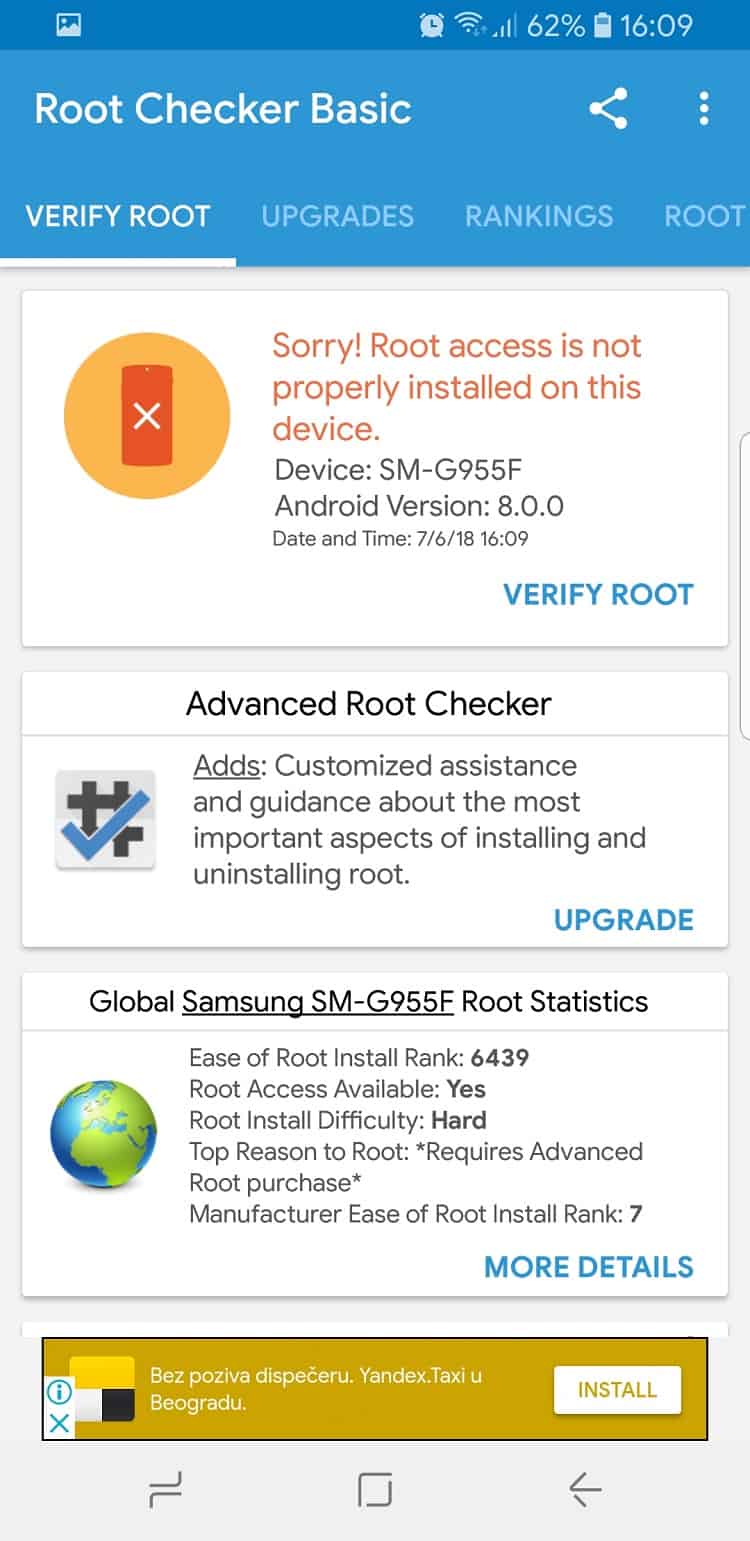
First, you need to download the Root Checker App on your Device. No worries, this app is simple, and you technically just need to run it when it’s downloaded and tap on the “Verify root” button.
This will show you the status of your root and you will see if there is root access on your device. Learn, How to root android easily here.
Disclaimer: But, before you start the execution of any of the listed methods, please make sure that you make a note of the original Mac address of your device, just as a precaution. As we mention above, You will find it in the settings >> about >> status. And the commands Shown in RED Color are used in terminal box with safe
Method #1: Change MAC Address of Rooted Android Using Terminal Emulator

For this method, you will be requiring a rooted Android device, BusyBox app installed in it and a terminal emulator app installed too. The steps required in this process are listed below:
Steps To Change MAC Address Of Your Android Smartphone
Step 1: Launch the terminal emulator app which you have installed on your rooted Android device.
Step 2: Once it is launched, enter the commands ‘SU‘ one after another and then, hit the enter button.
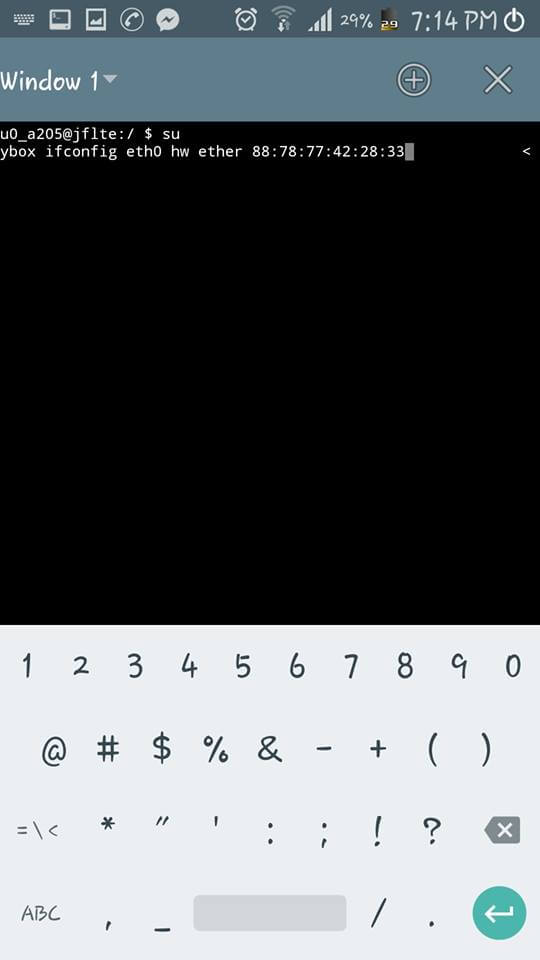
Step 3: You will now be assured of root permissions. Allow the root permissions and then, enter ‘busybox iplink show eth0‘ in the commands.
Step 4: You will now be shown the original Mac address of your device. Then, enter the command mentioned below.
busybox ifconfig eth0 how ether XX:XX:XX:XX:XX:XX
Step 5: In place of X, enter your desired MAC address and then, hit enter. Your Mac address will now be changed.
Step 6: Finally, enter the command ‘busybox iplink show eth0‘ and hit enter to confirm the Mac address changed by you.
You will have successfully changed your Mac address permanently by now!
Also Read: How To Improve High-End PC Games Graphics Without Graphics Card.
Method #2: Change MAC Address of Android Using Change My MAC – Spoof Wifi MAC

In this method, you will need a rooted Android device, BusyBox, and Change My MAC app installed on that particular Android device. The steps which you need to know are listed below.
Step 1: Launch the Change My MAC app which you had unattached in your device.
Step 2: This app then asks you for root permission. Click on the grant option to start exploring the app.
Step 3: You will find two different options. One saying, generate random MAC white the other saying, apply new MAC. Click on generate random MAC if you want a random MAC address but, if you wish to enter a specific MAC address then, click on the apply new MAC option.
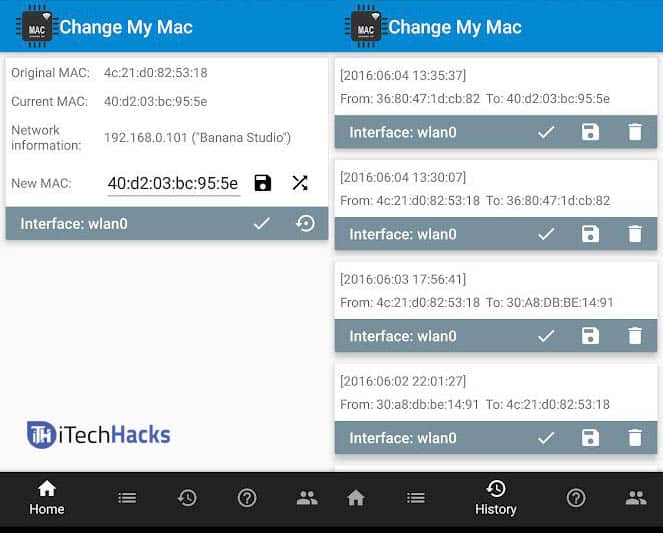
Step 4: Now, a confirmation box will pop up. Click on the change option if you wish to change your Mac address.
Grats!! That’s it! Your Mac address has now been successfully changed permanently.:)
Also Read: How to Fix Certain Websites Won’t Open in Browser
Method #3: Change MAC Address Of Your Android Without ROOTING
This method is for unrooted Android devices and also, this change is only temporary and not permanent. Whenever you reboot your Android device, it will use your original Mac address. For this method, you will need an Android device with, terminal emulator app installed on it. Then, follow the steps listed below one after another.
Step 1: Launch the app which you had installed and type ‘IP link show.‘
Step 2: Now, you will be displayed a list of different interfaces. In this list, search for the address that matches your Mac address.
Step 3: To convert it into your Mac address, enter the codes listed below:
ip link set AAAA address XX:XX:XX:YY:YY:YY
and
ip link set AAAA broadcast XX:XX:XX:YY:YY:YY
In the advice courses, AAAA represents the name of the interface that you want to change and XX:XX:XX:YY:YY:YY represents the new MAC address which you will be assigned to your Android device. But, always remember that only the last 3 sets of characters that are YY:YY:YY can be changed. If you change any of the previous set of characters you will certainly face many issues.
Step 4: In these simple steps, you will have successfully changed your Mac address temporarily.
Also Read: How to Convert EXE to APK Easily on Android and PC
Conclusion:
These were some of the best 3 methods for rooted as well as unrooted Android devices which we could find for you and which you can use to change the Mac address of your Android device permanently or temporarily. If you have any better and easy method then, please let us know in the comments section below.


")


I am getting permission denied while tried unrooted step, any suggestions?
It’s showing ‘Permission denied’ please hel me
Permission denied please give me some ideas
Same error for me – on a Galaxy 8+