- Hogwarts Legacy is a popular game with players experiencing the DirectX error issue, hindering gameplay.
- To resolve the DirectX error, users can run the game in administrator mode, update graphics drivers, use DirectX Diagnostic Tools, repair game files, force use DirectX 12, lower graphics settings, update the game, and check for Windows updates.
- Following these steps can help fix the DirectX error in Hogwarts Legacy and provide players with a smooth gaming experience.
Hogwarts Legacy is an action-adventure game based on the story of the Harry Potter Series. The players are excited about completing the different missions in the game. However, some players are stuck facing issues in the game. The players have reported the Hogwarts Legacy DirectX Error, so they cannot play the game. They are looking for some ways through which they can fix the issue. We are here with a guide to fix the Hogwarts Legacy DirectX Error. So, let’s get started with it.
How to Fix Hogwarts Legacy DirectX Error
Many users are stuck with the issue of DirectX Errors. Whenever they are playing the game, they get the DirectX error. Due to the issue, the players cannot play the game. We have listed the methods through which you can resolve the issue.
Run As Administrator
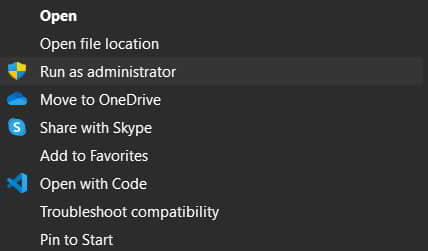
You can try running the game in administrator mode for those facing the Hogwarts Legacy DirectX Error. There are chances that the game might not be working due to a lack of admin authority on the system. It can occur sometimes; thus, we suggest you start the game in administrator mode to fix the issue. You must follow the steps below to run the game in administrator mode.
- Select the application file of the game.
- Right-click on it, and select “Run as Administrator.”
After it, check whether the game runs properly or not. If the game starts running properly after this, we suggest you do this setting by default for the game.
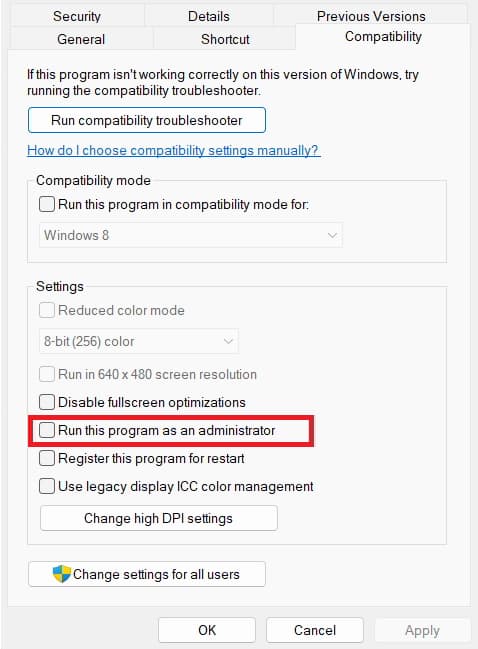
- Select the application file of the game.
- Right-click on it, and select Properties.
- Select the Compatibility Mode.
- Tick the option of “Run this program as administrator.”
- Click on OK to save the changes.
Use DirectX Diagnostic Tools
To assess whether you are using the right version of DirectX on your system or not, you can use the DirectX Diagnostic Tools. The users have to follow some steps, which are listed below.
- Press Windows + R Key.
- Type “dxdiag,” and press OK.
- Now, you will see the DirectX Diagnostic Tools on the screen.
- Check the version of DirectX that has been installed on your system.
- You can also go to different tabs and check what features are available on your system.
- If the version is less than 12, try the below-listed methods.
Update The Graphics Driver
For those who don’t know, if your system does not have the updated graphics drivers, the issue of DirectX error will occur. We suggest you update the graphics drivers on your PC to avoid the issue that is occurring because of it. You have to follow the steps which are mentioned below.
- Open the Device Manager and expand the Display Adapters.
- Now, please select the driver and right-click on it.
- Select the Update Driver option, and a pop-up will come on the screen.
- Follow the instruction to complete the update. That’s it. Once the driver is updated, restart your PC and check again for the issue.
Lower The Graphics Settings
There are chances that the issue might start to occur on your system because of the graphics settings that you have set in the game. If you don’t know, the graphics settings need to be set adequately to the graphics properties that your system has. If you set the graphics settings more than your graphics support of the system, the game will not work properly, and you will start facing different issues with the game.
We suggest the players reconfigure the graphics settings on the game according to the system that they have. When doing this, play the game each time after making the changes. By doing this, you will be able to set the best graphics settings for the game, so you will be able to run it properly without any issues on the PC.
Repair The Game Files
If the issue is still occurring even after changing the game settings, then it’s likely that there are some issues with the game’s files. This can occur if you faced issues when the game was installed on your system. However, you can easily fix this issue with the help of repairing the game files. Many users have faced the issue, but they used the game launcher’s repairing feature, which allowed them to resolve the issue on the PC.
You can also use the same feature on your system to fix the issue. The users will need to follow some steps, which are listed below, to do this.
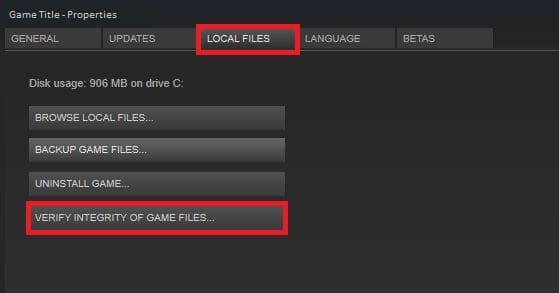
- First of all, open the game launcher through which you have installed the game on your PC.
- Go to the Library.
- Right-click on the game.
- Select the Properties option.
- Go to the Local Files option.
- Select Verify Integrity of Game Files.
Update The Game
Most users install the game on their PC and forget to check for any new updates after it. This can also cause many issues, as the developers always push new updates to make the game smoother for the players. You can also face the DirectX issue if you have not updated the game for a long time. We suggest the players open the game launcher and check for the updates for the game and whether there are any available or not. If there are any updates available, download them, as the developers might have already pushed the update to fix the issue, but you have not updated, so you are still stuck with the issue.
Force Use The DirectX 12
There are chances that DirectX 12 might not be working with the game due to some internal system issues. It sometimes happens when the app conflicts with the other game’s files, due to which the required files to run the game might not be working. The same issue can also happen to DirectX 12, so the DirectX 12 is not working, and you are facing issues with the game.
We suggest using the Force use option to start the DirectX 12 whenever the game starts. Also, when you do this, the game launcher will start the DirectX 12 along with the game. So, there is a high chance that the issue will be resolved after doing this. You can do this setting to the launcher with the help of the steps which are listed below.
Steam
- Open the Launcher and go to the Library.
- Right-click on the game.
- Select Properties.
- Go to the General Tab and select Launch Options.
- Type “-dx12” inside the text field.
- Restart the PC and check again.
Epic Game Launcher
- Open the Launcher.
- Click on the Profile Icon.
- Select Settings and go to the bottom.
- Now, click on the game and select the Additional Command Line Arguments box.
- Type “-dx12” inside the text field.
- Restart the PC and check again.
Check For Windows Update
Many users are trying to run the game on the outdated Windows version. The game and all its components, including DirectX, will require the latest Windows version to run without issues. You can also get this issue on your system if you have not updated the Windows for a long time. We suggest that users check for Windows Updates to avoid such issues on their system.
Wrapping Up
Users are facing issues with the Hogwarts Legacy game after installing it. When the users tried to play the game, they got the DirectX error. Due to the issue, the players could not play the game. We have listed how you can fix the issue on your system without any hassle. So, follow them properly and let us know whether your issue was resolved.
RELATED GUIDES:
- How to Fix Hogwarts Legacy Error Code WB8000E03
- How to Fix Hogwarts Legacy Error Code WB4000001
- Fix Hogwarts Legacy Ghosting Issue in PS4, PS5, PC, Steam
- Fix Hogwarts Legacy Missing Component Error on Epic Games
- Fix Hogwarts Legacy Won’t Launch or Crashing on PC, PS4, PS5, Xbox
- How to Fix Hogwarts Legacy Stuttering and Low FPS Issues


