- Users experiencing issues with Windows 11 Insider Build are seeking to revert to Windows 10, as it is the most recent version of Windows.
- Two effective methods are available to downgrade from Windows 11 to Windows 10, involving specific conditions and steps to follow.
- Precautions such as backing up system data and having a bootable media of Windows 10 are essential before initiating the downgrade process to prevent data loss.
Many users have reported issues with Windows 11 Insider Build and are looking to revert to Windows 10. Windows 11 is the most recent version of Windows, succeeding Windows 10. People who have signed up for the Windows Insider program have received a preview build 10.0.22000.51 update. Users who upgraded to Windows 11 are also looking for a way to roll back to Windows 10 because there are still many bugs and features missing. Fortunately, you can easily downgrade from Windows 11 to Windows 10.
How to Downgrade Windows 11 to Windows 10
If you have upgraded to Windows 11 but now want to downgrade back to Windows 10, worry not; this article will help you. In this article, we will be discussing how you can downgrade from Windows 11 to Windows 10.
Downgrading Windows 11 To Windows 10
You can downgrade to Windows 10 using one of two ways. Both approaches are effective in various states. To proceed with the downgrade, the first method includes a few conditions that must be completed. So, let’s get started with the first way in our Windows 11 to Windows 10 downgrade guide.
Things To Remember Before Downgrading To Windows 10 From Windows 11
Before you continue with the process to downgrade Windows 11 to Windows 10, ensure you have a backup of your system. Take a backup of your data, your apps, your files, everything stored on your computer. This is to prevent data losses that you may face during the rolling back process.
Also, ensure you have a bootable media of Windows 10 before you continue with the process. If the process stops and you cannot boot your PC, bootable media will help install Windows.
Downgrade Using Windows 11 Recovery
Follow the steps given below to downgrade Windows 11 to Windows 10:
- Open the settings on your PC. You can do it by searching for settings in Start Menu and then opening it or by pressing the Windows + I key combo.
- Go to the Windows Update section from the left sidebar in settings.
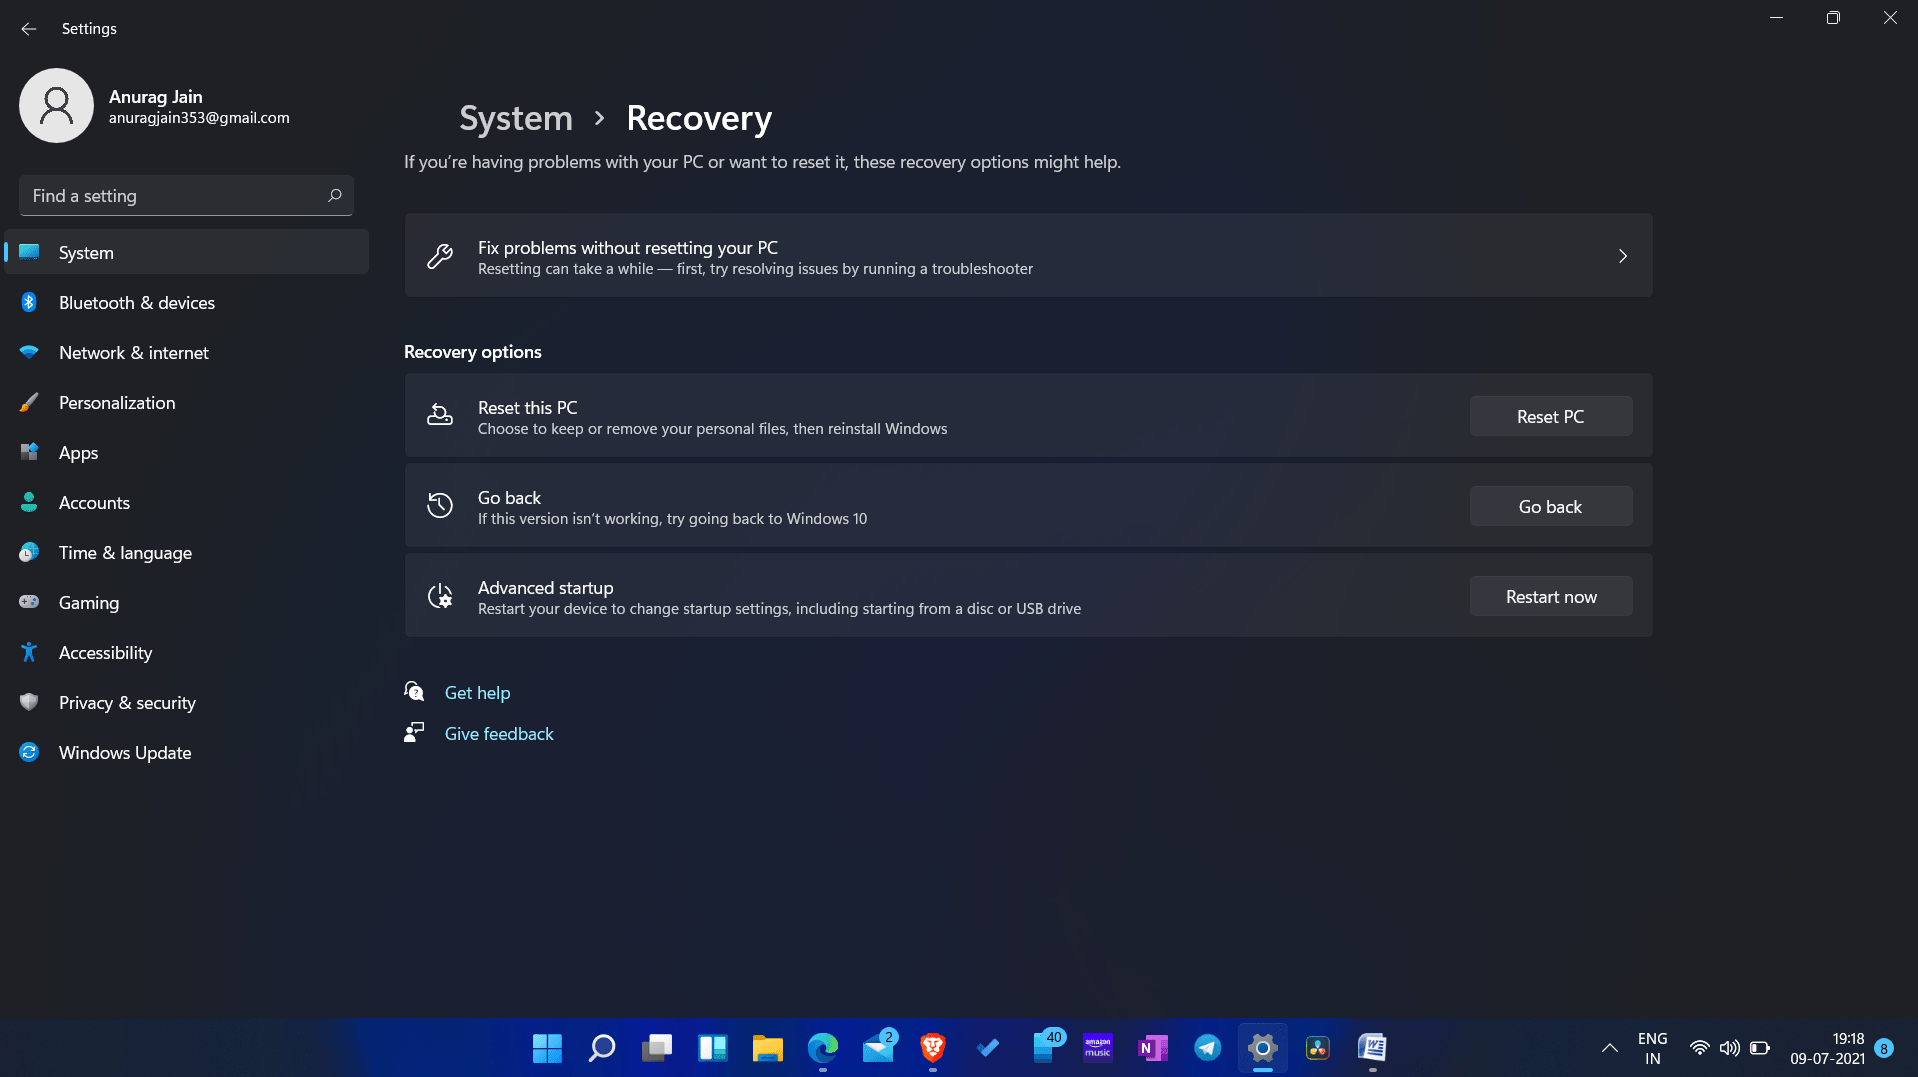
- In the Windows Update section, click on advanced options and then click on recovery. Here you will find various recovery options, such as reset this PC, previous version of Windows, advanced startup, and fix problems without resetting Your PC.

- As we have to roll back to Windows 10 from Windows 11, click on Go Back in the previous version of Windows.

- You will have to select the reason why you are going back. Select the reason from the checklist or type in the reason. Once done, click on next.
- Continue with the process, and confirm all the prompts. Once done, the restoration process will begin.
- Your PC will restart several times during the process. The process might take 30-40 minutes to get completed. Once done, your PC will be restored to Windows 10.
Roll Back to Windows 10 Using Bootable USB
If you have deleted the old Windows file, then you won’t be able to downgrade to Windows 10. The only option remaining is to use a bootable media drive. For that, you will have to create a bootable media of Windows 10. For this process, you first need to download Windows 10 ISO. After creating a bootable media, follow the steps given below to downgrade Windows 11 to Windows 10.
- Plugin the bootable USB drive to your PC, and then access the boot menu.
- In the boot menu, select the USB drive.
- Now you will be headed to the Windows 10 setup.
- Continue ahead with the setup. You will have to enter your language and region. Once done, click on next.

- You will get two options- Upgrade: Install Windows and keep files, settings, and applications, and custom: Install Windows only.
– Upgrade- This will install Windows and keep all the files, apps, settings on your PC. This will help you downgrade to Windows 10.
– Custom- This option will let you install a fresh version of Windows.
- If you want to downgrade without losing any data, then you can choose the upgrade option. Else, you can also go for the custom option.
- Next, you will be asked to select the drive on which you want to install the Windows.
- Now, follow the on-screen instructions to be able to downgrade Windows 11 to Windows 10.
- Once done, you will have to finalize the changes, and you will use Windows 10.
Before continuing with the process, ensure you have the backup, as you might face data loss in the process.
READ MORE:
- How To Change Windows 11 Virtual Memory Size
- How To Speed Up Windows 11 and Optimize Performance
- Windows 11 Media Creation Tool: How To Install/Upgrade
Final Words
That’s how you can downgrade from Windows 11 to Windows 10. You have two ways to do so; the first method is easy and short, whereas the second method may feel difficult. You can follow the steps mentioned in this article to get through the process and roll back to Windows 10.


