- Displaying CPU frequency in the status bar allows easy monitoring of device performance in real-time, crucial for power users, gamers, and developers.
- Steps to display CPU frequency include rooting Android, installing Xposed installer, and Xposed CPUFreq module app.
- Best CPU monitoring apps like System Monitor Lite, Trepn Profiler, and TinyCore provide detailed system performance information and CPU frequency display on the status bar.
Hey there, tech enthusiasts! Have you ever wondered how to keep an eye on your device’s CPU frequency without diving into complex system settings or using bulky software? Well, displaying CPU frequency in the status bar is a nifty trick that can help you do just that. In this article, we’ll walk through the steps on how to display CPU frequency in the status bar, ensuring you can monitor your device’s performance with ease.

Before we jump into the how-to, let’s quickly talk about CPU frequency. Simply put, it’s the speed at which your device’s processor operates. It’s measured in GHz (gigahertz), and higher frequencies generally mean faster processing speeds. Knowing your CPU frequency can be crucial, especially if you’re a power user, gamer, or developer.
Displaying CPU frequency in the status bar is incredibly useful. It allows you to monitor how hard your processor is working in real-time, which can be vital for diagnosing performance issues, optimizing battery life, or just satisfying your curiosity.
Steps To Display CPU Frequency In The Status Bar
Step 1: Root your Android device if it is not rooted. You can make use of our recent update which will guide you about how to root your Android device. If your device is already rooted, proceed to the next step.
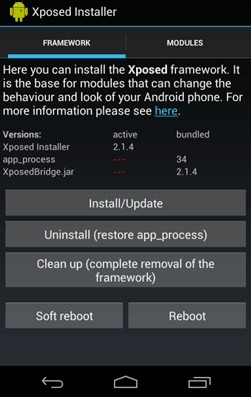
Step 2: Once your Android device is rooted, install the Xposed installer on your device.
Step 3: Then, download and install the Xposed CPUFreq in the status bar module app on your Android device which will display the CPU frequency on the status bar.
Step 4: After this module is installed on your device, enable it in the Xposed module with a tick on the app in the Xposed installer.
Step 5: Now, reboot your Android device once the above-mentioned steps are executed properly.
Step 6: Once your device reboots, open the app which you had downloaded and enable the CPU frequency option. As soon as you enable this option, the CPU frequency indicator will be activated on your status bar.
Using this method, you can easily display the CPU frequency of your Android device on the status bar. Rooting your Android device is the most important step of this method. However, no step can be skipped or else the desired result won’t be achieved.
How To Show CPU Frequency In The Status Bar Using Best CPU Monitoring Android Apps
It would have been very difficult for us to know about the system performance if we did not have dedicated apps from dedicated developers who have created apps that easily inform you about the system performance without getting yourself into a mess. So below we have listed a few such apps which allow you to know about the system performance of any Android device on which they are installed. So please have a look at the different apps which would help your cause.
Also Read: How To Use Google Chromecast on TV
#1 System Monitor Lite
This app uses texts and graphical representation of the real-time system load statistics. It provides you with an option to choose either to monitor total CPU usage or individual CPU cores. The full paid version unlocks the notification bar, flooding apps, widgets, and much more!
#2 Trepn Profiler
This is a kind of app that informs you about the dangerous apps for your CPU, battery gain, etc. It provides a real-time view of individual CPU cores. Many other features are also included in this app which is not relevant to be discussed under this topic.
#3 TinyCore
This app is a CPU, RAM Motoring app. This app can be partially used as a method to display the CPU frequency on the status bar of the Android device. This app adds a CPU and RAM indicator to the status bar of your Android device. This indicator is by default a line that is located at the top right corner of your status bar. As the name suggests, it is small in size and is fun to work with! It contains some locked features which can be unlocked with in-app purchases.
Also Read: How To Remotely Control One Android Phone with Another Using Apps
Wrap Up:
So these are some of the Best CPU Monitoring Apps which you should have on your Android device in case you wish to know about the performance of your Android system. Any of the apps listed below won’t disappoint you in any way possible since they are very efficient. If we have missed out on any such amazing app, please bring it to or notice in the comments section. If you find any difficulty in this method, please let us know in the comments section below.


