- Windows 11 uses search indexing to make finding files fast and easy, usually running smoothly in the background. You might need to disable or adjust it if it's causing high CPU use, wrong search results, or slow searches due to issues like index corruption or on low-end systems.
- Disabling search indexing can be done through Windows 11's settings under "Privacy & security," which is the safest method. You can stop indexing completely, choose which folders are included or excluded, or switch to "Classic" mode to only index user folders instead of the whole system drive.
Windows 11 relies on search indexing to deliver fast results in the Start menu, Settings, and File Explorer. The feature scans files and stores metadata so that searches feel instant. In most systems, indexing runs quietly in the background without causing slowdowns. However, issues can appear when the database becomes corrupt, OneDrive performs heavy syncing, or the indexer gets stuck. In such situations, users may want to disable indexing temporarily, rebuild the index, or limit what gets indexed.
This updated guide explains how search indexing works on Windows 11 versions 24H2 and higher, when disabling it makes sense, and the correct ways to turn it off without breaking core system features.
When Should You Disable Search Indexing in Windows 11?
Windows 11 indexing is optimized for modern SSD-based PCs. Disabling it is not recommended unless you have one of the following issues:
- The SearchIndexer process is stuck at high CPU or disk usage
- Search results are incorrect or missing
- File Explorer searches take too long
- Index corruption errors appear
- You are using a low-end system where background indexing causes noticeable lag
- You are troubleshooting Outlook search issues
- You are running a system that does not rely on local file search (for example, a VM or a kiosk)
If search works normally, disabling indexing provides little benefit.
How To Disable Windows 11 Search Indexing
In this article, we will be discussing how you can disable Windows 11 search indexing.
Use Settings to Adjust or Disable Search Indexing (Recommended for 2026)
Windows 11 now includes a dedicated settings panel for indexing. This is the safest and officially recommended way to control search behavior.
- Open Settings.
- Go to Privacy & security.
- Select Searching Windows.
Inside this section, you will find:
Indexing Status
Shows what Windows is currently indexing.
Excluded Folders
Lets you remove heavy or rarely used folders from the index.
Advanced Indexing Options
Opens the classic index control panel, where you can:
- Stop indexing
- Modify indexed locations
- Rebuild the index
- Restore defaults
To Temporarily Disable Enhanced Indexing
Windows 11 uses two modes:
- Classic: Index only user folders
- Enhanced: Index the entire system drive
Switch to Classic mode if you want to reduce indexing load without fully disabling it.
Disable the Windows Search Service (Breaks Search Features)
This method disables indexing completely, but it also affects:
- Start menu search
- Settings search
- Outlook desktop search
- File Explorer quick results
- Copilot and semantic search components on supported devices
Use this only for testing or troubleshooting.
-
Press Windows + R
-
Type services.msc and press Enter
-
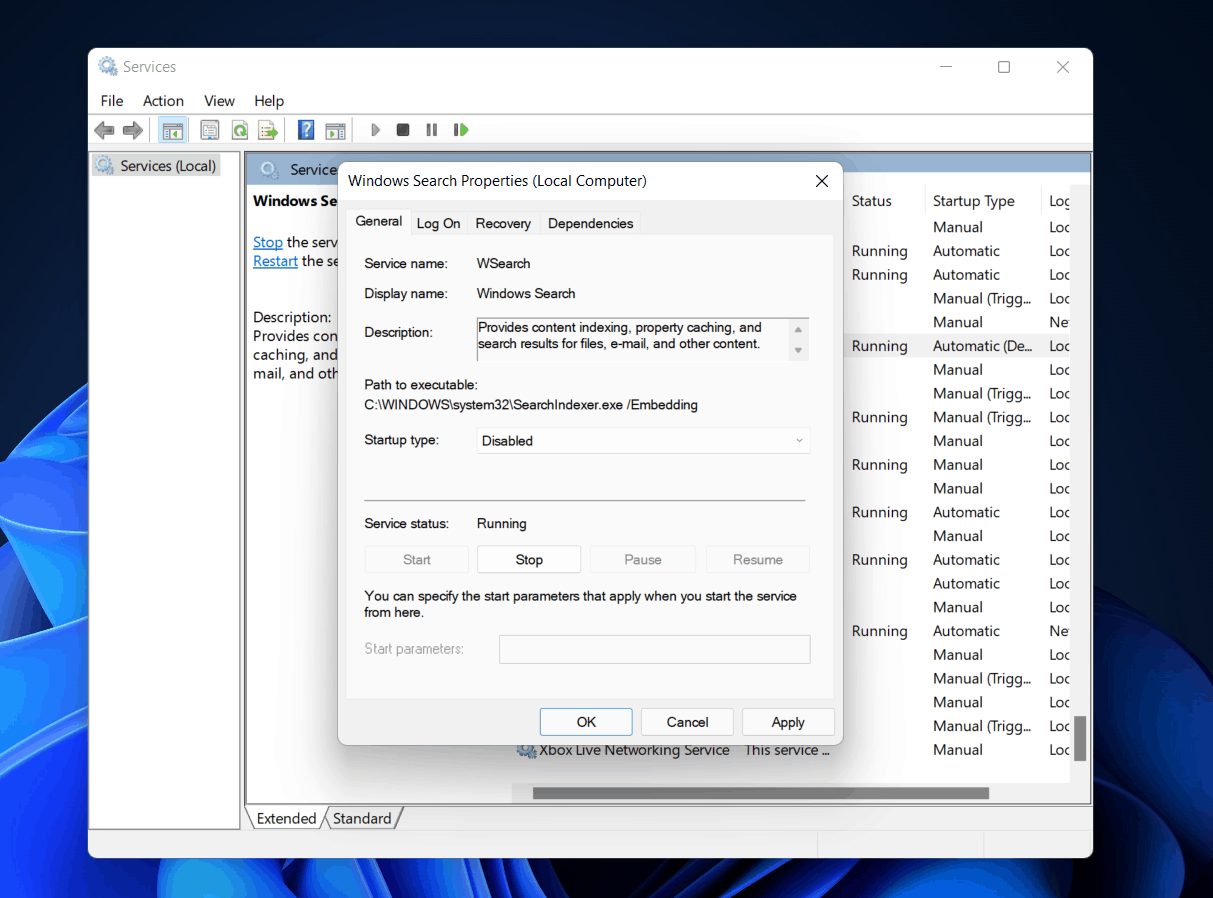
Find Windows Search

-
Double-click it
-
Set Startup type to Disabled
-
Click Stop
-
Select Apply and OK
-
Restart your PC
Search functions will be limited until the service is re-enabled.
Disable Windows Search Using PowerShell (Updated for 2026)
PowerShell commands are more reliable on newer builds than legacy sc commands.
Open PowerShell as administrator and run: Stop-Service -Name WSearch -Force
Set-Service -Name WSearch -StartupType Disabled
To enable it again:
Set-Service -Name WSearch -StartupType Automatic
Start-Service -Name WSearch
This provides the same effect as disabling it from Services.
Disable Content Indexing for a Specific Drive
This method limits indexing without turning off the entire service. Starting with Windows 11 24H2, disabling content indexing affects only file contents inside the drive. Metadata, filenames, and certain cloud attributes may still be indexed.
-
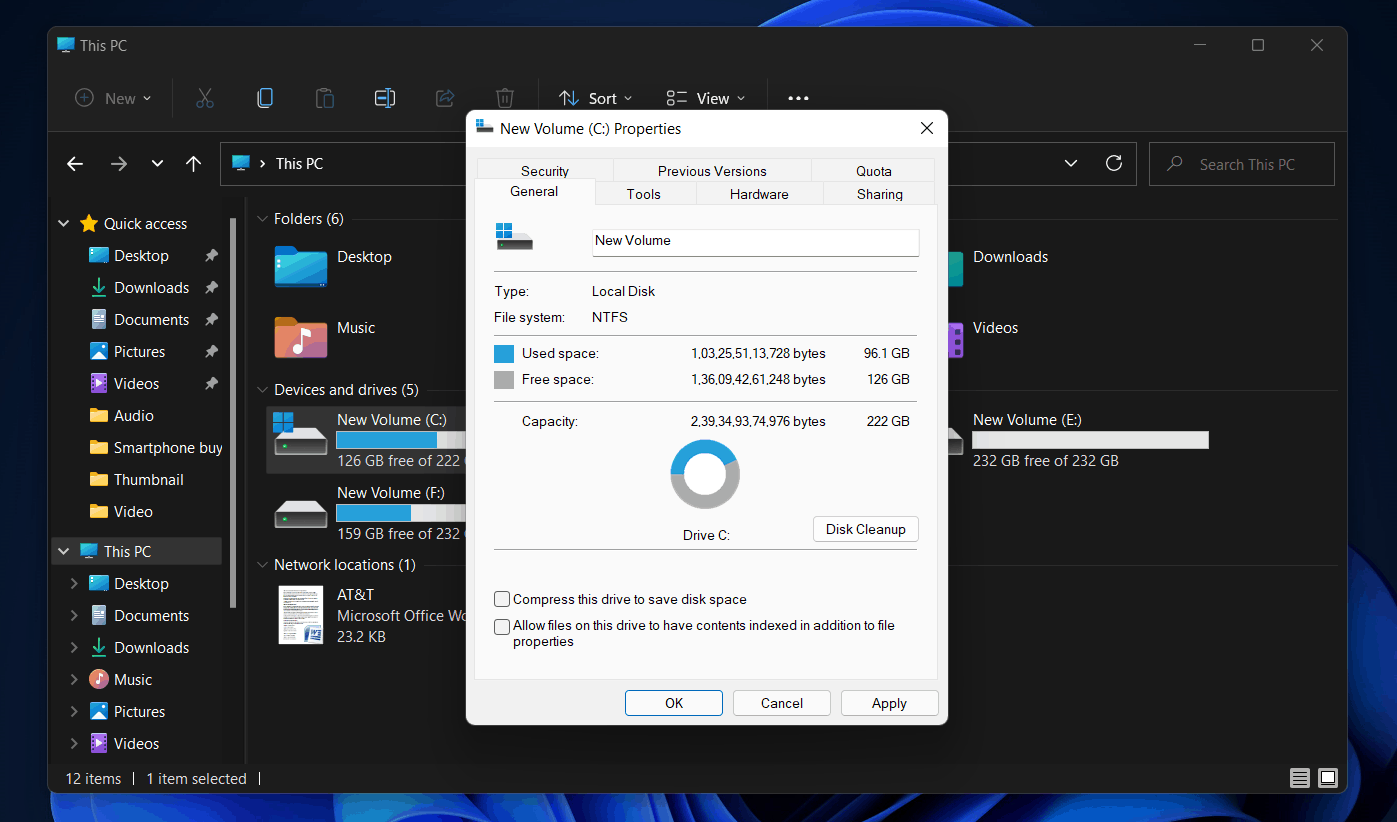
Open File Explorer
-
Right-click the drive
-
Select Properties

-
Under the General tab, uncheck: Allow files on this drive to have contents indexed
-
Apply changes
Windows will ask whether you want to apply changes to all subfolders and files.
This is useful for large storage drives that do not need content indexing.
Rebuild the Index Instead of Disabling It
Many indexing issues come from corruption or stuck entries. Rebuilding is the recommended modern fix.
- Open Settings
- Go to Privacy & security
- Click Searching Windows
- Select Advanced Indexing Options
- In the Indexing Options window, click Advanced
- Under Troubleshooting, click Rebuild
Windows will create a fresh index, which often resolves search slowdowns without disabling anything.
Important Notes for 2026 Windows Builds
Copilot+ PCs and Recall Features
If your PC supports Recall or enhanced Copilot search:
- Disabling indexing may reduce semantic search accuracy
- Some local search features may continue running even if the traditional indexer is disabled
- Indexing interacts with timeline-based search on AI-enhanced devices
SearchApp.exe
Windows Search now uses SearchApp.exe independently of the Windows Search service.
Even if the service is disabled, certain UI components may still load.
SSD-Only Systems
Disabling indexing no longer improves performance on machines with modern NVMe SSDs.
FAQs
Does disabling search indexing improve performance?
Not usually. On Windows 11 24H2 and later, indexing is heavily optimized. Performance improvement is noticeable only if the index is corrupt or the system is under resource pressure.
Will disabling indexing break search?
Yes. You may lose Start menu search, Settings search, quick results, and Outlook indexing. Disable it only when necessary.
How do I re-enable indexing after turning it off?
Enable the Windows Search service again from Services or PowerShell. You can also rebuild the index from the Searching Windows settings page.
Final Words
Search indexing remains an important part of how Windows 11 delivers fast results across the system. While disabling the Windows Search service can still fix certain problems, it should be used only when other troubleshooting steps fail. Using the Settings panel to manage indexing, exclude folders, or rebuild the index is safer and keeps core features working.
This updated guide covers all the correct methods for Windows 11 24H2 and 2026 builds, ensuring your readers avoid outdated steps and understand the real impact of turning indexing on or off.
RELATED GUIDES:


")
