- Windows 11 is a newly launched OS by Microsoft, with some users facing the "Undoing Changes Made to Your Computer" error notice.
- Reasons for the error include Windows Update Service issues and corrupted files, with various solutions available.
- Solutions include force restarting the PC, waiting for an hour, trying startup repair, uninstalling updates, starting the App Readiness Service, and more.
Windows 11 is the newly launched operating system by Microsoft which is the successor to Windows 10. Though previously, there was no assumption of receiving the Win11 update, Microsoft has done it surprisingly. This time there are minor changes in features and performance. But the overall visual changes and the user interface have changed a lot. Well, not everyone will like this new redesigned Windows 11 but everyone will have to upgrade it over a period of time. However, some unfortunate users are facing the Undoing Changes Made to Your Computer error notice while booting Windows 11 after updating for the first time.
Now, if you’re also facing the same issue then don’t worry. Windows 10 is still one of the widely used and most stable operating systems for PC users. But in the search for new features and visual improvements, Windows 10 users are interested in upgrading to Windows 11. In that scenario, a couple of compatibility issues and upgrading issues take place irrespective of the desktop and laptop.
According to some reports, after upgrading from Windows 10 to Windows 11 for the first time, a couple of users are getting the “Undoing changes made to your computer” error notice while applying an update. Some claim that after booting up Windows 11 for the first time, the loading screen got stuck and the specific error message appears infinitely. Even if the affected users try to install Windows 11 on their machine freshly, it just can’t help.
Windows 11 Undoing Changes Made to Rour Computer Error – Reasons
This particular error can happen due to several reasons. For instance, the Windows Update Service stopped working while the Windows 11 update was still installing, Windows registry errors, SoftwareDistribution files were corrupted, some issues with the Windows update process, low system storage space, conflicts with the BIOS compatibility, and so on.
Luckily, there are a couple of workarounds mentioned below that you can check out. If you’re also getting the error codes like 0x800f0922 or 0x800f0988 on your Windows 11 PC after installing, follow this in-depth guide to fix it.
Fix Undoing Changes Made To Your Windows 11 Computer
To be precise, it looks like a BSOD (Blue Screen of Death) issue on your Windows 11 OS which has been quite common for Windows users for ages. So, performing some troubleshooting methods should prevent the problem from appearing repeatedly. However, if the issue persists, we’ll recommend you go back to the Windows 10 OS as of now until the developers have fixed the problem.
1. Force Restart the PC Multiple Times
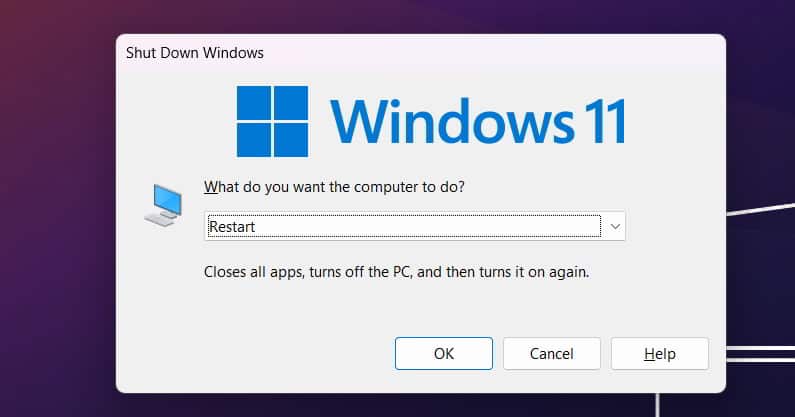
First, you can try force restarting the PC multiple times from the stuck screen issue to cross-check if the machine can run the OS smoothly or not. If your computer is stuck at the ‘Undoing changes made to your computer’ error, then press and hold down the Power key for a few seconds to shut it down and then turn it on several times.
2. Wait for an Hour
As you’re installing or upgrading to Windows 11 for the first time, it’s highly recommended to wait for an hour or so to ensure there is no progress left because the front screen shows an infinite loading screen sometimes. But multiple processes run or features get installed in the background which may take some time. So, wait for some time to complete all progress and check if the Windows 11 system boots up completely or not.
3. Try Startup Repair
If the Windows 11 boot loading screen is still stuck, then make sure to try startup repair by following the steps below. Sometimes it might help in fixing system software installation or upgrading issues.
- Once the screen is stuck, press the Power key once + press the F8 key multiple times.
- It’ll open the Recovery screen. (If fails, try pressing Shift + F8 hotkeys simultaneously or F11 key)
- Once you’re on the Recovery screen, click on Troubleshoot.
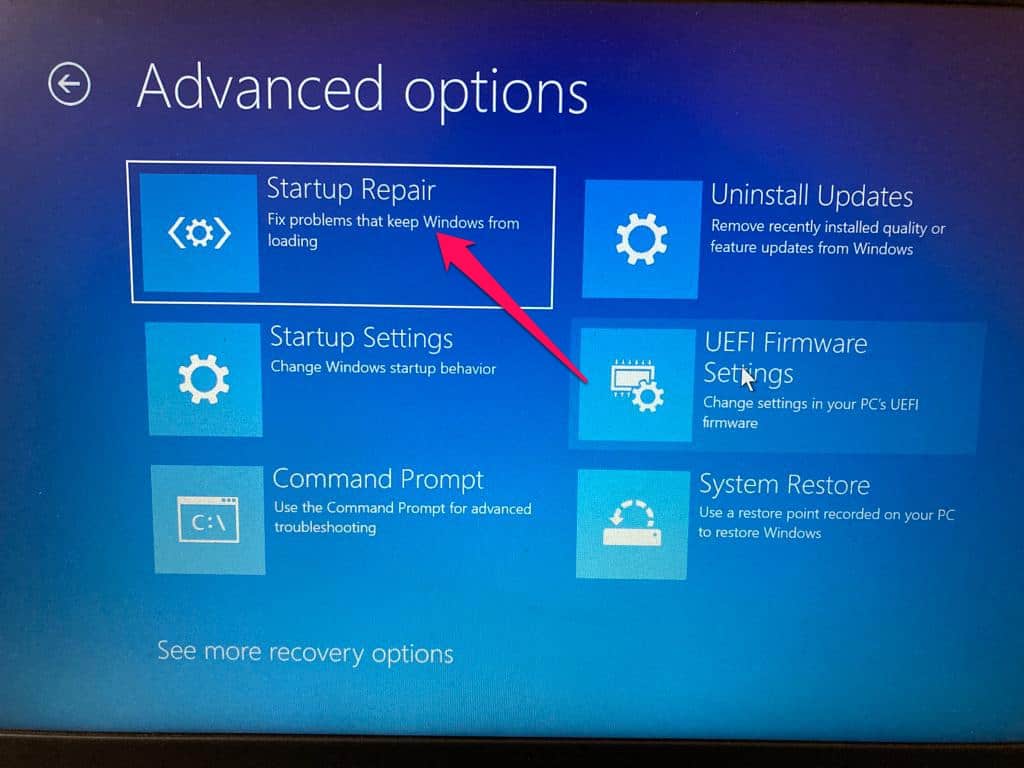
- Now, click on Advanced Options.
- Select Startup Repair and then wait for the system to diagnose the PC.
- It should boot the system smoothly without any further issues.
4. Uninstall Updates from Recovery
If the startup repair method didn’t work for you then make sure to simply uninstall updates from recovery to manually remove recently installed updates. Sometimes a newly installed update can eventually cause multiple issues with the system boot. Check out the following steps below.
- From the stuck screen, press the Power key once + press the F8 key multiple times.
- It’ll open the Recovery screen. (If fails, try pressing Shift + F8 hotkeys simultaneously or F11 key)
- Once you’re on the Recovery screen, click on Troubleshoot.
- Now, click on Advanced Options.
- Then click on Uninstall Updates on the Recovery screen.
- Click on Uninstall latest quality update.
- Click on the Uninstall quality update button.
- Wait for the process to complete, then manually restart the system and see if the ‘Undoing changes made to your computer’ error bothers you.
5. Start the App Readiness Service
If you’re still receiving the ‘Undoing Changes Made to Your Computer’ error with the 0x800f0922 or 0x800f0988 error code sometimes then make sure to manually start the App Readiness Service on Windows by following the steps below.
- Once you’re able to boot into the Windows 11 system, press the Windows + R hotkeys to open the Run menu.
- Type services.msc and hit Enter to open Windows Services.
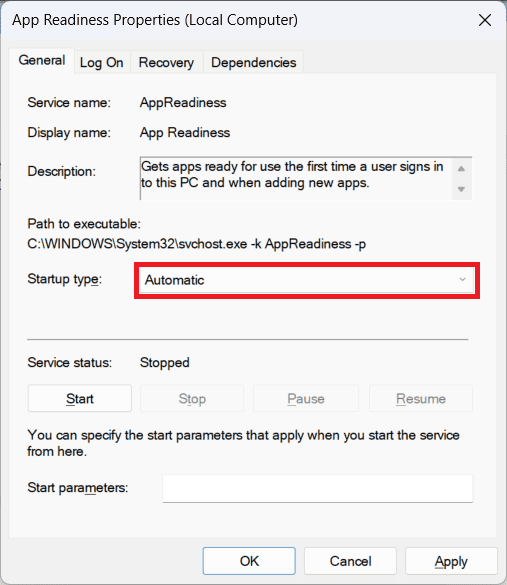
- Now, search for App Readiness from the list, and open it.
- Then change the Startup type to Automatic.
- Make sure to click on Start to run the service manually.
- Once done, click on OK to save changes.
6. Boot the System in Safe Mode
It looks like that manually booting up your Windows 11 system in Safe Mode might actually help in fixing the issue with
- From the stuck screen, press the Power key once + press the F8 key multiple times.
- It’ll open the Recovery screen. (If fails, try pressing Shift + F8 hotkeys simultaneously or F11 key)
- Once you’re on the Recovery screen, click on Troubleshoot.
- Now, click on Advanced Options.
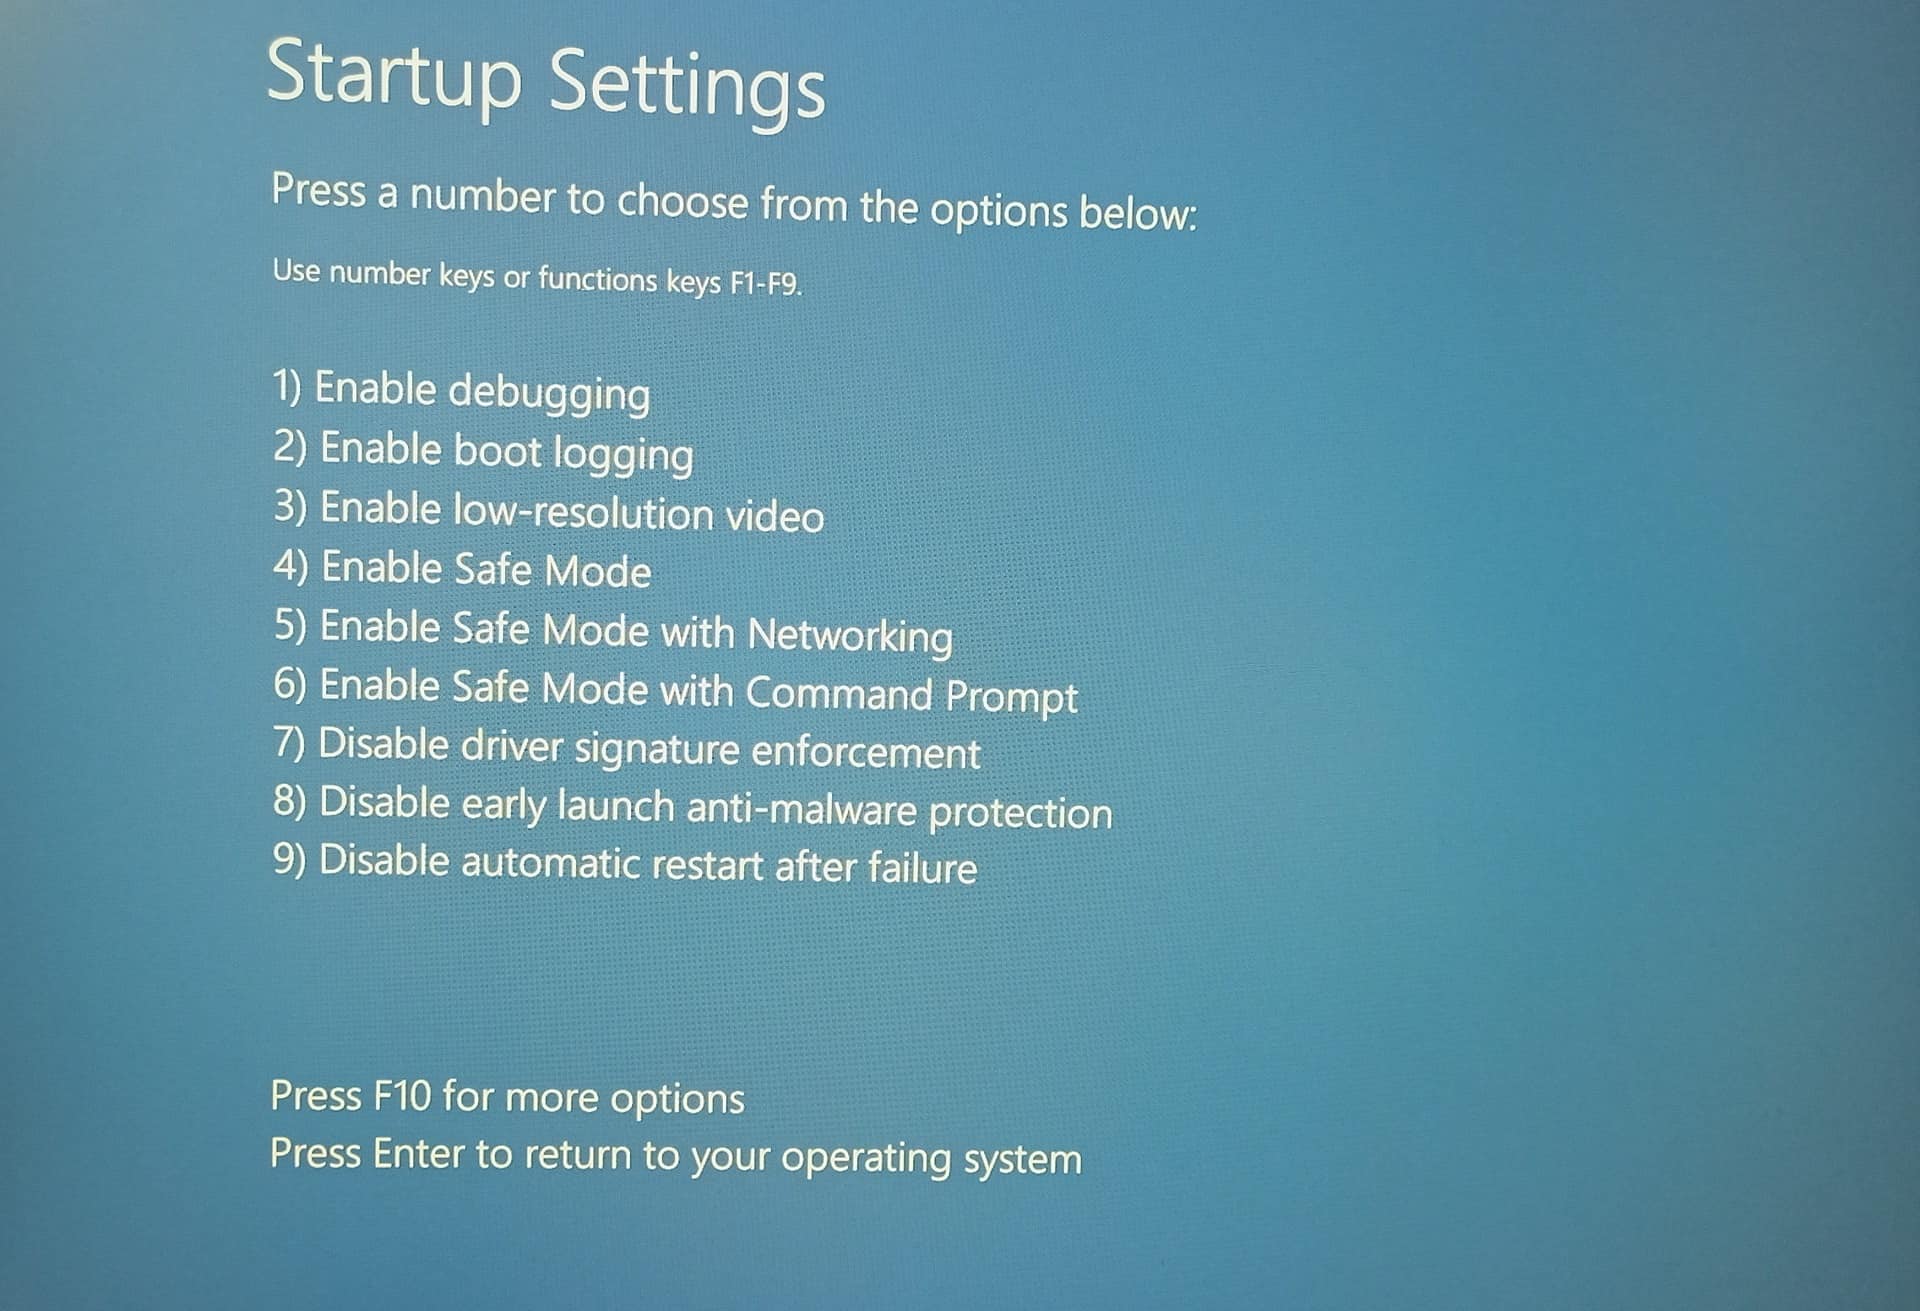
- Select Startup Settings and click on the Restart button.
- Then press the F5 key from the keyboard to Enable Safe Mode with Networking.
- Wait for the system to boot into the Safe Mode with Networking.
- If the Windows 11 system successfully boots up that means there is some issue with other software or system settings that needs to be deleted or correctly configured.
7. Delete the SoftwareDistribution Folder
While updating Windows, the Windows Update agent (WUAgent) basically uses the SoftwareDistribution folder to store installation files on a temporary basis. In case, the folder has become corrupted then deleting the SoftwareDistribution folder and then rebooting the system might fix the issue. To do so:
- Head over to the C:\Windows drive and search for the SoftwareDistribution folder.
- Press the Shift + Delete shortcut keys to permanently remove the folder.
- Once done, make sure to restart the PC.
- Windows 11 will automatically recreate the SoftwareDistribution folder.
However, if you’re unable to delete the folder, then make sure to stop the Windows Update Service and Background Intelligent Transfer Services manually. You can do this by using the Command Prompt method below. Such as:
- Press the Windows key to open the Start menu.
- Type cmd and click on Run as administrator.
- Click on Yes whenever prompted.
- Copy and paste the following command line then hit Enter to stop the Windows Update Service.
net stop wuauserv
- Next, copy & paste the following command line and then hit Enter to stop the BITS.
net stop bits
- Once done, try deleting the SoftwareDistribution folder again.
- Finally, reboot the PC to save the changes.
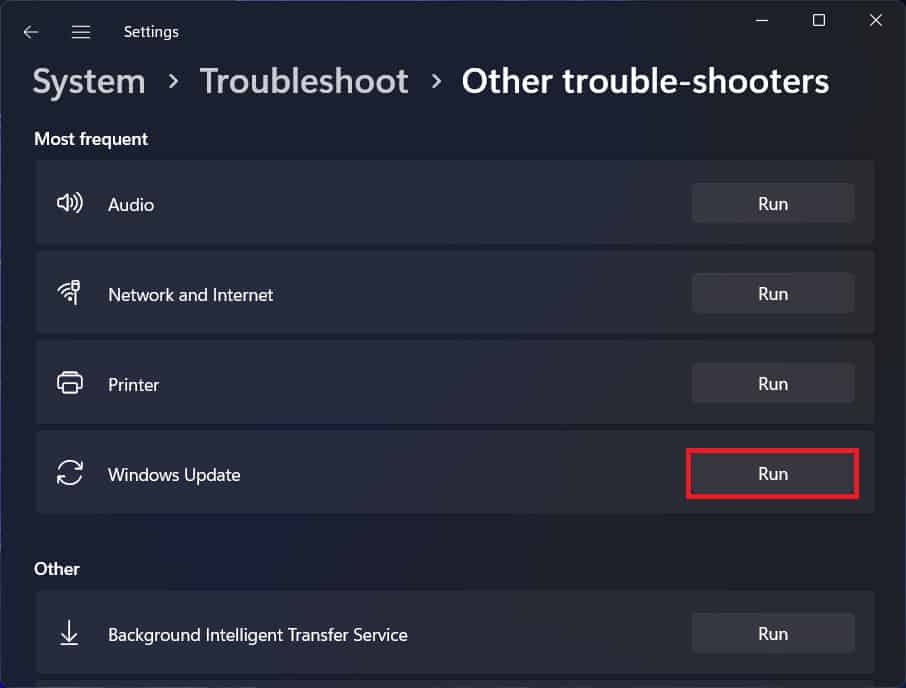
8. Run the Windows Update Troubleshooter
The troubleshooter method can also help you find and resolve multiple unknown issues with the Windows update method on the PC. While updating Windows or security patches, you might not usually receive any warning or error notice. But this method will help a lot.
- Press the Windows + I shortcut keys to open Settings.
- From the System tab, click on Troubleshoot.
- Click on Other troubleshooters.
- Click on the Run button next to the Windows Update.
- Then follow the on-screen prompts and complete the process.
- Once done, restart the PC.
9. Use System Restore
System Restore is one of the useful options on Windows that basically helps the user to go back to a previously created system restore point which was in a good state. So, whenever you face any kind of issue on your Windows system, this method will come in handy. But there is a catch. If you only create a system restore point manually on the PC then you’ll be able to use that restore point in the later part. Otherwise, no system restore point will be found.
- Open the Start menu on the PC by pressing the Windows key.
- Search for Create A Restore Point and press Enter.
- Then click on System Restore.
- Now, select Choose a different restore point from the System Restore menu, and click on Next.
- Click to select the specific system restore point that you created earlier, and then click on Next.
- Click on Finish to restore the system point.
- Once done, your system will reboot automatically to change effects.
10. Run an SFC Scan
SFC, also known as ‘System File Checker’, is one of the utility tools on Windows OS that basically help users to scan the corrupted or missing system files. Users can easily restore files automatically. To do so:
- Open the Start menu by pressing the Windows key.
- Search for cmd and open it as administrator.
- Once Command Prompt opens, type the following command & hit Enter to start the scan:
sfc /scannow
- Now, wait for the process to complete.
- Make sure to restart your computer to apply changes.
11. Use the DISM Method
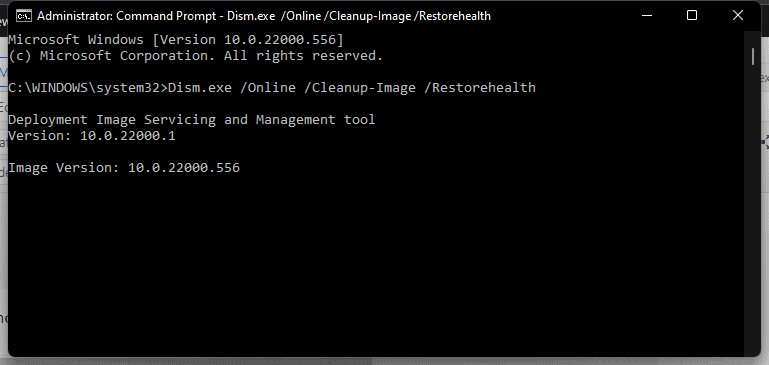
In another way, you can try using the DISM method which is also known as ‘Deployment Image Servicing and Management’. It’s basically a command-line tool that can help in fixing Windows images before deployment. Some users did report that the DISM method helped a lot.
- Open the Start menu by pressing the Windows key.
- Type cmd to search for it and right-click on it.
- Now, select Run as administrator, and click on Yes to confirm the admin permission.
- In the Command Prompt, execute the following commands one-by-one-
DISM /Online /Cleanup-Image /CheckHealth
DISM /Online /Cleanup-Image /ScanHealth
DISM /Online /Cleanup-Image /RestoreHealth
- Next, you’ll need to wait for the process to complete.
- Once done, close Command Prompt, and reboot the PC for the changes to take effect.
10. Reset This PC
We also recommend you factory reset your PC from the Windows Settings menu by following the steps below. Do keep in mind that resetting your PC will remove all the manually installed apps and user-configured settings. Additionally, it’ll also delete the saved networks, Wi-Fi passwords, logged-in accounts, system storage files, etc. But definitely worth doing it because temporary issues get fixed quite easily. To do so:
- Press the Windows + I hotkeys to open the Settings menu.
- From the System section, click on Recovery.
- Now, click on the Reset PC button.
- It will open the Reset this PC popup window.
- Here you will see two options – Keep my files and Remove everything.
- Keep My Files- Selecting this option will apps and settings, keeping your personal files.
- Remove Everything- Selecting this option will remove all your apps, settings, and even personal files.
- Make sure to select the option as per your choice. For the safe side, you should select Keep my files.
- Then follow the on-screen instructions to complete the factory reset on your Windows 11 system.
11. Update to Windows 11 with Installation Assistance
Some of the reports are suggesting that updating to Windows 11 OS with Microsoft Windows 11 Installation Assistant did help a lot in terms of easily installing over Windows 10. If you’re still getting the ‘Undoing changes made to your computer’ error notice stuck on the boot screen then follow the steps below to avoid this error.
- Visit the official Windows 11 Installation Assistant webpage here.
- Make sure to cross-check a couple of things before downloading the tool. For instance, you should run Windows 10, version 2004 or higher. A minimum of 9 GB of free disk space is required. Windows 10 valid license is also required.
- Now, you can click on the Download Now button to get the Windows 11 Installation Assistant tool.
- Run the tool and follow the on-screen instructions to download the latest build of Windows 11 OS.
- Once done, restart your computer, and follow the on-screen prompts again to upgrade to the latest version of Windows 11.
- As the first-time system boot might take a couple of minutes to complete, you’ll need to wait for that.
- While booting for the first time, do not shut down your computer to avoid potential crashes or glitches.
12. Check for Windows 11 Updates
If all the above methods go in vain then make sure to manually check for Windows 11 updates on the computer by following the steps below. You can try downloading and installing all pending updates to check for the issue.
- Press the Windows + I hotkeys to open Windows Settings.
- Click on Windows Update from the bottom left side.
- Now, click on the Check for updates button.
- It’ll check for available updates and starts downloading the same.
- You can also manually Download and Install the available update.
- Wait for the update to complete, and then restart the system.
Bottom Line
This is it for now; your issue should be solved by now. If you are still facing the ‘Undoing Changes Made to Your Computer’ error on your Windows PC then do let us know in the comment section.
READ MORE:
- 5 Ways To Stop Windows 11 From Using So Much Data
- How to Disable Firewall in Windows 11
- How To Change Windows 11 Virtual Memory Size (Working)
- 10 Instant Ways to Increase Internet Speed on Windows 11
- 6 Ways to Fix Headphones Not Working on Windows 11
- 5 Best Ways To Disable Search Indexing in Windows 11
- Fix Google Chrome Is Out of Memory Error on Windows 11
- 4 Ways To Make Transparent Taskbar In Windows 11


