- Excel files can be password protected to prevent unauthorized access
- The process to password protect Excel files varies between different versions of Microsoft Excel
- Users can follow simple steps to create, remove, and check if their Excel files are password protected.
We all have been working with different types of software for making documents, spreadsheets, and presentations. It is not easy to manage and share them to the right person. Sometimes, we share it with the wrong person to whom it should not be shared. There are a lot of cases in which this situation has been raised. All of us have worked on creating Spreadsheets for our work or project purposes.
However, we all have to look for the safety of the Excel File because Microsoft does not give the feature to share it with the right person. We have to share the file with the mail or platform. But we all are worried about whether the Excel File has reached the right person. If you don’t know, you can password-protect the Excel File. This guide will help you with “How to Password Protect Excel File.” So, let’s get started with it.
Can We Open Password Protected Excel File?

A lot of users are there who are confused about whether they will be able to open password-protected Excel Files. For those who don’t know, the users to whom the password-protected Excel Files have been shared can open the file easily. However, the users will need to enter the correct password to open the Excel File. You cannot open the protected Excel file if you don’t have the correct password. Also, the password will be shared by the person who has created the password-protected Excel File. So if you don’t have the password, you will need to contact the owner of the Excel File to open password protected Excel file.
How to Password Protect Excel File
We know that you are here to make the Password Protect Excel File. The procedure to create the password protect Excel file is not much complex. You have to follow some simple steps through which you will be able to make the password-protected Excel file easily. Below we have listed the steps for you, do check them.
For Excel 2010, 2013, and 2016
There are different Microsoft versions that are available to users for creating Excel files. Some of the versions have very simple ways, whereas the other versions have different steps that you have to follow to create a protected Excel file. If you have the Microsoft Excel 2010, 2013, and 2016 versions, then you have to follow the steps which are listed below to password-protect Excel Files.
- First of all, open the Excel File.
- Now, go to the File option.
- Under the Info tab, you have to select the Protect Workbook.
- Select Encrypt with Password.
- Now, you have to type the Password.
- Type the password and press Enter.
- After it, you have to reenter the password.
- Click on the OK Button.
- Try opening the Excel file and check whether the file is asking for a password.
For Older Versions
If you have the older versions of the Excel file, you have to follow the steps which are listed below to password-protect Excel File. The process is going to be different from the newer versions. So if you have the older versions of Microsoft Excel, check the steps below.
- First of all, create the Excel file.
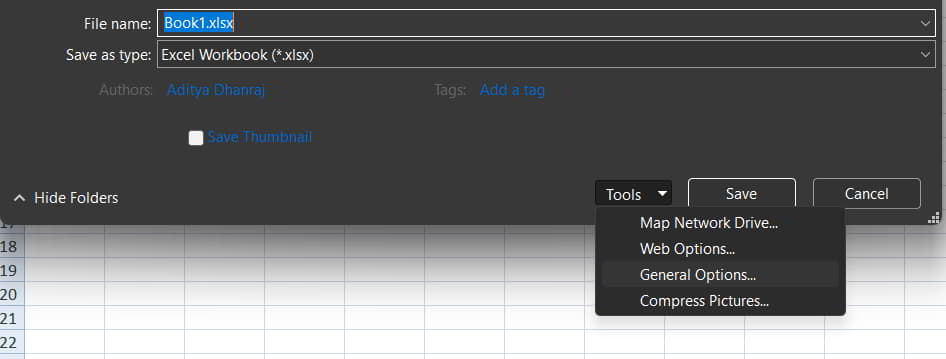
- Now, go to the File option and click on the Save As option.
- After it, select Excel Workbook.
- Click on the Tools option.
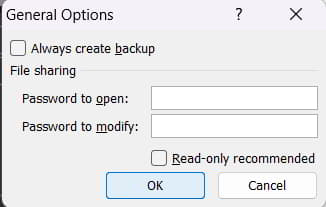
- Select the General option.
- Now, type the password for opening and modifying the Excel File.
- Password To Open: Type the password for opening the Excel File.
- Password To Modify: Type the password to modify the Excel File.
- After it, Click on the OK Button to save the changes. That’s it.
How To Remove Password Protect From Excel File
If you have added the password to the Excel file, then you should also know about the procedure to remove password protection from the Excel file. The steps are very similar to do this. You can check them below.
- Open the Workbook with the password.
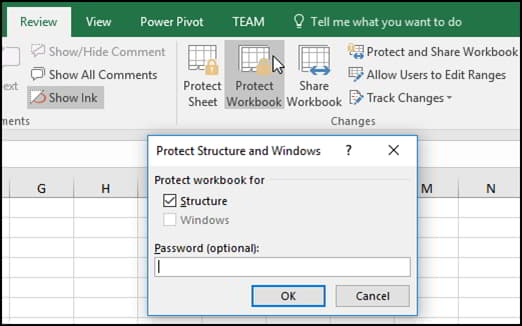
- Now, go to the Review tab.
- Click on Protect Sheet or Protect Workbook.
- After it, click on Unprotect Sheet.
- Now, enter the password and press the OK button.
Why is my password protect not working in Excel?
Many users have reported that the password protect is not working in Excel. There are various reasons available why you might be facing issues. If you are using an outdated Microsoft Excel version or a corrupted file of Excel, then you might be facing the issue because of it. There are also chances that the issue might occur with you due to improper user configuration or the wrong file format. So we will suggest you make sure that you have made the password protect Excel file properly. If you are unsure, try to make it properly again.
How do I know if my Excel is password protected?
There are a lot of users who are confused about whether the Excel file that they have created on their PC is password protected or not. There are various ways available through which you will be able to check this.
- When you open the Excel file and go to the Review tab, you will see the option of Unprotect Sheet, which means the sheet is protected.
- The protected sheet will ask you for the password whenever you open the sheet.
- You will see the grayed-out icon when the sheet is protected, which means that you cannot make any changes to the sheet.
- The menu buttons will not work when you try to implement them.
Wrapping Up
Thousands of users are confused about whether the Excel file they created and added to the protection is working. We have added the reasons in the guide through which you can check whether the Excel file is protected or not. Along with it, we have also added the steps that you can follow to create the password-protected Excel file. The process is very simple to do.
Once you have made the password-protected Excel file, you can also add different customization to it. In this guide, we have added how you can add and remove passwords from the Excel file. We also recommend that you make a password-protected Excel file to ensure that the right person is opening the sheet.
ALSO READ:


