- XAMPP is a free tool that helps you set up a server on your computer, making it a great choice for web development because you can test code safely on your PC without needing the internet.
- To download XAMPP for Windows 11, visit the official Apache Friends website, choose the version matching the PHP version you want, and then download and run the installer as an administrator to avoid issues.
- After installing XAMPP, set up your projects in the "htdocs" folder and manage databases using phpMyAdmin, making sure to choose Apache, MySQL, and PHP during the installation for essential functions.
Web development is one of the most in-demand skills in the world today. Whether you are learning to code PHP, building a WordPress theme from scratch, or managing a complex SQL database, you need a playground—a safe environment to test your code before it goes live on the internet.
You need a local server. And for over 20 years, the king of local servers has been XAMPP.
XAMPP stands for Cross-Platform, Apache, MariaDB (MySQL), PHP, and Perl. It is a completely free, open-source software package that installs everything you need to run a web server on your personal laptop. It turns your Windows 11 or 10 machine into a powerful development environment in minutes.
However, setting up a server environment isn’t always as simple as clicking “Next.” Beginners often face port conflicts, firewall blocks, or confusion about where to put their files.
This comprehensive guide will walk you through exactly how to find the correct xampp download for windows 11, how to install it without errors, and how to write your very first “Hello World” PHP script.
Why Use XAMPP in 2026?
Before we dive into the installation, it is worth understanding why XAMPP is still the industry standard despite the rise of Docker and other modern tools.
- All-in-One Solution: Manually installing Apache, then configuring PHP, and then setting up MySQL is a nightmare of configuration files. XAMPP does it all in one installer.
- Offline Development: You don’t need an internet connection. You can code on a plane, a train, or in a cabin in the woods.
- Speed: Working locally is instant. There is no waiting for files to upload via FTP to a remote server.
- Safety: If you break your code locally, nobody sees it. It is the perfect sandbox for trial and error.
How to Get the Right XAMPP Download for Windows 11
The first step is obtaining the installer. Because XAMPP is open source, there are many mirror sites, but for security reasons, you should only download from the official source.
Step 1: Visit Apache Friends
Open your web browser and navigate to the official website: apachefriends.org. This is the home of the XAMPP project.
Step 2: Choose Your Version
On the homepage, you will see a big button for “XAMPP for Windows.” However, don’t just click the first link you see. You need to match the XAMPP version to the PHP version you intend to use.
When you look for the XAMPP download for Windows 11, you will typically see three options based on the PHP version:
- PHP 8.2.x: The “Old Reliable.” Good for maintaining legacy projects.
- PHP 8.3.x: The current stable standard. Most WordPress sites and modern frameworks run best here.
- PHP 8.4.x (or newer): The cutting edge. Choose this if you want to experiment with the latest PHP features.
Recommendation: If you are a beginner or learning WordPress, choose the middle option (PHP 8.3 or 8.4). It offers the best balance of compatibility and modern features.
Step 3: The Download
Click the Download (64-bit) button.
- Note: There is no separate “Windows 11” version. The Windows version works flawlessly on Windows 10, Windows 11, and Windows Server.
- The file is usually around 150MB – 200MB.
Step-by-Step Guide to Install XAMPP on Windows 11
Once your XAMPP download for Windows 11 is complete, head to your Downloads folder.
1. Run as Administrator
Right-click on the installer file (usually named xampp-windows-x64-8.x.x-installer.exe) and select Run as administrator. This is crucial because XAMPP needs permission to write to the C: drive and configure Windows Services.
2. The “UAC” Warning
You might see a warning pop up immediately:
“Important! Because an activated User Account Control (UAC) on your system, some functions of XAMPP are possibly restricted…”
Don’t Panic. This is a standard warning. It simply means you should avoid installing XAMPP into the C:\Program Files folder because Windows protects that folder too aggressively.
- Simply click OK to proceed.
3. Select Components
The setup wizard will ask what you want to install. You will see a long list including FileZilla FTP Server, Mercury Mail, Tomcat, etc.
- For Beginners: You can uncheck almost everything except:
- Apache (Required)
- MySQL (Required for databases)
- PHP (Required)
- phpMyAdmin (Essential for managing databases)
- Tip: Unchecking Tomcat, Mercury, and Webalizer saves disk space and reduces clutter if you don’t need them.
4. Choose Installation Folder
Crucial Step: The default location is C:\xampp.
Do NOT change this.
Installing XAMPP on the root of the C: drive avoids almost all permission issues. Do not install it in “Documents” or “Program Files.”
- Click Next.
5. Language and Bitnami
- Select “English.”
- Uncheck the box “Learn more about Bitnami for XAMPP” if you don’t want a browser window popping up with advertisements for cloud hosting.
- Click Next.
6. The Install Process
The installer will now unpack files. This takes about 2–5 minutes depending on your SSD speed.
- Firewall Alert: During installation, Windows Defender Firewall might pop up asking if you want to allow “Apache HTTP Server” to communicate.
- Check both boxes (Private and Public networks) and click Allow Access. If you deny this, your browser won’t be able to talk to the server.
7. Finish
Once done, leave the box “Do you want to start the Control Panel now?” checked and click Finish.
Configuring the XAMPP Control Panel
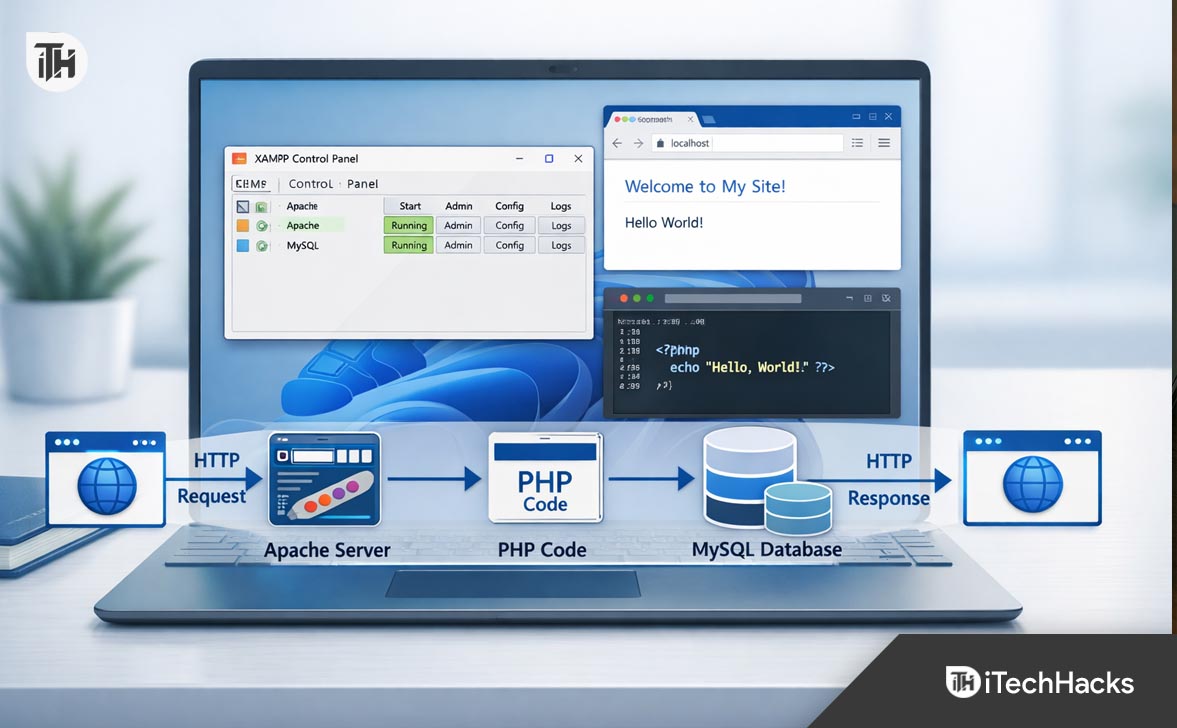
Welcome to the command center. The XAMPP Control Panel is where you start and stop your server.
When it opens, you will see a list of modules (Apache, MySQL, FileZilla, etc.) on the left, and “Start” buttons next to them.
Testing the Server
- Click the Start button next to Apache.
- Wait for the module name to turn Green.
- You should see port numbers appear (usually Port 80 and 443).
- Click the Start button next to MySQL.
- Wait for it to turn Green (usually Port 3306).
If both turn green, congratulations! Your web server is live.
How to Verify It Works
Open your web browser (Chrome, Edge, Firefox).
In the address bar, type: http://localhost
Press Enter.
If you see a “Welcome to XAMPP” dashboard page, the installation was a success. This page is actually a local website running from your hard drive!
Troubleshooting Common Errors
It doesn’t always go smoothly. Here are the two most common issues users face after their XAMPP download for Windows 11.
Error 1: Port 80 is Busy (Apache Won’t Start)
Apache needs “Port 80” to run. However, other programs like Skype, VMware, or the built-in World Wide Web Publishing Service (IIS) often steal this port. If Apache starts effectively but shuts down immediately with a red error text, this is the cause.
The Fix: Change the Apache Port
- In the XAMPP Control Panel, click the Config button next to Apache.
- Select Apache (httpd.conf). A text file will open in Notepad.
- Press
Ctrl + Fand search forListen 80. - Change it to
Listen 8080. - Search for
ServerName localhost:80. - Change it to
ServerName localhost:8080. - Save the file (
Ctrl + S) and close Notepad. - Now click Start on Apache.
- Note: Now you must access your site by typing
http://localhost:8080instead of justlocalhost.
Error 2: MySQL Shutdown Unexpectedly
This usually happens if you had XAMPP installed previously and didn’t uninstall it cleanly, leaving corrupt data files.
The Fix:
- Open the XAMPP folder (
C:\xampp). - Go to the
mysqlfolder >data. - Rename the file
ibdata1toibdata1_old. - Restart MySQL from the Control Panel. Windows will recreate the file fresh.
Your First Project (Where do the files go?)
Now that the server is running, where do you put your HTML or PHP files?
You cannot just leave them on your Desktop. The server only looks in one specific folder: htdocs.
- Navigate to
C:\xampp\htdocs. - You will see a bunch of files there (index.php, dashboard folder, etc.). This is the “Welcome to XAMPP” page you saw earlier.
- Create a New Folder: Name it
testsite. - Open a text editor (Notepad, VS Code, Sublime Text).
- Type the following code:
<?php echo "Hello! This is my first XAMPP project on Windows 11."; ?> - Save this file inside
C:\xampp\htdocs\testsite\and name itindex.php.- Important: Make sure it is not saved as
index.php.txt.
- Important: Make sure it is not saved as
View Your Site
Go to your browser and type: http://localhost/testsite/
You should see your text: “Hello! This is my first XAMPP project on Windows 11.”
You are now officially a web developer running a local server.
Managing Databases with phpMyAdmin
For dynamic sites (like WordPress), files aren’t enough—you need a database. XAMPP makes this easy with phpMyAdmin.
- Ensure MySQL is running in the Control Panel.
- Open your browser and type:
http://localhost/phpmyadmin - You will see a graphical interface to manage your databases.
Creating a Database:
- Click the Databases tab at the top.
- Under “Create database,” type a name (e.g.,
wordpress_db). - Click Create.
That’s it. You now have a SQL database ready to accept connections from your PHP scripts.
Best Practices for XAMPP Users
1. Security Warning
XAMPP is designed for development, not production. By default, it is very open.
- The MySQL administrator user (
root) has no password. - The server pages are accessible to anyone on your local Wi-Fi network. Do not use XAMPP to host a live website on the internet. It is not secure enough out of the box. Use it only for local testing.
2. Run as Administrator
Always open the XAMPP Control Panel as Administrator. This prevents issues when stopping or starting services. You can right-click the shortcut > Properties > Compatibility > Check “Run this program as administrator” to make it permanent.
3. Installing WordPress
If you want to install WordPress:
- Download WordPress from the official site (wordpress.org).
- Extract the ZIP file.
- Copy the
wordpressfolder intoC:\xampp\htdocs. - Create a database named
wordpressin phpMyAdmin. - Go to
http://localhost/wordpressand follow the setup wizard. - When asked for database user, use
rootand leave the password field blank.
Conclusion
Installing a local server environment used to be a rite of passage involving frustration and command-line errors. With XAMPP, it is a streamlined process that opens the door to the world of backend development.
By securing the correct XAMPP download for Windows 11, sticking to the default installation paths, and understanding the role of the htdocs folder, you have transformed your standard PC into a professional web development workstation.
Whether you are building the next Facebook or just tinkering with a personal blog, your journey starts here. Open the Control Panel, hit that Start button, and happy coding!
ALSO READ:


