- Windows cannot be installed to this disk. The selected disk has an MBR partition table occurs because your computer's settings (UEFI mode) are not compatible with the disk's partition format (MBR).
- Solutions like Command Prompt during installation or using third-party tools without data loss.
- Checking your disk's partition style can be done via Disk Management or Command Prompt by looking for MBR or GPT indicators.
Encountering the error message “Windows cannot be installed to this disk. The selected disk has an MBR partition table. On EFI systems, Windows can only be installed to GPT disks” can be a frustrating experience, especially when you’re in the middle of installation or upgrading your Windows operating system. This error generally occurs because of a mismatch between the type of partition table on your disk (MBR) and the firmware mode your computer is set to use (UEFI).
In simpler terms, your computer’s settings and the way your hard drive is formatted are not compatible with each other, preventing Windows from being installed. This issue is common among users who are upgrading to newer versions of Windows, such as Windows 10 or 11, or those who are installing Windows on a new hard drive for the first time.
How do I solve Windows cannot be installed to this disk The selected disk has an MBR partition table on EFI system Windows can only be installed to GPT disks?
Method 1: Convert MBR Disk to GPT Disk Using Command Prompt
This method is particularly useful if you’re already in the middle of the Windows installation process and have encountered the error. It involves converting the MBR disk to GPT using the Command Prompt, which can be accessed directly from the installation setup. This approach is powerful, but it will erase all data on the disk, so make sure to back up any important files before proceeding.
Important Note: This method will erase all data on your disk. It is recommended only if you are performing a fresh installation or if you have already backed up your data and do not need to worry about data loss.
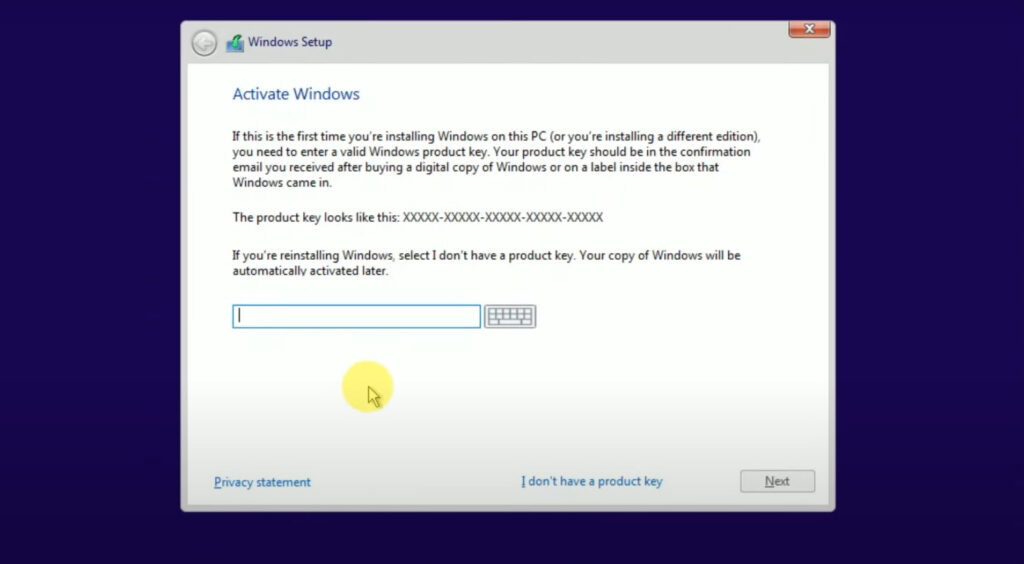
- Start the Installation Process: Boot your computer from the Windows installation media (USB or DVD).
- Proceed Until the Product Key Page: Continue with the installation process until you reach the screen where you’re asked to enter the product key.

- Open Command Prompt: Press Shift + F10 on your keyboard. This key combination will open the Command Prompt window.
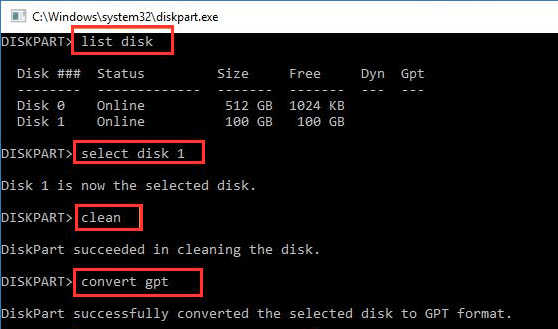
Once you have the Command Prompt open, you can use the diskpart utility to convert the disk from MBR to GPT. Follow these steps carefully:
- Launch Diskpart: In the Command Prompt, type
diskpartand press Enter. This will launch the disk partitioning utility. - List All Disks: Type
list diskand press Enter. This command will display all the disks connected to your system, along with their respective numbers. - Select the Disk to Convert: Identify the disk you want to convert (usually Disk 0 if it’s your primary drive). Type
select disk X(replace X with the disk number) and press Enter. - Clean the Disk: This step will erase all data on the selected disk. Type
cleanand press Enter. Diskpart will confirm that the disk has been cleaned. - Convert to GPT: Now that the disk is clean, you can convert it to GPT by typing
convert gptand pressing Enter. - Exit Diskpart: Once the conversion is complete, type
exitand press Enter to close Diskpart.
With the disk now converted to GPT, you can proceed with the Windows installation:
- Close Command Prompt: Simply type
exitagain in the Command Prompt to close it. - Refresh the Installation Setup: Go back to the Windows installation screen and click on the Refresh button to update the list of available drives.
- Select the Converted Disk: Your disk should now be listed as a GPT disk. Select it and continue with the Windows installation.
This method directly addresses the root of the issue by ensuring that the disk is in the correct format (GPT) for the UEFI mode, allowing the installation to proceed smoothly.
Method 2: Convert MBR to GPT Without Data Loss
If you’re not currently in the middle of an installation and would like to convert an MBR disk to GPT without losing your data, this method is ideal. It leverages tools available within Windows and third-party software to perform the conversion safely.
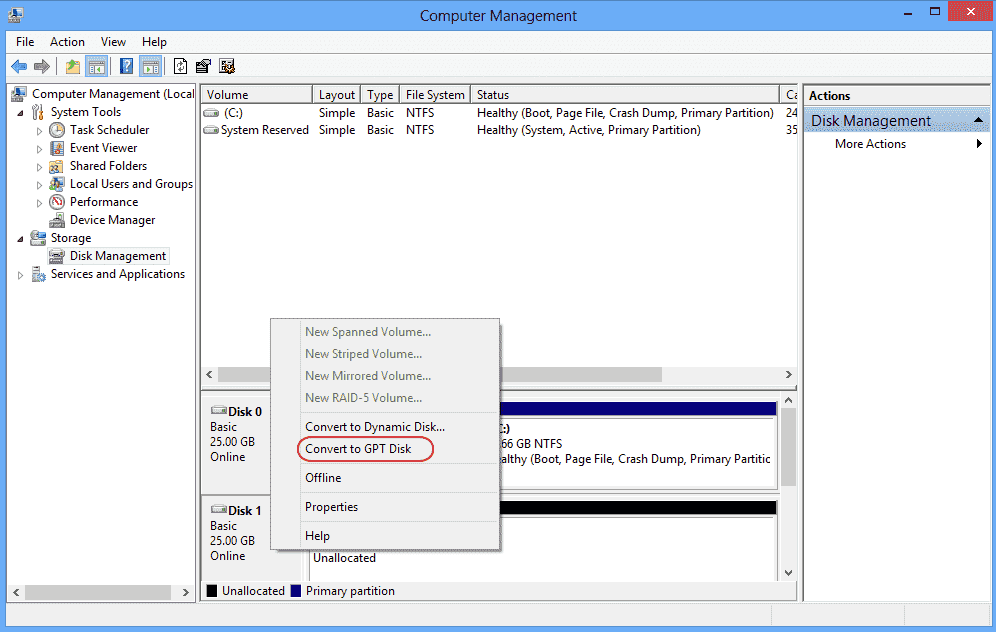
1. Using Disk Management
Windows’ built-in Disk Management tool can convert MBR to GPT, but only if the disk is empty or you’re willing to delete all partitions. Here’s how you can do it:
- Open Disk Management: Press Win + X and select Disk Management from the menu.

- Backup Your Data: If there’s any data on the disk, back it up now, as the conversion will require you to delete all partitions.
- Delete All Partitions: Right-click on each partition on the disk and select Delete Volume. Do this until the entire disk shows as unallocated space.
- Convert to GPT: Once the disk is unallocated, right-click on the disk’s name (e.g., Disk 0) and select Convert to GPT Disk.

- Create New Partitions: After converting, you can create new partitions and format them as needed.

2. Using Third-Party Tools
If you don’t want to lose data and prefer a simpler, user-friendly solution, third-party tools like EaseUS Partition Master can convert MBR to GPT without data loss:
- Download and Install EaseUS Partition Master: Install the software from the official website.
- Launch the Software: Open EaseUS Partition Master and find the disk you want to convert.
- Select the Disk: Right-click on the disk and choose Convert MBR to GPT.
- Apply Changes: Click on Apply in the top-left corner to execute the conversion. The software will handle the process without affecting your data.
Method 3: Change BIOS Settings
Another approach to fixing the installation error is by adjusting your system’s BIOS settings. Specifically, you can switch from UEFI mode to Legacy BIOS mode, which is compatible with MBR disks. This method is useful if you cannot or do not want to convert the disk to GPT.
1. Switch from UEFI to Legacy BIOS
To change your system settings from UEFI to Legacy BIOS mode, follow these steps:
- Restart Your Computer: While your computer is booting up, press the key (usually F2, F10, Del, or Esc) to enter the BIOS/UEFI settings. The specific key varies by manufacturer, so check your motherboard’s manual if unsure.
- Navigate to Boot Settings: Use the arrow keys to find the Boot section in the BIOS menu.
- Change Boot Mode: Look for an option like Boot Mode, UEFI/BIOS Mode, or Legacy Boot. Change it from UEFI to Legacy.
- Save and Exit: Save the changes and exit the BIOS. Your computer will reboot with the new settings.
2. Pros and Cons of Using Legacy Mode
While switching to Legacy BIOS mode can solve the installation issue without converting the disk, it comes with some trade-offs:
- Pros:
- Simpler Setup: No need to convert the disk or worry about data loss.
- Compatibility: Older systems or certain applications may work better in Legacy mode.
- Cons:
- No Support for Modern Features: UEFI offers faster boot times, enhanced security features like Secure Boot, and support for larger drives that Legacy BIOS does not.
- Limited Future Compatibility: As UEFI becomes the standard, future software and hardware may require UEFI mode.
This method is effective but may not be ideal if you plan to use modern hardware or software that requires UEFI.
Method 4: Clean Install with GPT
If you’re starting fresh and don’t mind erasing everything on your disk, performing a clean install with a GPT partition is a straightforward solution.
1. Backup Data
Before proceeding with a clean install, back up all your important files to an external drive or cloud storage. This step is crucial as the process will erase all data on the disk.
2. Use Windows Installation Media
Create or use an existing Windows installation media (USB or DVD) to perform the installation:
- Boot from Installation Media: Insert the installation media and boot your computer from it.
- Select Installation Type: When prompted, choose the Custom: Install Windows only (advanced) option.
3. Format and Convert During Installation
During the installation, you can format the disk and convert it to GPT:
- Delete Existing Partitions: At the installation screen, where you select the disk for installation, delete all existing partitions on the disk. This will make the disk unallocated.
- Convert to GPT: Although the installer may automatically use GPT if the disk is unallocated, you can ensure it by pressing Shift + F10 to open the Command Prompt and using the
diskpartcommands mentioned in Method 1 to manually convert it. - Continue with Installation: Proceed with the installation by selecting the unallocated space. The installer will create the necessary partitions on the GPT disk.
Method 5: Use MBR2GPT Tool (Non-Destructive, No Data Loss)

If your PC is running Windows 10, 11, or 12, you can convert your MBR disk to GPT without deleting any data using Microsoft’s official tool — MBR2GPT.exe.:
-
From within Windows, search for
cmd, right-click Command Prompt, and choose Run as administrator. -
Before converting, check if your disk is eligible: mbr2gpt /validate /allowFullOS
-
If validation is successful, run: mbr2gpt /convert /allowFullOS
-
Reboot and Switch BIOS to UEFI Mode
- Enter BIOS (usually F2, Del, Esc).
- Change Boot Mode from Legacy/CSM to UEFI.
- Save and exit.
How to Check Partition Table Type in Windows PC
Before or after resolving the “Windows cannot be installed to this disk. The selected disk has an MBR partition table” error, you may want to check the partition table type of your disk to confirm whether it’s MBR or GPT. Knowing the partition type is crucial for ensuring compatibility with your system’s firmware settings. Here are two simple methods to check the partition table type.
Using Disk Management
Disk Management is a built-in tool in Windows that provides an easy way to manage your disks and partitions. Here’s how to use it to check the partition table type:
Open Disk Management:
- Press Win + X on your keyboard and select Disk Management from the menu that appears.
- Alternatively, you can press Win + R to open the Run dialog, type
diskmgmt.msc, and press Enter.
Locate the Disk:
- In the Disk Management window, you’ll see a list of all the disks connected to your computer. Each disk will be labeled (e.g., Disk 0, Disk 1).
Check Partition Style:
- Right-click on the disk you want to check (e.g., Disk 0) and select Properties from the context menu.
- In the Properties window, click on the Volumes tab.
- Look for the entry labeled Partition style. It will indicate whether the disk is using the Master Boot Record (MBR) or GUID Partition Table (GPT).
This method is straightforward and doesn’t require any technical expertise, making it ideal for most users.
Using Command Prompt
For those who prefer using the Command Prompt, you can check the partition table type with a few simple commands:
Open Command Prompt:
- Press Win + S and type
cmdin the search bar. Right-click on Command Prompt and select Run as administrator.
Launch Diskpart:
- In the Command Prompt window, type
diskpartand press Enter to launch the Diskpart utility.
List All Disks:
- Type
list diskand press Enter. This command will display all the disks connected to your computer.
Check the Partition Style:
- Look at the columns in the list. If a disk has an asterisk (*) under the GPT column, it means that the disk is using the GPT partition style. If there is no asterisk, the disk is using the MBR partition style.
Using Command Prompt is a quick and efficient way to check the partition style, especially if you’re comfortable with command-line tools.
Conclusion
Getting the “Windows cannot be installed to this disk. The selected disk has an MBR partition table” error can be a significant roadblock, but it’s one that can be resolved with the right approach. Understanding the underlying issue arising from a mismatch between your disk’s partition style and your system’s firmware settings allows you to choose the most appropriate method to fix the problem.
ALSO READ:


