- Carl Bot helps manage Discord channels and server members efficiently, acting as a digital handyman for menial tasks.
- Create roles on Discord server by accessing Server Settings, navigating to Roles tab, creating a new role with color and image, and saving changes.
- Add Carl Bot to Discord server by logging into Carl Bot website, selecting the server, authorizing the bot, and arranging roles in Server Settings area.
Multiple channels and uncountable members are supported on a single Discord server. As the public membership is free, it helps brands grow their audience. But sometimes, managing the amount of audience on a single server gets tricky. In cases like this, people struggle to monitor several channels and their member’s activities. Keep reading to know how to fix it using Carl Bot for roles on Discord.
This is where the Carl Bot comes into place. It makes controlling your channel’s activities and monitoring members easier. You can understand Carl Bot as a digital handyman who manages menial tasks for you once added to a discord server.
What is Carl Bot Reaction Roles?
Every user who joins a Discord server is assigned the everyone role by default. It makes it easy to target a specific group of users while communicating. For example, if we create a social media server about Facebook and Instagram. Here we can create two roles – Facebook and Instagram. Now every user on the server can choose the role they prefer.
Using a Carl Bot for Roles on Discord
You need to follow three steps to create carl bot reaction roles on a Discord server. Follow these steps one by one to get your work done:
Create Roles on Your Discord Server
Here is how you can create roles on your Discord server:
- Open Discord and then your Server.
- Click on the Server name at the top right corner and click on Server Settings.
- Navigate to the Roles tab in the left pane.
- Now click on Create Role.
- Type a name for the Role. You can also assign a color and image to make it easy to identify.
- Once done, click on Save Changes.
- You have now successfully created a role on your discord server. Follow the steps above to create all the required roles you want.
Adding Carl Bot to your Discord Server
Follow these steps to add Carl Bot to your Discord server:
- Open the Carl Bot website and log in with your Discord account.
- Select the Server you want to add the Carl Bot to.
- Now click on Continue on the next page to add Carl Bot to the server. Then select Authorize to allow the bot to manage your server.
- Once done, the Carl Bot will be installed on that server.
- Now open Discord, and navigate to your Server > Server Settings.
- Drag both the role entry above other roles to control them. Then click on Save Changes.
- You have now successfully added Carl Bot to your Discord server.
Setting Up Reaction Roles on Carl Bot
Follow the steps mentioned below to get your work done:
- Open the Carl Bot Dashboard and click on the Reaction Roles option in the left pane.
- Now click on Create New Reaction Role option.
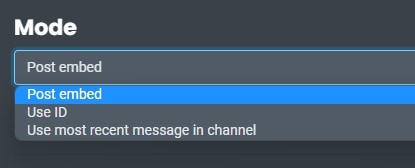
- A pop-up window will appear now. Here you will get three modes to choose from:
- Post Embed: This mode allows you to write a message on Carl Bot and embed it on your Discord channel.
- Use ID: This mode will convert an existing message into a reaction role message. You will now have to paste the message ID to specify the exact message.
- Use most recent message in channel: By selecting this mode, you will be selecting a specific channel on your server. It will convert the last seen message into a reaction role message.
- We will be using the Post Embed option.
- Now select the Channel on which you want the message to appear.
- Then scroll down and select the Add Emoji option to select an emoji representing the role.
- Now select the Role users will be assigned once they click on the emoji. Multiple roles can also be added; this will assign use as multiple roles by clicking on the emoji. Add emojis and roles as per your requirement.
- Navigate to the Content section and create a message to be displayed. It will let users know what role they will be assigned by clicking on the emoji.
- Once done, click on the Create button.
- And that’s it. You have now successfully created and set up reaction rolls on cardboard. You can now use Carl Bot for roles on Discord.
Wrapping Up
This was how to use carl bot reaction roles on Discord. We hope the steps mentioned above were able to help you. Still, if you have any issues, feel free to drop a comment below.
RELATED GUIDES:


