- Sonoma macOS update is causing battery drain for some MacBook users, impacting performance and battery life.
- Common causes of battery draining fast include bugs in the update, outdated apps, background processes, and poor battery health.
- Strategies to fix the issue include checking battery health, updating apps, checking for macOS updates, managing background processes, and more.
MacBooks are known for beast-like performance and good battery life, but what’s the point of getting a Mac if the battery starts draining fast after the macOS 14 update? This update has been troubling most MacBook users, as they are not getting the battery life they were getting earlier.
Battery drain issues after the Sonoma update affect the battery life and your Mac’s performance. Amidst the battery life issues, some users reported that their battery life improved and they are getting better performance on their Mac after the Sonoma Update.
This update is not affecting every Mac under the Sun, but those affected face major issues. If your Mac has a messed up battery life after the Sonoma update, this article will guide you on what you can do next. In this article, we will be discussing how you can fix macOS Sonoma Battery Life Draining Fast.

Why is the MacBook Battery Draining So Fast After the macOS Sonoma Update?
If your macOS Sonoma is making the battery drain faster, then it can be due to the following reasons-
- The newer macOS Sonoma version can have some bugs that may cause the battery of your Mac to drain faster.
- The issue can be encountered if the apps installed on your Mac are outdated and incompatible with the latest released software update.
- Excessive battery drain can also be a result of multiple background processes. These background processes require CPU and memory resources, thus draining your battery life faster.
- Another common reason behind the issue is poor battery health. If your Mac is old and its battery life is below average, then that can cause your Mac’s battery to drain faster.
These were some of the known and common reasons behind macOS Sonoma battery draining faster, but sometimes the issue can be encountered due to increased screen brightness, startup items running in the background, Bluetooth and Wi-Fi, unwanted accessories, etc.
Fix macOS Sonoma Battery Draining Issues 2024
Now the question is, how do I fix macOS Sonoma Battery Draining Fast or improve the battery life of my Mac after the update? The steps given below should help you resolve this issue and get better battery life on your Mac like you used to before the update-
1. Check the Battery Health
The first thing that you must do is check the battery health of your Mac. Below are the steps to do so:
- Open the Apple Menu and then click on System Settings.

- Inside System Settings, head to Battery on the left pane.

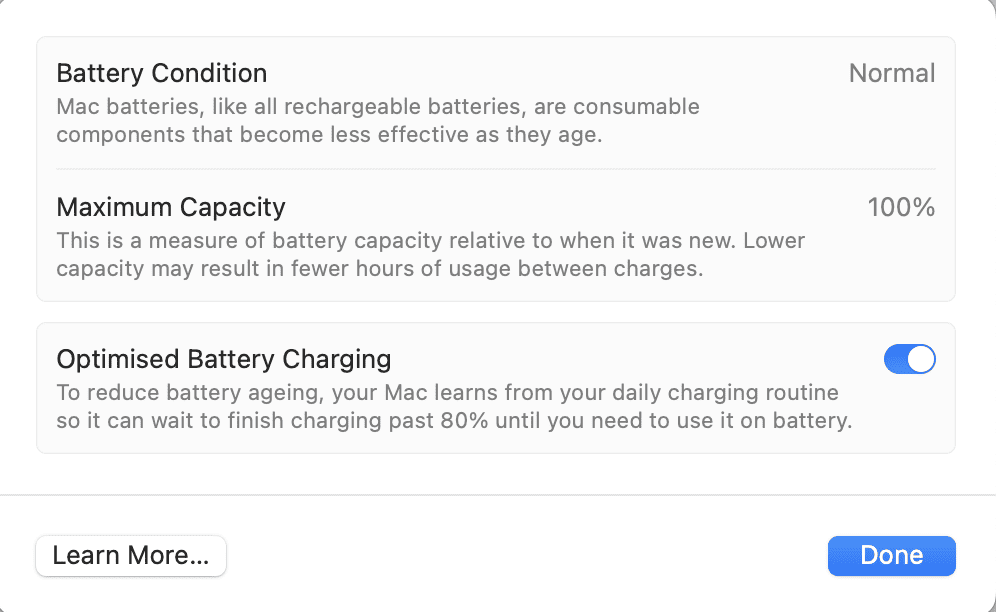
- On the right side, look for Battery Health. It should show either of the two states-
- Normal- This indicates the battery life on the Mac is normal and in good condition.
- Service Recommended- This indicates the battery life is below the normal condition or the average health.


If the battery health is normal, you need not get your Mac serviced. But if you are facing battery drain issues, you can continue with the next step in this article.
However, if the battery health is shown as Service Recommended, your battery is not in good condition, and you need to replace it. If you see Service Recommended, you will have to get your Mac’s battery replaced, and there’s no point following the other steps until you get your battery replaced.
Get your Mac to the service center and replace your Mac’s battery, and this should fix the issue. Replacing the battery will fix battery draining issues if poor battery health causes it in the first place.
2. Restart Mac

If you have checked the battery life of your Mac through the above steps but are facing this issue, then you must try restarting your Mac. Save all the work and close all the apps on your Mac. After this, restart your Mac and see if the issue is fixed.
3. Update Apps
As discussed in the reasons above, you may face macOS Sonoma battery drain issues if the apps on your Mac are outdated. Check the apps for available updates and install them. You can update the apps from the App Store by following the steps given below-
- Open the Apple Menu and then click on App Store.

- Head to the Updates section on the left pane.

- You will see the available updates on the right side.
- Install all the updates and then restart your Mac.
Note- If you didn’t download the apps from the App Store, then you won’t be able to update them from the App Store. You will have to download their latest installer to update all the apps downloaded from outside the App Store.
4. Check for macOS Updates
The current Mac version installed on your phone may have some bugs or might not be properly installed. This can make the macOS Sonoma battery drain fast. Check for the available updates, and if there are, then install them.
- Open the Launchpad from the dock.
- Now, search for the System Settings and open it.

- After this, click on the General on the left pane and then on Software Update.

- Your Mac will start checking for the available updates.

- If the Mac shows any available updates, install them.
5. Check the Processes
The issue can be caused due to the processes running in the background. Use the Activity Monitor to check the background activity and close the CPU and memory-intensive processes. Here’s how you can do it-
- Click on the Launchpad icon on your dock and then open Activity Monitor.

- Head to the CPU tab.

- Look for the process consuming most of the CPU; select it, and click the x button.

- Similarly, close all the unwanted CPU-intensive processes.
6. Disable Startup Items
The battery on macOS Sonoma may drain faster if you have multiple startup apps. These apps start when you boot your Mac and may drain your battery faster. You can try disabling the startup items by following the steps given below-
- Open the System Settings on your Mac.
- Click on the General on the left pane, and then click on Login Items.

- Under the Open at Login section, you will see all the startup apps.
- Select any app, then click the – icon to remove it.

- You will have to disable all the setup items similarly.
7. Ensure Spotlight is Not Indexing
When you boot your Mac the first time after the software update, the Spotlight Search will get reindexed. This may take some time initially, and while this happens, you may see your battery draining faster than usual. You can check whether your Spotlight is indexing by searching for something in the Spotlight.
Hit up the Spotlight Search by pressing Command + Spacebar. Now, try searching for a file or an app and see if it takes time. If the Spotlight Search takes some time to search for the file or the app, then that means Spotlight is reindexing.
This might take some time, so you may face battery drain issues while this happens, but it should be solved with the next boot. However, if the search results appear instantly, something else is causing the issue. You can move to the next step in this article to solve it.
8. Reduce Screen Brightness
High Screen brightness can also cause this issue on your Mac after the Sonoma update. You should turn down the screen brightness and check whether the issue is resolved.
You can use the F1 key on your keyboard to turn down the brightness and the F2 key to increase the brightness. Check if you still encounter the issue after reducing the brightness or not.
9. Disconnect Accessories
Have accessories like a USB drive, monitor, keyboard, etc., connected to your Mac? If you have some external peripherals connected to your Mac that you are not using currently, you can disconnect them.
External accessories that you connect to your Mac take up power from your Mac and make the battery drain fast. If these accessories are not used, you can disconnect and reconnect them whenever required.
10. Run Apple Diagnostics
If you have tried everything mentioned in the article above, you must run Apple Diagnostics to test your Mac and know what’s causing the issue. Here’s how you can do it-
- Disconnect all the accessories from the Mac and disconnect it from the power source. Before continuing, you must ensure your Mac is fully charged.
- Now, click on the Apple icon at the top and then on Shut Down to turn off your Mac.
- Now, the steps vary for Mac with Apple Silicon and Intel-based processors.
- For Mac with Apple Silicon-
- Press and hold the Power button. If your Mac has Touch ID, you must press and hold it.
- You will now see the Startup Options. As soon as you see it, release the Power button.
- Now, press and hold the Command + D keys together.
- For Mac with Intel processors-
- Press the Power button to turn on your Mac.
- Press and hold down the D key on your keyboard as soon as you press the Power button.
- You will see a progress bar on your screen. When you see it, you can release the D key.
Note- If holding the D key doesn’t work, press and hold the Options + D keys together.
- You will be asked to select the language to continue.
- Once done, you can follow the on-screen instructions to test your Mac.
If it reports some issue on your Mac, you will have to get it serviced/repaired.
Bottom Line
We suggest taking your Mac to the nearest Apple service center if the above steps don’t solve the issue or if Apple Diagnostics reports some issues. If there are hardware issues (like issues with the battery), the service center will fix them. If the issue is with the macOS Sonoma update itself, they will downgrade the macOS to a compatible version.
That’s it with this guide; the above steps should help you solve the macOS Sonoma battery draining fast issue. If you find this article helpful, or if some other method helped you solve this issue and is not mentioned in the above steps, then tell us in the comments section below.
READ MORE:


")


")