- RSAT is a tool for remote management of Windows server roles and features on a Windows PC, not installed by default on Windows 11.
- Two methods to install RSAT on Windows 11 are through the Settings app or Windows PowerShell.
- In Settings, go to Apps, then Optional features to add RSAT components, while in PowerShell, use commands to install all or individual RSAT tools.
RSAT or Remote Server Administration Tool is used in Windows for remote management of roles and features on a Windows server through a Windows PC. This tool is not installed by Microsoft on Windows 11 by default, and if you want to use it, then you will have to manually install it. Installing RSAT on Windows 11 is not much of a very difficult task. There are two ways through which you can install RSAT on Windows 11.
If you have been searching for a way to install RSAT on Windows 11, then you are at the right place. In this guide, we have mentioned the step-by-step process to help you install RAST on Windows 11. We will be discussing both the methods using which you can install RSAT on Windows 11, so you can follow any of the methods mentioned in this article to install RSAT on Windows 11.
Installing RSAT On Your PC
There are two ways to install RSAT on your PC. You can install RSAT using the Settings app or from Windows PowerShell. We have discussed both the methods to install Remote Server Administration Tool on Windows 11 below-
Install RSAT On Windows 11 From Settings
The very first way to install RSAT on Windows 11 is from the Settings app. The settings app is the go-to option for all the tweaks and changes that you have to do on your PC. We have discussed the complete process to install RSAT on Windows 11 from the Settings app-
- Open the Start Menu by pressing the Windows key. Now in the Start Menu, search for Settings and open it. You can either press the Windows + I key combo, which is the keyboard shortcut to open the Settings app on Windows PC.
- By default, you will be headed to the System tab in the Settings. Click on the Apps tab on the left sidebar of the Settings app.

- Now on the right side in the Apps section/tab, click on Optional features. After doing so, click on the View Features button that you see right next to the Add an optional feature option.

- Here in the search box, search for RSAT. Now check all the boxes saying RSAT.
 After doing so, click on Next. You will be able to see all the features you are adding to your PC.


- If you want to edit the features already available or want to edit the optional features, then click on Edit or add more optional features. If you don’t want to edit the features or add more features, then click on Install to install the RSAT on your PC.
- On the Optional Features page, you will be able to see all the optional features that are being installed on your PC.
- Doing so will install the RSAT on Windows 11.
Install RSAT On Windows 11 From Windows PowerShell
Another way to install RSAT on Windows 11 is using Windows PowerShell. When using PowerShell, you will have the option to install all the RSAT tools individually as well as all in one go. To install RSAT on Windows 11 from Windows PowerShell, follow the steps given below-
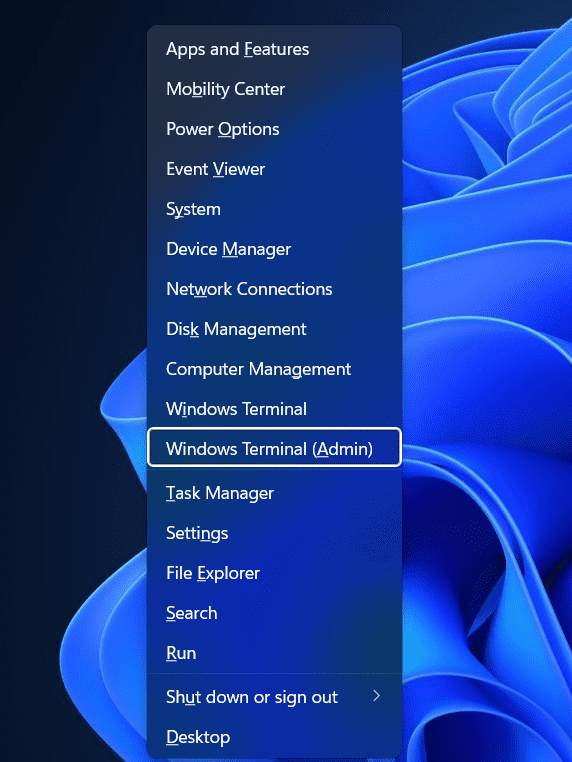
- Firstly, press the Windows + X key combo. Now in the menu that opens up, click on Windows Terminal (Admin). This will run the Windows PowerShell with administrative privileges.
- In the Windows PowerShell, type the following command and execute it-
- Get-WindowsCapability -Name RSAT* -Online | Select-Object -Property DisplayName, State

- The above command will display a list of all the RSAT components that are installed, and also the components that are not installed. This will make it easier for you to find out which RSAT components are there on your PC and which you need to install.
- If you want to install all the components at once, then type the following command and execute it-
- Get-WindowsCapability –Name RSAT* -Online | Add-Windows Capability –Online
- In case, if you want to install all the components one by one, then type the following command in the Windows PowerShell-
- Add-WindowsCapability –Online –Name tool-name
- In the above command, replace the tool-name with the name of the component that you want to install.
Running RSAT On Windows 11
After you have installed RSAT on your Windows 11 PC, you can easily run it. To run RSAT tools in Windows 11, follow the steps given below-
- Open Start Menu by pressing the Windows key on your keyboard.
- In the Start Menu, search for Windows Tools and open it.
- Here you will find all the RSAT components. You can open any of the RSAT components by double-clicking on it.
RELATED GUIDES:
- How To Enable Developer Mode In Windows 11
- Fix Generic PnP Monitor Driver Problem On Windows 11
- How To Stop Windows 11 From Using So Much Data
- Fix: Windows 11 Memory Integrity Is Keeps Turning Off
- How To Fix Windows 11 Blue Screen of Death Errors
Final Words
Installing RSAT on Windows 11 is easy, and you can easily do it by following the steps above. We have discussed both the methods to install RSAT on your Windows 11 PC. You can follow any of the steps in the above article and you will be able to install Remote Server Administration Tool on Windows 11.


Useless. Not really “downloading”