- Download GApps package, set up WSL 2, and download 7-Zip and WSAGA script before installing Google Play Store on Windows 11
- Download WSA package, manage WSA files using 7-Zip, and patch the WSA package on Windows 11 to include Google Apps
- Install Google Play Store on Windows Subsystem for Android by enabling Developer Mode, connecting ADB, and granting superuser rights in the shell mode
During the launch event of Windows 11, Microsoft said that users would be able to download and run Android apps on their PC. However, you can now install Google PlayStore on Windows Subsystem on Android, with which you can easily download and install Android apps on your Windows 11 PC. This makes it possible for Windows 11 to install apps from Google Play Store and also utilize all the Google apps. If you want to download and run Google Play Store on Windows 11, this article will help you. Here is the complete step-by-step process to run Google Play Store on Windows 11.
Prerequisites To Know Before Installing Google Play Store
There are certain things that you need to know before you get started with the process. Ensure you download the following files and take care of the things below before downloading and installing Google Play Store on Windows 11.
- Download the GApps package on your PC. You can download the package from here.Ensure you download the GApps version that matches ‘x86_64’, and preferably ‘Android 13’ or ‘12.1’, with the ‘Pico’ variant.
- Ensure you have downloaded and set up WSL 2/Windows Subsystem for Linux on your PC. You can download it from here.
- Download and install 7-Zip on your Windows PC. You can download 7-Zip from this link. If you use any other Zip converter, then you can use that instead of 7-Zip.
- Also, download the WSAGA script. You can download the link from GitHub from this link. Here, click on Code and then click on Download ZIP.
Install Google PlayStore On Windows 11
You can easily run the Google PlayStore on Windows 11 by following the steps given in this article. We have divided the complete process into five steps to make it easier for you to follow. To run Google Play Store on Windows 11, follow the steps given below-
Download WSA (Windows Subsystem for Android) Package On Your PC
Firstly, you will have to download the WSAP package on your PC. You can easily download the package from the Microsoft serves. Given below are the steps to download the WSA package on your PC-
- Head to this website from where you can download the official WSA package.
- On the screen that appears, select the drop-down box saying URL (link), and from the list of options that appears, select ProductID.
- In the given field, enter the following Product ID 9P3395VX91NR.

- Now select the drop-down menu saying RP. You will find this drop-down menu next to the field where you entered the product ID.
- Now, click on the Tick button to get ahead.
- The next screen that opens up will give you a list of various files to download. Here, search for msixbundle file that will be of the size of around 1.21GB.

- Right-click on the appropriate file, and then from the context menu, select Save Link As, and you will be able to download the file on your PC.
You can optionally download the latest WSA build supporting Android 13 directly from the official Microsoft GitHub repo.
Managing The WSA Files
Now that you have downloaded the WSA files on your PC, you will also have to manage them. To manage the WSA (Windows Subsystem for Android) files, follow the steps given below-
- Head to the location where you saved the WSA file and then open it with the 7-Zip software or any other alternative.

- Here you will see two files; the first file will have ARM64 in the name while the other will have x64. Select the file with the x64 in the name and open it.
- Now open the File Explorer on your PC by pressing the Windows + E key combo. Head to the C: drive in the File Explorer and create a folder with the name WindowsSubsystemAndroid.

- After you have created the folder, head back to the 7-Zip (or any alternative) window where you have opened the file with x64 in the name.
- Here, select all the files except with the names AppxMetadata, AppxBlockMap.xml, AppxSignature.p7x, and [Content_Types.xml]. You can select all the files by pressing Ctrl + A key combo. To deselect these particular files, press and hold the Ctrl key and click on these files individually.

- Copy the files you have selected, and then paste all the files to the WindowsSubsytemAndroid folder you have created in the C: drive.

- Now create a new folder with the name GAppsWSA in the C: drive.

- Head to the location where you saved the WSAGA script and extract the script to the GAppsWSA folder you created.

- Now, locate the GApps (Pico) ZIP file that we downloaded, and then copy it. Now head to the #GAPPS folder inside the GAppsWSA folder, and paste the file here. You don’t need to extract the file.

- Head to the WindowsSubsystemAndroid folder in the C: drive. Here, copy the files with the name vendor.img, system.img, system_ext1.img, and product.img.

- Now, head to the #IMAGES folder that you will find in the GAppsWSA folder in the C: drive, and paste these files here.

Patching The WSA Package
Now the next thing that you will have to do is patch the WSA package on Windows 11. You will have to do this to include Google Apps on Windows 11. To do so, follow the steps given below-
- Firstly, open the Linux on Windows Terminal.
- Here type sudo su and then hit Enter to continue. You will be asked to enter your PC password to have the root privileges to the Linux Enter your password and hit Enter to continue.
- After doing so, enter the following commands and execute them. If asked to confirm, you will have to press Y to allow the installation.
- apt install zip unzip
- apt install dos2unix
- Next, you will have to run the following commands. Run the command one by one to move to the GAppsWSA folder that you have created in the C: drive. Paste the command as it is, and do note that there is space between cd and dots.
- cd ..
- cd ..
- cd GAppsWSA/
- After you are in the GAppsWSA, execute the following commands in the terminal. Execute the following commands one by one-
- dos2unix apply.sh
- dos2unix extend_and_mount_images.sh
- dos2unix extract_gapps_pico.sh
- dos2unix unmount_images.sh
- dos2unix VARIABLES.sh
- Next, execute the set of following commands one by one-
- ./extract_gapps_pico.sh
- ./extend_and_mount_images.sh
- ./apply.sh
- ./unmount_images.sh
- After doing so, open the GAppsWSA folder in the C: drive and open the #IMAGES folder. Now copy all the files with .IMG extension. You will find four files here; copy all of them.

- Now, head to the WindowsSubsystemAndroid folder in the C: drive, and paste all the four files here. You will be asked whether you want to replace the file, skip copying, or whether you have varying choices for each file. Select Replace the file in the destination.

- Now, head back to the GAppsWSA folder, and here open the misc folder. Copy the kernel file here.

- After doing so, move back to the WindowsSubsystemAndroid folder, and here open the Tools folder.

- You will see a file name kernel already present here. Rename the already preset kernel file to kernel_bak and then paste the kernel file you copied here.
Install Google Play Store On Windows Subsystem For Android
This part of the guide will help you install Google Play Store on your Windows 11 PC. This part is as essential as other parts of the article, so do not skip either this part or any other part. To install the Google Play Store on your PC, follow the steps given below-
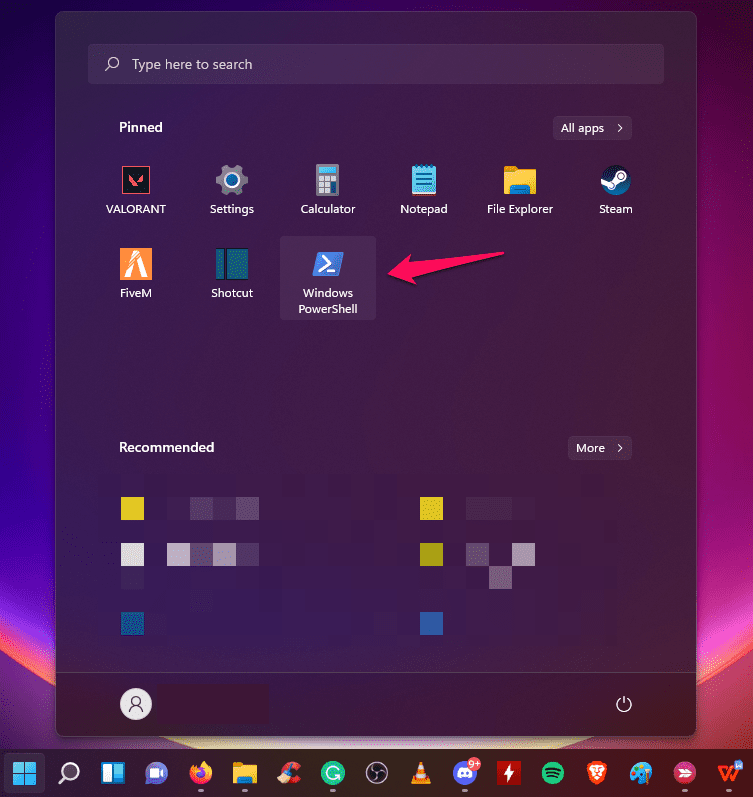
- Open the Start Menu on your PC by pressing the Windows key. In the Start Menu, search for PowerShell. Right-click on the Windows PowerShell and then click on Run as administrator. You will need to give administrative privileges to Windows PowerShell to install Google Play Store.
- Now you will have to install the modified WSA on your PC. To do so, enter the following command and execute it-
- Add-AppxPackage -Register C:\WindowsSubsystemAndroid\AppxManifest.xml

- If you do not get any errors, then you can continue with the steps ahead. However, if you get the error, then you will have to enable the Developer Mode. To enable Developer Mode, follow the steps given below-
- Open the Settings app on your PC by pressing the Windows + I key combo.
- Head to the Privacy & security section in the left sidebar.
- Now click on For Developers and then turn on the toggle for the Developer Mode on the right side. You will be asked to confirm turning on Developer Mode. Turn on the toggle.

-
- After enabling the Developer Mode, try running the above code again.
- After doing so, search for Windows Subsystem for Android in the Start Menu and open it.
- Now, under the Windows Subsystem for Android window, enable the toggle for Developer Mode. This will assign an IP address to the Android container. Ensure you note down the IP address somewhere, as you will need it later.

- Now, click on the Files button to run the WSA for Windows 11 PC. You can then close the Files window.
- Your IP address should show up in the WSA settings. If you cannot see the IP address, then click on the Manage Developer Settings option that you will see under the Developer mode. Now, scroll down in the Developer options and open Wireless debugging. You will see the IP address here; note it down somewhere.

- Now download and install the ADB and fastboot tools on your PC. You can download the ADB and fastboot tools from this link.
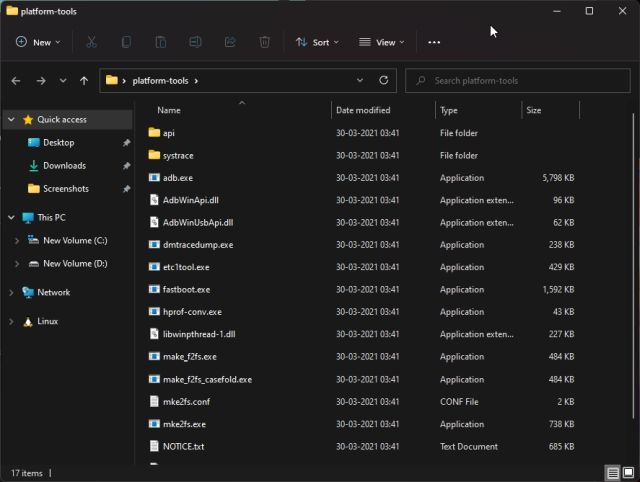
- Open the folder where you have extracted/installed ADB and fastboot tools. Now, in the address bar search for CMD and hit Enter to open the Command Prompt.
- Now type adb connect ipaddress in the Command Prompt and execute it. Here you will have to replace the ipaddress with the one that you have noted above. If the Command Prompt fails to authenticate it for the first time, then enter the command again.
- After doing so, you will have to enter the Shell Mode of the WSA and then grant it superuser rights. To do so, enter the following commands one by one-
- ADB shell
- su
- Next, you will have to change the SELinux mode to permissive. To do so, enter setenforce 0 in the Command Prompt and execute it.
- Google Play Store will be installed on your PC now.
- Open the Start Menu and search for Google PlayStore on it. Click on Google PlayStore to open it.

- Next, you will have to sign in to your Google account to download and install apps from the Google Play Store.
Restoring Kernel On WSA
Now that you are done with everything, you will have to restore the kernel on the WSA. To do so, follow the steps given below-
- Firstly, close all the windows that are opened on your PC and then open the Settings page of the WSA.
- Here, click on the Turn off button, then you see next to Turn off Windows Subsystem for Android. Wait till the loading sign disappears here.

- After doing so, head to the WindowsSubsystemAndroid folder in the C: drive and head to the Tools folder.
- Rename the kernel file to the kernel_root and rename kernel_bak file to the kernel.

- Once done, you will have successfully restored the kernel on WSA.
RELATED GUIDES:
- Fix Windows 11 Doesn’t Allow 4K Netflix Streaming
- How To Redeem Codes or Gift Cards in Microsoft Windows 11
- How To Update Apps In Microsoft Windows 11
- How To Create Live Tiles And Widgets In Windows 11
Conclusion
Following the above steps, you will be able to run Google Play Store on Windows 11. Ensure you follow all the steps correctly; only then will you run Google Play Store on Windows 11 without any issue.


")


