- "VT-X Is Not Available (VERR VMX NO VMX)" error occurs due to virtualization being disabled in the BIOS settings.
- To resolve the issue, enable VT-x in the BIOS settings by accessing the BIOS and ensuring virtualization technology is enabled.
- Another potential fix includes disabling Hyper-V Virtualization through Command Prompt to allow VT-x to function properly in VirtualBox.
When you try to start a virtual machine with the VirtualBox application, the Vt-X Is Not Available (verr_vmx_no_vmx) error message appears on your computer. The most likely explanation is that virtualization has been disabled.
VT-x may often be turned on or off in your BIOS. Press DEL (or a comparable key) to access the BIOS settings when your machine first turns on. It is possible to make VT technology available.
Read this post to learn how to fix the Vt-X Is Not Available (Verr VMX No VMX) issue and why it occurred in the first place.
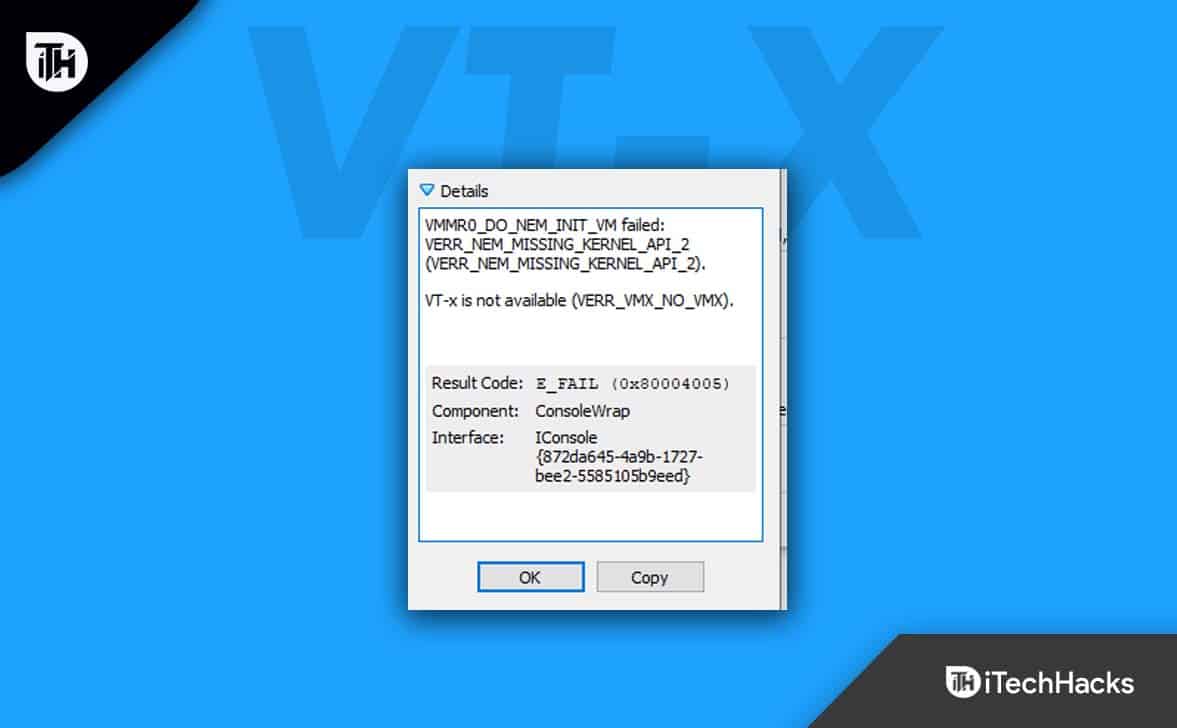
Fix VT-X is Not Available (VERR_VMX_NO_VMX)
I investigated the issue by attempting to reproduce it and by checking other user reports. As far as I can understand, several circumstances will cause the creation of this error message:
VT-X is Not Activated in the BIOS.
Some third-party software in the BIOS settings allows you to disable VT-X manually or disable it remotely. It will result in the issue “Vt-X Is Not Available” (Verr VMX No VMX).
The CPU does not support VT-X
Rarely, but occasionally, the issue can be linked to the PC’s inability to use VT-X due to its hardware limitations.
Windows Hyper-V Virtualization is enabled.
VT-X is hampered by Microsoft’s Hyper-V technology. The OS will automatically turn off VT-x if Hyper-V virtualization is allowed.
VT-X was Disabled After an Avast Update.
Recently, Avast released an update that completely disables VT-x. Real-time protection is active simultaneously unless the user chooses to activate layered virtualization from the options menu.
Core Isolation is Enabled:
The VirtualBox application may experience problems after you enable the Core Isolation setting on your machine, leading to the VT-x not being available (VERR VMX NO VMX) issue. Therefore, we advise disabling this function and checking to see if the issue disappears.
Fix the VirtualBox Vt-X Is Not Available (Verr_vmx_no_vmx) Error
1. Disable Core Isolation in Windows Defender
Windows Defender Device Security Option Core isolation is known to conflict with VT-X. Check to see whether Core Isolation is enabled if you’re having trouble with the Vt-X Is Not Available (Verr VMX No VMX) issue and using Windows Defender as your default security setting.
- Use the star icon located in the bottom-left corner to search for Windows Defender.
- Go to the Windows Defender Security Center and select it to access the built-in security feature.
- Select Device security from the left-hand menu in the Windows Defender Security Center.
- From the Device Security menu, select Core Isolation Details (under Core Isolation).
- Make sure the Core isolation menu’s switch for memory integrity is turned off.
- After turning off the setting, restart the computer to check if the issue has been resolved.
- Verify whether you were successful in resolving the “Vt-X Is Not Available” (Verr vmx no vmx) problem.
2. Enable Vt-X in the BIOS (Boot Menu)
Disabling the Virtualization Technology option in the BIOS settings can majorly contribute to this issue. So, check if this option is disabled and turn it on if it is.
Vt-X Is Not Available (Verr VMX No VMX) is most likely caused by the technology being disabled in your BIOS settings. Don’t give up on this method until you’ve checked to see if any third-party applications can change these settings.
- To enter “BIOS Mode,” first “boot” your computer, and when the “Windows logo” appears on your screen, hit the setup button.
- When in BIOS mode, choose the “Security” tab and then select “System Security.”
- Look for the “Virtualization Technology (VTx/VTd)” option and make sure it is “enabled.” Do it now if it isn’t already enabled.
- “Reboot” the machine using virtualization technology (VTx/VTd). Verify whether you were successful in resolving the “Vt-X Is Not Available” (Verr vmx no vmx) problem.
3. Using Command Prompt, Disable Hyper-V Virtualization
First, make sure VT-x isn’t being hampered by Hyper-V virtualization. The equivalent of VT-x virtualization is instantly disabled when Hyper-V virtualization is enabled or turned on. Hyper-functioning is disabled after an update. An application installation might have brought on this problem. Remember that, in most cases, the Hyper-V technology will continue to function even after the application that enabled it has been removed.
There are various ways to disable Hyper-V virtualization. To remove Microsoft Hyper-V, perform the following instructions from a Command Prompt (Admin):
- Hold the Windows key and R together to open the Run dialogue box. To open an elevated Command Prompt, press Ctrl + Shift + Enter the command “cmd.” When the UAC (User Account Control) window asks you a question, click Yes.
- Enter each of the commands listed below, one at a time, into the elevated command prompt to disable Microsoft Hyper-V:
- bcdedit /turn off hypervisorlaunchtype
- bcdedit /change VM No
- dism.exe / Disable Feature: Microsoft-Hyper-V / Online

- Once the commands have been properly executed, close the command prompt and restart the computer.
- When you reboot your VirtualBox machine, see if you still receive the same error message.
- Verify whether you were successful in resolving the “Vt-X Is Not Available” (Verr vmx no vmx) issue.
4. Enable Nested Virtualization in Avast
If you use Avast, be advised that a recent update to the antivirus introduced an automatic feature that disables VT-X from functioning on your system if certain conditions are met.
Without deleting the third-party security client, this issue can be resolved.
Enable the Avast Settings and Troubleshooting checks before choosing “Use virtualization nested within virtualization nested within.”
Additionally, enable hardware-supported virtualization.
Check whether the “Vt-X Is Not Available” (Verr VMX No VMX) problem has been resolved.
5. Disable Device Guard / Credential Guard
Use “Window + R” simultaneously to launch the Run dialogue box. Press “Enter” after typing “gpedit.MSC” in the dialogue box.
-
- Go to the “Local Computer Policy,” “Computer Configuration,” “Administrative Templates,” “System,” “Device Guard,” and “Turn On Virtualization-Based Security To Disabled” menu options in the Group Editor box.
- Here is another method to complete the task if you cannot use the group policy editor.
- In the registry, change the value of the key “key HKLM > System > CurrentControlSet > Control > DeviceGuard > EnableVirtualizationBasedSecurity > Enabled” to “0.”
- Check to see if the “Vt-X Is Not Available” (Verr VMX No VMX) problem has been resolved.
6. Uninstalling Third-Party Antivirus Software
This issue might be caused by any antivirus software that is installed on your computer. It’s better to uninstall it temporarily and check whether that resolves the issue. The procedures listed below will enable you to disable the Windows Defender Firewall if you’re using it:
- In the search box next to the Start menu, type “settings,” and then press the “Enter” key.
- Choose “Windows Security” after choosing “Update & Security” in the Settings window’s left pane.
- Under “Protection Areas,” click “Virus & Threat Protection,” and then click “Manage Settings” under “Virus & Threat Protection Settings.”

vt-x is not available - Make sure the “Real-Time Protection” toggle is off in this window.
- Select “Firewall & Network Protection” in the left pane of the “Windows Security” tab.

- Pick “Domain Network,” “Private Network,” and “Public Network” in order in this box.
- Check to see if the “Vt-X Is Not Available” (Verr VMX No VMX) problem has been resolved.


7. Enable Virtualization
- Launch the command prompt window.
- Now enter systeminfo.exe into the command prompt.

vt-x is not available - You can see that virtualization is enabled in the firmware to the right of the Hyper-V system requirements.
- Select settings from the drop-down menu by heading to the start menu.
- Then select Update and Security from the list. Click Recovery in the newly-added tab that will appear.
- Restart by clicking the restart now button under advanced startup, which can be found under recovery and clicked.

- When the blue screen appears with specific icons, you must select Troubleshoot.
- Go to the Advanced tab. The firmware is the cause of our problem, so you must locate that setting.
- Once we’ve located them, click the UEFI firmware settings option, and the restart button will appear once more. Press enter to restart.

vt-x is not available - By pressing the relevant function key, locate the BIOS setup.
- There will be a new panel; select System configuration (you can use the arrow keys to get there) and then search for Virtualization Technology.
- Your virtualization technology is activated at this point. By pressing F10, you can exit this.
- Verify whether you were successful in resolving the “Vt-X Is Not Available” (Verr vmx no vmx) bug.


8. Disable Memory Integrity
Windows Security comes with a virtualization-based security capability that may identify low-level code injections and shield your computer from even the most serious infections. This, however, clashes with VirtualBox in the same way that Hyper-V did.
However, most users don’t require the high level of protection that Core Isolation offers. It is disabled by default on modern laptops since it interferes with hardware performance optimization software that is already installed.
To see if your problem is fixed, you can turn off Windows Security’s memory integrity feature. Do the following to help with that:
- In the Taskbar search box, type “Windows Security.”

- Click on the specific search result.
- Go to the Device Security tab on the left side.

- Select Core Isolation Details.
- Turn off Memory Integrity by toggling the button.

- After that, restart your computer to see if the issue is still present.


Conclusion
Your Windows computer will display the error “VT-x is disabled in the BIOS for all CPU modes” if virtualization is not enabled. However, many Windows PCs’ BIOS settings prevent virtualization by default; virtualization must be enabled to build a new virtual machine. I hope this post was useful to you. If you have any questions or comments about this article, kindly post them in the comments section below, and we’ll get back to you.
RELATED GUIDES:
- How To Fix Modern Setup Host High CPU in Windows 11
- How to Fix Killer Network Service High CPU Usage
- Fix Adobe CEF Helper.exe Causing High CPU In Windows PC
- What Is LSASS.EXE? Fix Lsass.exe High CPU Usage Issue Windows 11
- How to Lower WindowServer CPU Usage on Mac
- How To Fix CPU Performance Issues and Lags In Windows 11


