- Many Nvidia users face missing control panel in Windows 11, impacting gamers who require settings access.
- Causes of missing control panel include Nvidia package bugs, PC threats, installation errors, and Windows build versions.
- To fix, manually reinstall GPU drivers using Display Driver Uninstaller, update display adapter drivers, restart Nvidia services, and add Nvidia control panel to desktop context menu. These steps have been effective in resolving the issue for many users.
Almost every Nvidia GPU user has faced a missing control panel including myself. Most PC users don’t need the control panel because the default configuration is more than enough to juice the machine for optimal performance. However, I’m a gamer, and I need access to the dashboard to tweak the settings for maximum output.
Why does the Nvidia control panel not showing in Windows 11?
I installed fresh graphics drivers downloaded from the official site and yet, Windows PC couldn’t find the control panel. Several users have reported that the Nvidia didn’t open when the icon was showing up in the search results.
- It’s an Nvidia package bug or glitch that is causing it.
- PC Threats.
- Something must have gone wrong during the installation.
- Windows latest build version
Nonetheless, I have to say that it’s not your fault if the control panel isn’t showing up after installing it correctly. I was able to solve it multiple times by re-installing the entire package completely.
Download Manual Drivers Package
The ultimate solution is to re-install Nvidia GPU drivers manually. You have to uninstall the driver’s Display Driver Uninstaller (DDU) that will remove all remnants from the PC. Let me show you how you uninstall the GPU drivers completely from the PC, and I have done this several times in the past.
ALSO CHECK: How To Update Drivers In Windows 11
Download Drivers:
- Open the browser.
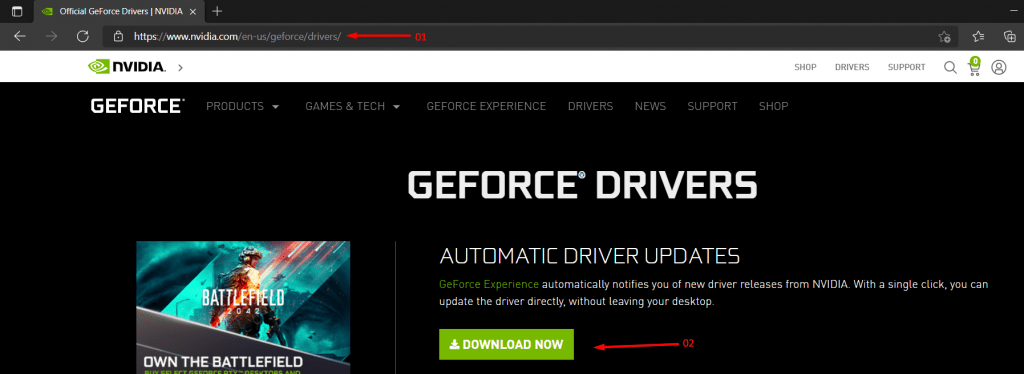
- Go to Nvidia’s official site and download the package locally
- Extract the files in the local folder.
You are halfway to re-install the GPU drivers.
Remove GPU Drivers:
- Open the browser.
- Go to the DDU site and download it.
A. Extract the ZIP folder.
B. Go to Windows Safe Mode, and you can watch YouTube for visual instructions.
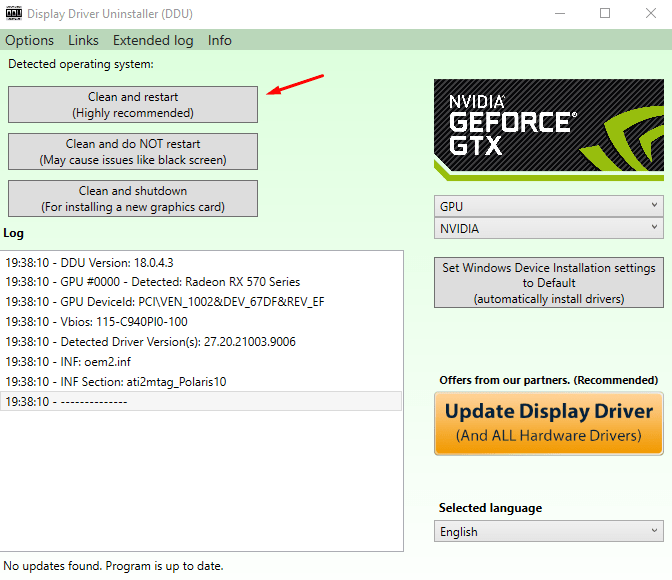
C. Launch DDU as administrator.
- Select GPU and Nvidia in the options.
- Click on “Clean & Restart” to finish the process.
Your PC will reboot, and Nvidia GPU drivers is removed from the machine.
Now, install GPU drivers as usual, and no further instructions are needed. Display Driver Uninstaller is my go-to GPU and Audio uninstaller because it won’t leave a single remnant behind and that eliminates shortcomings of Nvidia package manager.
Update Display Adapter Drivers Automatically
Older drivers cause a lot of problems in the newer Windows to build version. Microsoft is forcing the users to update the software frequently, and it includes the build version. I have installed Windows 2004 build version and it was a disaster, to be frank.
I encountered several problems with the FiveM application and other stability issues. The American GPU manufacturer releases newer software updates when they think it’s necessary to fix known problems. Use Windows Update, and keep the system video drivers up-to-date.
- Click on the “Windows” icon.
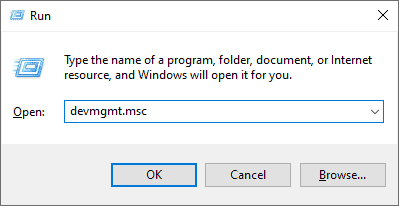
- Type “Run” and press the “Enter” key to open the application.
- Type “devmgmt.msc” in the run option then hit “OK”.
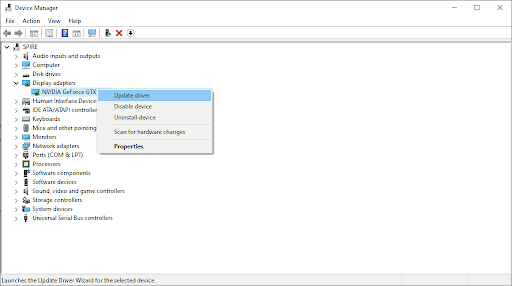
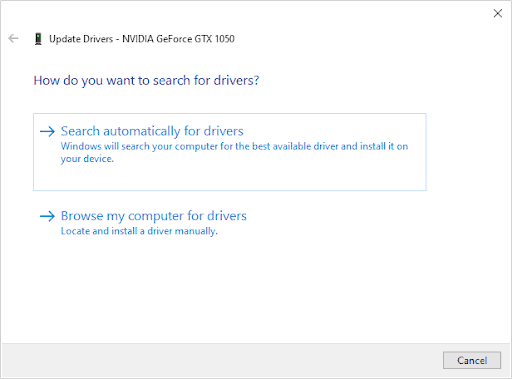
- Search and right-click on “Display adapters” then choose “Update driver”.
- A window will pop up on the screen and select “Search automatically for drivers”.
- Let Windows look for suitable drivers.
The scanning and installation process takes a few minutes, so be patient and do not close the window. Restart the Windows 11 PC after the updated graphics drivers are installed.
Restart your NVIDIA Services
Windows software is not perfect and has shortcomings that we have to live with it. Nonetheless, you can force restart Nvidia services and that may fix the GUI issue.
- Click on the “Windows” icon.
- Type “Run” and click to open the application.
- Type “services.msc” in the run option then click “OK”.
- Search for “NVIDIA Display Container LS” and right-click to view more options and then choose “Properties”.
- You have to perform three actions.
- A. Change the Startup type to “Automatic”.
- B. Click on “Stop” then click on “Start”.
Click on “OK” to save changes.
Reboot the Windows machine to force restart all services again and new changes will kick in while the PC is booting.
Add Desktop Context Menu
How do you access the “Refresh” button in Windows? Yes, that’s what Context Menu stands for.
- Click on the “Windows” icon.
- Search for “Control panel” and click on “Open”.
- Change the “View by Category” to “Large icons.”
- Click on the Nvidia control panel.
- Click on “Desktop” located at the top menu and then choose “Add Desktop Context Menu”.
Now, close the control panel and restart the machine to end the session. Turn on the machine and check if the Nvidia Control Panel appears in the Context Menu.
RELATED GUIDES:
- How to Fix WiFi Not Working in Windows 11
- How to Fix Nvidia GeForce Experience Error Code 0x0003
- Best Nvidia Tesla V100 Volta VS Nvidia Tesla T4 GPU
- How to Fix TranslucentTB Not Working on Windows 11
- How To Display Nintendo 3Ds On TV
Conclusion
I have fixed the missing Nvidia control panel by uninstalling the GPU drivers using DDU and re-installing it manually. Display Driver Uninstaller solved the problem multiple times, and it has worked for several others, who approached me with similar situations. Let us know which solution worked to resolve the control panel issue in the comment section below.


