- Logitech keyboards are popular for their quality and technology, including wireless options
- Methods to fix Logitech keyboard not working error include checking connectivity, uninstalling and reinstalling the keyboard driver, restarting HID Human Interface Service, and uninstalling and reinstalling Logitech software
- These simple steps can help resolve the issue, but if they don't work, seeking professional repair or replacement may be necessary
A keyboard is one of the most important components of a PC. It is used as an input device to enter information or use shortcuts. There are several companies that manufacture keyboards and Logitech is one of them. People from all around the world use Logitech keyboards as it provides with good quality keyboards with the latest technologies. Logitech keyboards range from wired to wireless keyboards at an affordable price.
However, several Logitech keyboard users have reported that their keyboard stopped working. There are several reasons due to which Logitech keyboard Not Working error might occur. Thus, here we are with some of the methods which you can use to fix the Logitech Keyboard Not Working error.
ALSO CHECK: Fix Keyboard Stopped Typing on Windows 10
Fix Logitech Wireless Keyboard Not Working
Method 1: Check Connectivity.
In most cases, a keyboard not working error is found to occur due to a connectivity issue between the keyboard and your PC.
If you have a wired Logitech keyboard, make sure that it is connected directly to your computer. If you have a wireless Logitech keyboard, check the batteries on it. Also, make sure that the wireless receiver is plugged correctly into your PC.
Method 2: Check its functioning.
Before starting with the technical methods, make sure that there is nothing wrong with your Logitech keyboard. You can do it by connecting your keyboard to another PC.
If your keyboard works fine on it, start executing the methods listed below after reconnecting it to the PC on which it was not working.
Method 3: Uninstall Keyboard Driver.
If there is a problem with your keyboard driver, you will not be able to use your Logitech keyboard on your PC. Follow the steps listed below to uninstall and reinstall it.
Step 1- Launch ‘Run‘ on your PC by pressing the Windows key and R simultaneously on your PC. Then, type ‘devmgmt.msc‘ in the text box and hit Enter.
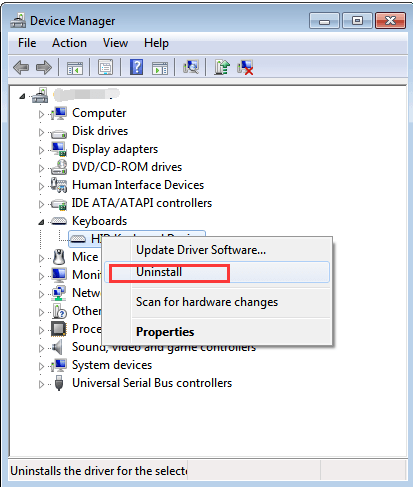
Step 2- A list of categories will appear on your screen. Click on ‘Keyboards‘ to expand it. Then, right-click on ‘Logitech Keyboard‘ and select ‘Uninstall‘ from the drop-down box.
Step 3- Now, restart your PC to automatically install the keyboard driver on your PC.
Now, check if your Logitech keyboard not working error has been fixed. If not, go ahead with the next method listed below.
You can also make use of third-party driver update software such as Driver Booster to update all the outdated or missing drivers on your PC.
Method 4: Restart HID Human Interface Service.
Almost every input device such as your Logitech keyboard works closely with the HID interface. Follow the steps listed below to restart the HID Human Interface Service.
Step 1- Launch ‘Run‘ on your PC by pressing the Windows key and R simultaneously on your PC. Then, type ‘services.msc‘ in the text box and hit Enter.
Step 2- The list of services will appear on your screen. Search for ‘Human Interface Device Service‘ and right-click on it. Then, select ‘Properties‘ from the drop-down box.
Step 3- A dialog box will appear on your screen. Here, make sure that the Startup type is set to ‘Automatic‘ and the service is running.
Now, restart your PC and check if your Logitech keyboard not working error has been fixed.
Method 5: Uninstall and Reinstall Logitech Software.
Logitech keyboards come with Logitech software which automatically gets installed on your PC. If this software is not working efficiently, you might face an error while trying to use the Logitech keyboard on your PC. Follow the steps listed below to uninstall and reinstall Logitech software.
Step 1- Launch ‘Run‘ on your PC by pressing the Windows key and R simultaneously on your PC. Then, type ‘appwiz.cpl‘ in the text box and hit Enter.

Step 2- A list of all the software’s will appear on your screen. Search for Logitech Software in this list and right-click on it. Now, select ‘Uninstall‘ from the drop-down box.
Step 3- Now, disconnect your keyboard from your PC and restart it. Reinstall the Logitech software after restarting your PC.
Once your PC restarts, reconnect your Logitech keyboard to your PC and check if it has started working.
ALSO CHECK: How to Change DPI on Your Mouse in Windows 10
Conclusion:
These are some of the best methods which you can use to fix Logitech keyboard not working error. The steps involved in these methods are easy to understand and execute. If none of these methods help you in fixing the error then you need to approach a keyboard repair specialist or replace it with a new one. If we have missed out on any such useful method to fix the Logitech keyboard not working, then please let us know about it in the comments section below.

")


