- To find other computers on the same network in Windows 11, start by changing your network profile from public to private through the Settings menu if you are on a trusted network like home or workplace. This allows your devices to communicate and share files.
- Next, enable file sharing and network discovery in Windows 11 by going to the Control Panel, selecting Network and Internet, and then Network and Sharing Center. Here, turn on network discovery and file and printer sharing for the private profile to ensure your computer can find and connect with other networked devices.
In workplaces and institutes, the devices are on the same domain or workgroup. These devices connected to the same devices are called the network and can be used to share things, including printers, the internet, or files. A network can be divided into two groups- a private network and a public network.
The private network has devices that can share things. This network is a trusted network that you can use at home or work. The public network devices cannot communicate with each other. This network is used outside your home at public networks. When on a private network, you may find the need to find other devices connected to the same network and share files.
If you don’t know how to find computers on a network in Windows 11, then here’s how you can do that. In this article, we will be discussing how you can find other computers on a network in Windows 11.

Find Other Computers On A Network In Windows 11
Given below are the steps to help you find other computers on a network in Windows 11. We have divided the steps into three steps: changing your network profile, turning on file sharing and network discovery, and viewing other computers.
Changing Your Network Profile
Firstly, you will have to change your network profile. When you are on a network, it will by default be a public network. Devices on a public network cannot see each other and cannot communicate with other computers. If you are on a trusted Wi-Fi network like that of your home or your workplace, then you will have to set your network profile as private. However, if you are using public Wi-Fi, then you should keep your network profile public.
If your network profile is not private, you will have to set it to private for your PC to find other computers on a network and communicate with them. To change your network profile from public to private, follow the steps given below-
- Open the settings on your PC. Search for Settings in the Start menu and open it, or you can press the Windows + I key combo to open the settings.
- In the settings, head to the Network & Internet from the left sidebar.
- On the right side, either click on Wi-Fi or Ethernet, depending on what network you are connected to.
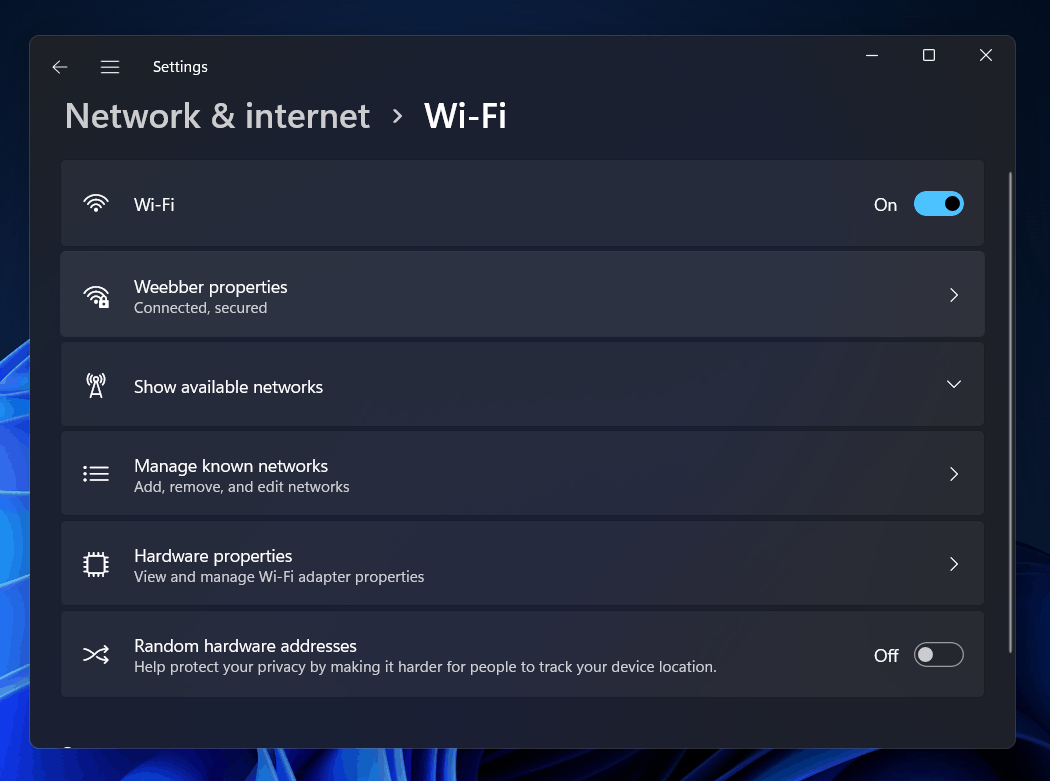
- Here you will see your Wi-Fi/ethernet properties option; click on it.
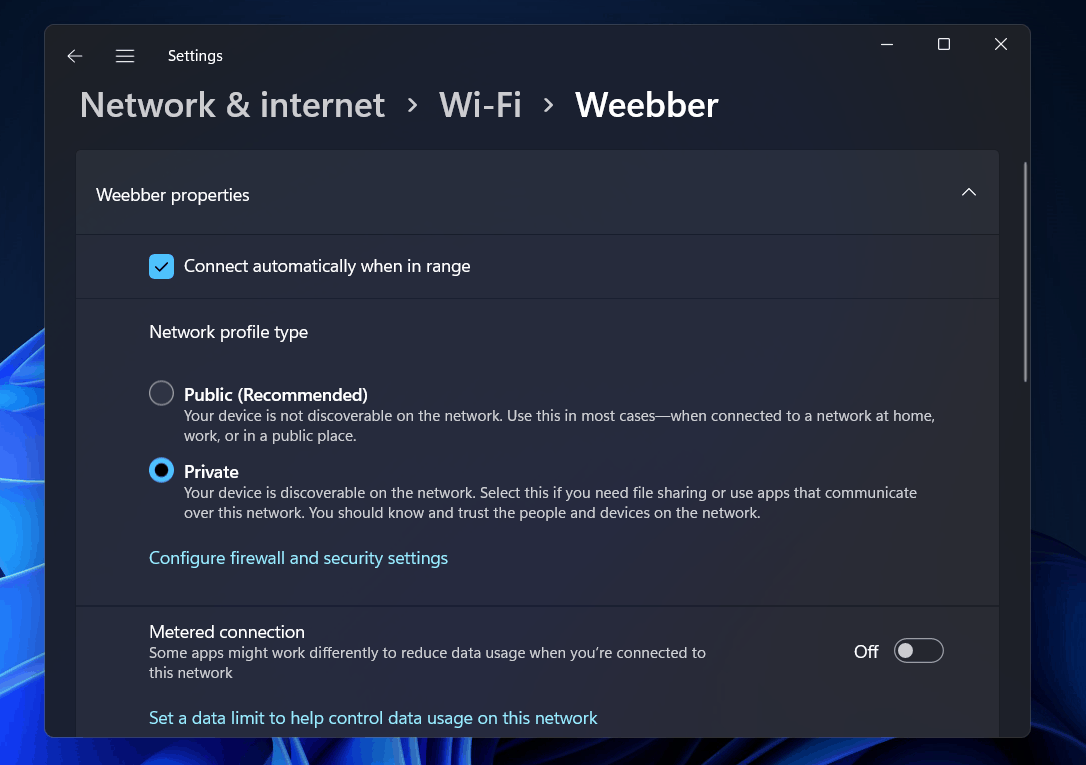
- Then under the Network profile type, your network profile will be set to public by default. Select Private to set the network profile to private.
Enabling File Sharing And Network Discovery In Windows 11
After you have set your network profile to private, you will have to enable file sharing and network discovery. This is an essential step as it allows your computer to find other devices on the same network and even communicate with them and share the files.
You can enable the file sharing and network discovery option from the Control Panel in Windows 11. To enable the file sharing and network discovery option in Windows 11, follow the steps given below-
- In the Start menu, search for Control Panel and open it.
- Now in the Control Panel, click on Network and Internet section.
- On the next window, click on Network and Sharing Center.

- In the left sidebar of the Network and Sharing Center, click on the Change advanced shared settings.
- Here you will see the Private (current profile) section. Expand it by clicking on the arrow right-beside this option.
- Now under the Network discovery section, select the Turn on network discovery option, and under it, select Turn on automatic setup of network-connected devices option. This will allow your PC to find all the devices connected to the network automatically.

- Next, select the Turn on file and printer sharing option under the File and printer sharing section. This will allow your PC to communicate with other PCs on the same network and share files and printers with them.
- After doing so, click on Save changes and exit the Control Panel.
Viewing Other Computers On The Same Network
After setting the network profile to private and enabling file sharing and network discovery option in Windows 11, you will be able to find other computers on the network in Windows 11. To find other computers on the network in Windows 11, follow the steps given below-
- Press the Windows + E key combo on your keyboard to open the File Explorer.
- In the left sidebar on the File Explorer, select and open the network.
- Now on the right side, you will see all the computers connected to the network.
RELATED GUIDES:
- How To Disable Windows 11 Feedback Hub Notifications
- Fix SmartByte Network Service Telemetry On Windows 11
- Fix Windows Could Not Automatically Detect This Network’s Proxy Settings Error
Final Words
This is the complete process of turning on network sharing and finding other PCs on the same network. If you want to find other computers on the network in Windows 11, follow the steps in this article, and you will be able to do so.


")
")


