- Bloatware on Windows 11 devices can slow down performance by consuming RAM, reducing battery life, and utilizing system resources.
- To debloat Windows 11, users can uninstall bloatware directly from Settings or use the Debloator tool to remove unnecessary software.
- The Debloator tool can be downloaded from Github, used to remove bloatware with a custom blacklist, and enhance Windows 11 performance by uninstalling unwanted apps.
Is your Windows 11 device getting slow? With time, your Windows device can get slow if too much bloatware is installed. Any software you don’t want on your device can be referred to as bloatware. Bloatware on a PC consumes the RAM, reduces battery life, and slows down your device. If you are also facing this problem, keep reading to know how to debloat Windows 11.
Bloatware can sometimes be helpful for some people. But majorly, most bloatware just drains system resources, including RAM, CPU, and GPU utilization. It can have a significant impact on the performance of your device. In this post, we will learn about debloating Windows 11 to increase its performance.
How To Debloat Windows 11
You can follow different methods to develop your Windows 11 device. But before getting started with these steps below, make sure your device is updated. Once done, you can get started with the steps mentioned below:
Uninstall Bloatware Directly from Settings
Uninstalling bloatware directly from Settings or Control Panel. However, you cannot remove all bloatware using this method as all apps are not visible in the Settings app for you to uninstall. Here is how you can do it:
- Click on Start > Settings > Apps > Apps & features.
- Click on three dots beside the app you want to uninstall.
- Then click on Uninstall.

Using Deblator Tool
The Debloator tool is a script that removes all unnecessary Windows and manufacturer bloatware to enhance your PC’s performance. It works flawlessly on Windows 11 operating system. Before getting started with this tool, make sure to create a system restore point so you can backup your data in case anything goes wrong.
Here is how you can use the debloater tool in Windows 11:
- Click on this GitHub link and download the zip file as shown below.
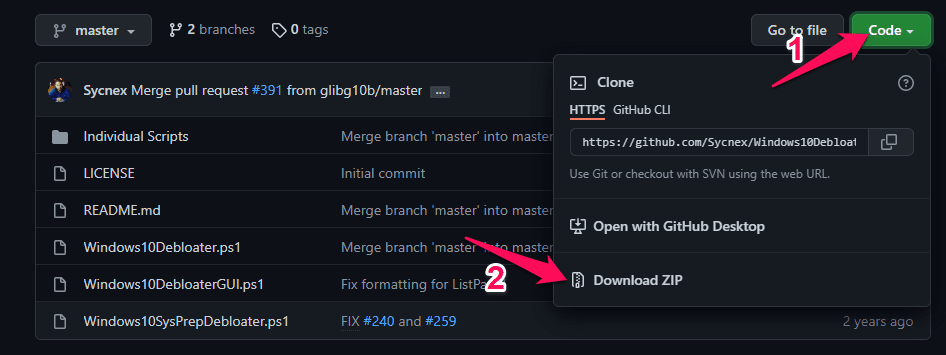
- Once downloaded, extract the zip file.
- Open the extracted file, right-click on Windows10DebloaterGUI.ps1, and select the Run with Powershell option.

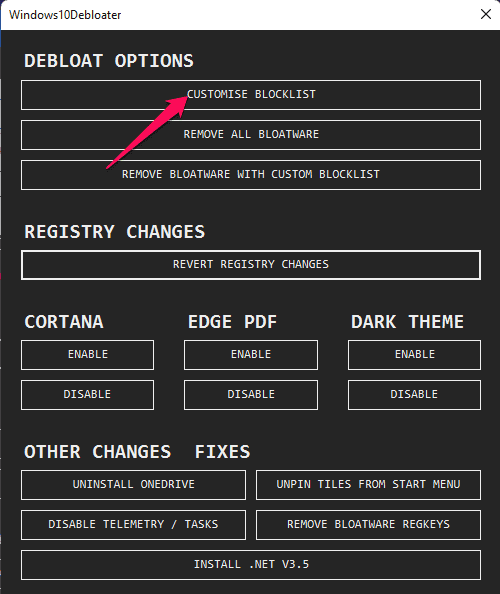
- You will now see the Windows10Debloater interface.
- If you want to remove all bloatware from your device, click on Remove All Bloatware.

- Select the Customise Blocklist option if you want to remove the bloatware manually.
- Uncheck all the apps you don’t want to remove and click on the Save button.
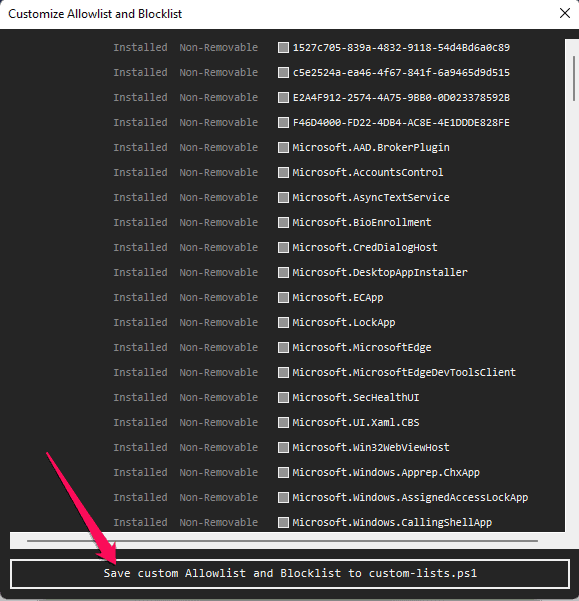
- Then click on Remove Bloatware with the Custom Blacklist option on the main screen.

- The selected bloatware will be removed from your Windows 11 device.
- Once done, restart your PC.
- Using this tool, you can also uninstall OneDrive, unpin tiles from the Start menu, disable telemetry/tasks, etc.
Wrapping Up
This was how you can debloat Windows 11 for best performance. We hope that the steps mentioned above were able to help you. If you still have any issues, feel free to drop a comment below.
RELATED WINDOWS GUIDE:


")