- Installing Windows 10 on a GPT partition without data loss can be achieved by first preparing the PC for installation by backing up essential files/folders.
- Check the partition scheme (MBR or GPT) using Disk Management tool, ensuring it is GPT for Windows 10 installation.
- Create Windows 10 Installation Media, change BIOS settings to UEFI, and follow on-screen instructions to install Windows 10 on GPT partition without losing data.
Unable to install Windows 10 on the GPT partition? Installing Windows 10 on a GPT partition can be a headache for many users who haven’t done it prior to this point. Also, it is a common fear of users that they will lose all of their data when trying to install Windows 10. If you have some similar query then we are here to help you with it. In this article, we will guide you on how you can install Windows 10 on a GPT partition without data loss.
Steps to Install Windows 10 on GPT Partition Without Data Loss
It is easy to install Windows 10 on a GPT partition that too without losing data. This involves preparing your PC for Windows installation, checking the scheme of the partition (whether MBR or GPT), creating a Windows 10 installation tool, making BIOS changes, and then finally installing Windows 10. Let’s go through all of these steps one by one:
1. Preparing your PC for Windows Installation
First, you will have to prepare your PC for Windows Installation. For this part, you will have to backup your essential files/folder in the current Windows Installation partition. To do so, follow the steps given below-
- Copy all the files and folders on your Desktop, and then paste them to some other partition on your PC except for the Windows Installation partition.
- Open Windows Explorer on your PC by pressing Windows + E. Here on the left pane, you will see folders like Downloads, Music, Pictures, Videos, Documents, etc. Copy all the files from these folders and paste them to some partition.
- Open the C Volume (current Windows Installation drive) on Windows Explorer and look for other essential files stored here. Copy those files to some other partition.

- In the Windows Explorer, right-click on Windows partition and then click on Rename. Rename the partition to something like Windows 10.

If you don’t have some partition, then you will have to use an external storage device for this step.
2. Check Partition Scheme
The next thing to do is check the partition scheme, whether MBR or GPT. You will have to use the Disk Management tool to do so. Here’s how you can do it-
- Press the Windows + X key combo, and then click on Disk Management.

- Here, right-click on the Disk on which your Windows is installed and then click on Properties. For instance, my Windows is installed on New Volume (C:) which is present on Disk 1 so I am right-clicking on Disk 1.

- In the Properties window, head to the Volumes tab.
- Check the Partition Style here. This should show GPT or MBR.

3. Create Windows 10 Installation Media
To fresh install Windows 10, you need to have Windows 10 Installation Media. This can be created with the Windows 10 media creation tool. For this step, you will need the following things-
- A pen drive with at least 8GB of storage
- A stable internet connection
Once you have all of the above steps, you can follow our guide to creating Windows 10 installation media using the media creation tool.
4. Changing BIOS Settings
The next thing that you have to do is change the BIOS Settings. You will have to switch the boot mode from legacy to UEFI which is required if you want to install Windows in GPT partition. To do so follow the steps given below-
- First, turn off your PC and wait for it to completely shut down.
- Now, press the Power key and immediately press the hotkey to boot to the BIOS menu. This hotkey may vary for different manufacturers. Here’s a list of hotkeys to access the BIOS menu on some PCs-
- Asus: F2 or Del
- HP: ESC or F10
- Dell: F2 or F12
- Acer: F2 or Dell
- Lenovo: F2, Fn + F2, F1, F1 + Enter
- MSI: DEL
- Samsung: F2
- Microsoft Surface Tablets: Press and hold the volume up
- Once in the BIOS menu, head to the Boot tab.
- Here, you will see BIOS Boot Mode, highlight it using the arrow keys, and press Enter. Now, select UEFI mode here.

- Once done, press F10 to save the changes and exit the BIOS settings.
Note- The step to change the BIOS boot mode from legacy and UEFI will be different for every laptop and PC, so you will have to refer to your PC’s or laptop’s guide for how to do that.
5. Installing Windows 10 on GPT Partition without Data Loss
Now the last step in this complete process is to install Windows 10. Once you have all of the things ready as mentioned in the previous methods, you can continue with the steps given below to install Windows 10-
- Ensure your PC is completely shut down.
- Insert the Windows 10 installation media into the USB port on your PC.
- The press Power button, and then immediately press and hold down the boot menu key. This will again vary for different manufacturers. Esc, F2, F10, and F12 are common boot menu keys for most of the PC’s. You can refer to your PC’s guide for the same.
- Now, select the Windows 10 installation media from the boot menu.
- On the Windows 10 installation screen, select the language, set time, and currency as well as keyboard; click on Next to continue.
- Now, click on Install Now.

- If you are asked to enter the product key, click on I don’t have a product key. Do this if Windows 10 was pre-installed by the OEM. If you have a key, enter it and then click on Next.

- After this, you will be asked to select the Windows 10 version. Select the version which was already installed on your PC, and then click on Next.

- On the license agreement page, check the checkbox saying ‘I accept the license terms’ and then click on Next.
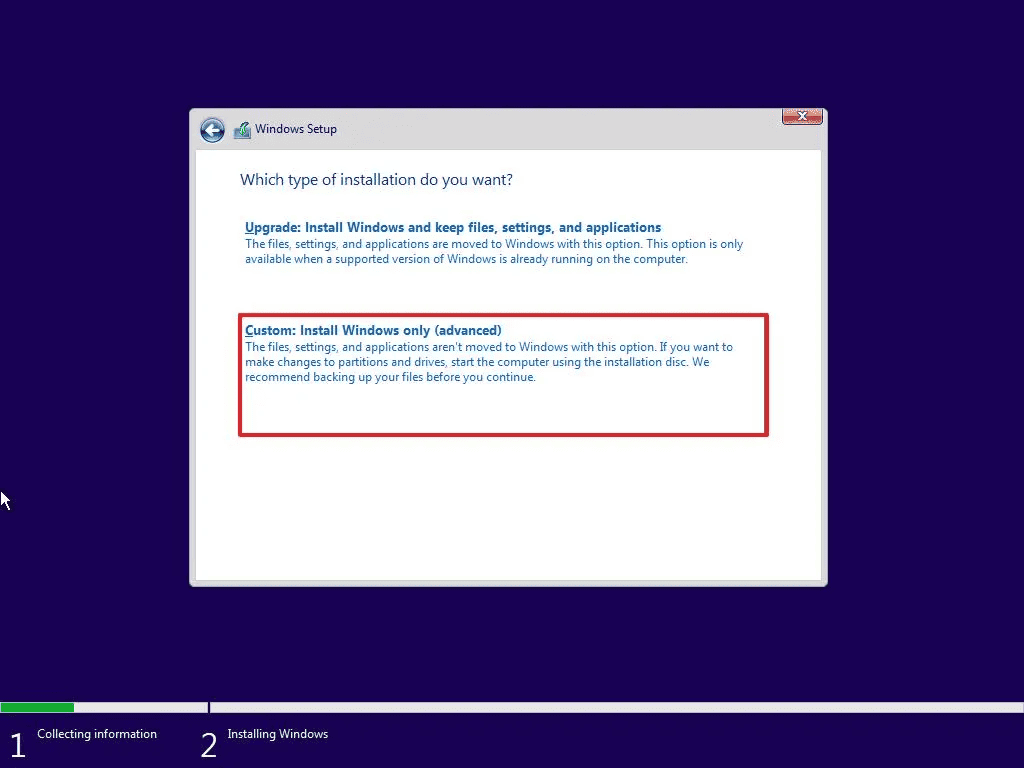
- When asked to select the installation type, click on ‘Custom: Install Windows Only (advanced).’
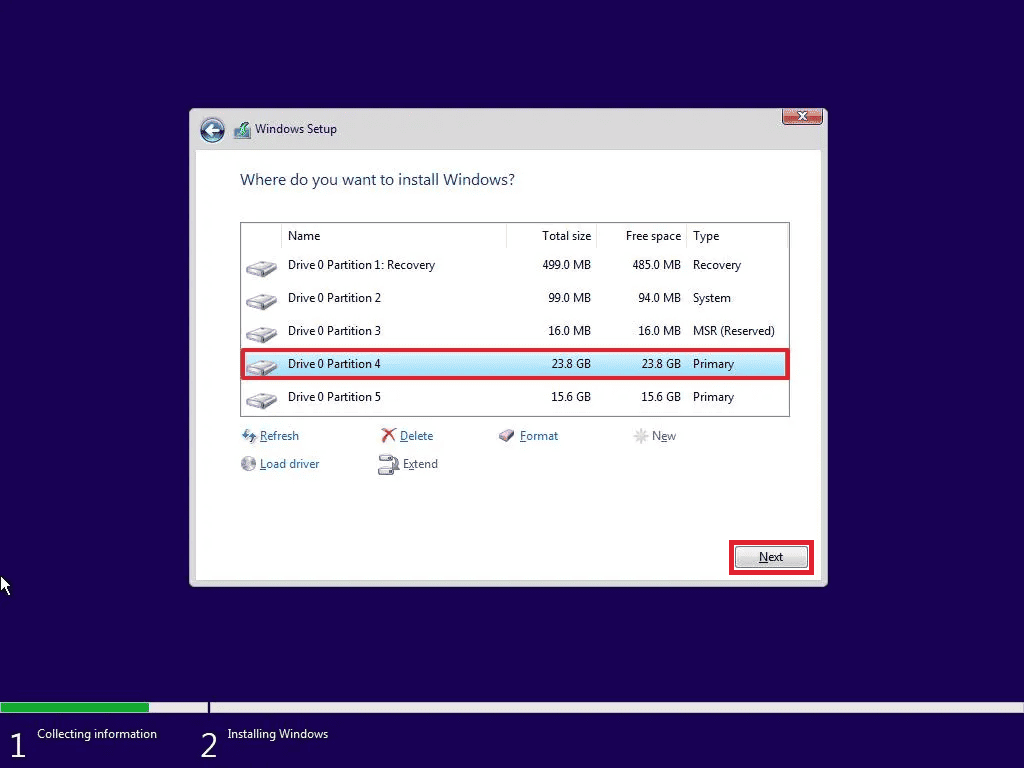
- Click on the Windows 10 partition that you renamed earlier and then click on Delete. Now, do the same for the System, MSR (Reserved), and Recovery partition. Do not delete any other partition apart from these else your data may get deleted.
- After this, click on Unallocated Space and then click on New. Do not change the size, and then click on Apply. Click on OK to confirm and move ahead.
- Now, click on the new partition, and then click on Next.
- Follow the on-screen instructions to install Windows 10 without data loss.
Bottom Line
So, that’s the complete guide to installing Windows 10 on a GPT partition without data loss. We suggest you follow all the above steps one by one correctly. Even if one step is skipped, it can cause corrupted installation as well as data loss. For any queries feel free to comment below and we will answer it.
READ MORE:
- Fix: Bluetooth Icon Is Missing From Windows 10/11
- Fix: Windows 11 Not Showing Up In Windows 10/8 Update Settings
- Top 8 Ways to Fix Video Scheduler Internal Error In Windows 10
- 12 Ways to Fix Razer Synapse Not Opening in Windows 10/11
- How To Activate gpedit.msc on Windows 10/11
- Windows 11 Full Free Download (ISO 64 Bit): Install Windows 11
")


")


