- In 1v1.lol, players can build platforms and shoot similarly to Fortnite, making it a good alternative for those tired of extra features in Fortnite.
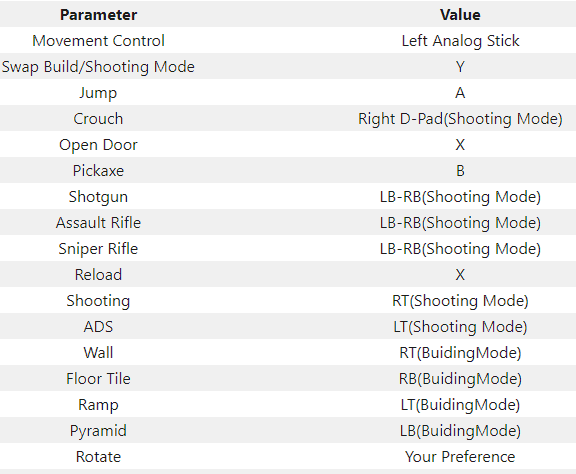
- For best settings in 1v1.lol, controller players can benefit from native controller support with keybindings and sensitivity adjustments to improve gameplay.
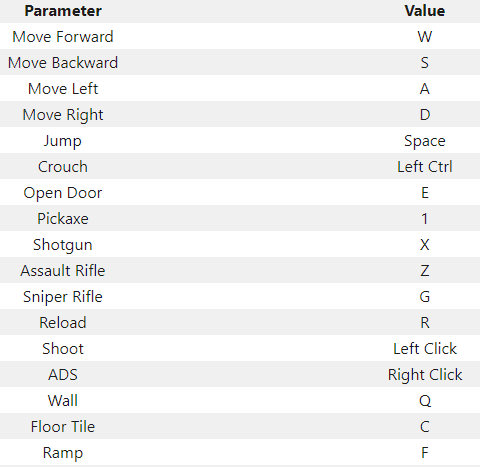
- Keyboard and mouse players should focus on easy access to build options, keybindings, and sensitivity settings to enhance their speed and accuracy in 1v1.lol matches.
In 1v1.lol, you can build platforms as well as shoot. The game works similarly to Fortnite. So, you can build platforms in the same way.
But it lacks Fortnite’s skins, emotes, dances, etc. So, if you’re tired of the extra features in Fortnite, then 1v1.lol is for you.
And, if for 1v1.lol, you want to ensure you’re up against the competition with the best settings, then continue reading.
1v1 LoL Best Settings
One of the most important factors determining the outcome of a 1v1 game is not only mastering weapon mechanics and developing strategies.
And having the right keybinding, frame layout, and sensitivity settings will also help you improve your aim and reflex mechanism.
So, below are some of the best settings for 1v1 LoL on each platform.
Best 1v1.LOL Settings for Controller Players
It is one advantage of 1v1.lol that it supports controllers natively. Using your controller on it does not require any mods.
The players who prefer controllers have benefited from this. Here’s how it works.
The right stick button can be used for jumping when you adjust the controller settings. This is the easiest way to jump since the right stick is visible.
While building, you can use R1 for the cone, R2 for the walls, L1 for the floor, and L2 for the ramp. These will be your primary sources of building materials.
The cone belongs to R1, and the walls belong to R2. And the rest of the settings can be changed as you wish.
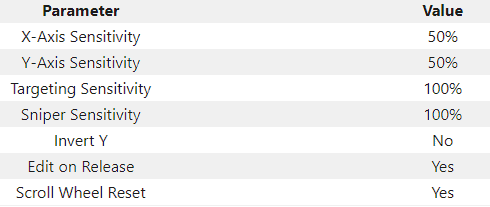
Sensitivity is set at 55%, and target sensitivity at 33%. 2.6 is the build multiplier value, and 2.3 is the edit multiplier value.
And, many prefer to play without aim assist. However, you can turn it on if you’re not very good at aiming.
KeyBindings
Sensitivity Settings
Best 1v1.LOL Settings for Keyboard & Mouse Players
It’s essential to have easy access to all build options when setting up 1v1.lol’s mouse and keyboard. No matter what you are building, they should be there to push.
The sensitivity of the mouse should be somewhere between low and high. By having a higher sensitivity in the middle, you will be able to build faster.
It’s also easy to switch to 1v1. Lol if you’ve already played Fortnite. To change from Fortnite to 1v1, you can use the mouse sensitivity.
Anyway, back to settings. Here’s what you should do
There is no tie between these keys and the nearest random key. Everything is tied together.
The most common way to move forward, backward, left, and right is using WASD. Therefore, these won’t be changed.
And, to use the pickaxe, press one instead of F. Walls and ramps can only be edited with the F key because it’s just a button away from the usual position of your hand.
So, new players will find it easier to press. The remaining weapons are Shotgun, AR, and Sniper, which are 2, 3, and 4, respectively. They can be changed to whatever you please.
Let’s move on to the critical part, the builds. You can bind the builds to each key easily. Typically, gamers find Q and E easier to use than other keys.
For this reason, the ramp and wall are controlled using these keys. C and V contain the bottom and cone, respectively.
Meanwhile, many prefer to have a mouse sensitivity of 25%. And, Sniper sensitivity is best at 100 percent compared to aim sensitivity of 50 percent.
KeyBindings | 1v1.lol Aimbot
Sensitivity Settings
Best 1v1.LOL Settings for Mobile Players
1v1.lol can be downloaded from the Android and iOS app stores. The app is free to download. There are lots of advertisements in the game, however.
In any case, the placement of the buttons on your HUD can change your gameplay drastically regarding mobile settings. There is an old-school version available.
This makes HUDs clear. And this also allows you to focus on your enemy rather than your HUD.
The four build options can be found on the left, above the joystick. The wall and the ramp can be located on the far left. Your left thumb should be closest to them.
And your left thumb should also be closest to the place button. On the other side of the place button is the toggle button. The toggle button is accessible with the left index finger.
We have Jump, Crouch, Edit, Place, and Shoot buttons on the right side of our thumb. And clicking these buttons requires you to use your right thumb to look around.
The setting is commonly referred to as the three-finger setting. And this is done with the thumb, index finger, and right thumb.
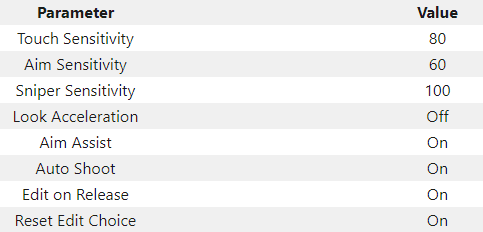
As for sensitivity, we have 65 for touch and 50 for aim. For snipers, we should have 100 for sensitivity. In the same way as elsewhere, you can turn gaze acceleration on or off based on your playstyle.
You will benefit a lot from the aim assist feature. But, it’s up to you whether you choose to activate Auto Shoot. The HUD placement, however, makes auto-shooting irrelevant.
HUD Layout – Building Mode
HUD Layout – Shooting Mode lol 1v1
Sensitivity Settings
Final Words
These are the best lol 1v1 settings we used when playing against randoms or having friends. You can change them as you wish. We all play differently, so feel free to change them accordingly. However, we’re confident that if you follow our playstyle, you’ll be able to improve.
RELATED ARTICLES:


