- "Account Already Connected to Another User" issue on OnlyFans is common due to inconsistent account access, possibly from forgotten passwords or system glitches
- It may occur due to weak security measures like using a weak password or sharing login information, allowing others to access the account
- Resolving the issue involves verifying email address, submitting necessary details to OnlyFans support, and checking for multiple accounts or clearing browser cookies and cache. Consider updating browsers, using private mode, and checking extensions for login issues.
With OnlyFans, creators have access to a unique space to connect with their audience in the vast world of online content creation. There are, however, not always smooth waters for a content creator, and the infamous “Account Already Connected to Another User” issue can quickly turn excitement into frustration. You don’t need to feel lost in the maze of OnlyFans – this article will guide you through the complex fixes of solving the OnlyFans Account Already Connected to Another User issue.
What does it Mean This Account is Already Connected to Another User OnlyFans

Usually, the “Account Already Connected to Another User” message appears when account access is not consistent. You may be experiencing this issue for different reasons, such as a forgotten password, multiple attempts to log in, or a system glitch. In order to resolve the issue, you must be patient and follow the steps required.
Why Is OnlyFans Saying My Account Is Connected To Another User?
There are many users who have expressed concern about being unable to connect with the OnlyFans account on Twitter. In the error message, it says, “Account already connected to another user” For the account holder, this can lead to confusion and frustration.
It is primarily due to a lack of security measures that your account is linked to someone else. When you use a weak password, there is a risk that someone will hack your account and gain access to your data.
In addition, if you share your login information or save your passwords on multiple computers, someone else might be able to access your account without your knowledge.
How to Fix OnlyFans Account Already Connected to Another User
So, here are some fixes to resolve the error message Account already connected to another user on OnlyFans:
Check Your Login Details

It is more likely that your account has glitched than it has been hacked. You might encounter this problem if you are entering incorrect login information. Make sure your login credentials are correct. However, if you created your account with an email address, be sure to enter it correctly.
If your account is not compromised, the problem may be from your end. Moreover, this can be done by verifying the email address used in the account creation process. It can be prevented from connecting to another user as a result.
In order to verify your email address, you must be already connected to an Onlyfans account. Consequently, another user cannot connect to it. Only Fans will send you a verification link to verify that you are a real user.
- Go to the verification link and click on it.
- Afterwards, you can verify your email address by going to your account settings page.
- Once your account has been verified, you will get another email that will ask you to confirm your identity with the captcha.
- Finally, to regain access to your account, follow the instructions on the screen.
Verify Your Identity

There may be times when OnlyFans requires additional verification to confirm your identity. It may be necessary to provide a government-issued ID or other supporting documentation. In order to expedite the resolution process, please submit all necessary information as soon as possible.
Contact OnlyFans Support Team
There’s a good chance your account has been hacked if you’re unable to access it due to it being connected to another user. First of all, contact the OnlyFans Team and let them know what’s wrong. There is a dedicated team that assists users who encounter this issue. OnlyFans’ official website is the best place to get in touch with them. You can also email them: [email protected]
1. Place A Report
Make sure that the details are filled out and placed in the report. To verify your identity, you will need to provide the necessary information after you place the report. Here are some details the team may request to fix Account Already Connected to Another User issue:
- You need to use your official registered email ID to create an account with OnlyFans.
- OnlyFans Username
- You will be able to view the transaction IDs of all receipts you receive or purchases you make at any time.
- If there are any other details, please provide them.
2. Submit The Details
You will hear back from the support team within 24 to 48 hours after submitting your details.
In some cases, it may take a little longer, depending on the severity of the issue. It may take a while for the team to investigate the issue and find a solution to recover your account.
3. Follow Up
You should follow all instructions given to you by the support team promptly after receiving the response. Work closely with the team during this process so that a faster resolution can be achieved. After the issue is resolved, you can regain access to your account.
It is, however, necessary to create a new account if the support team is unable to retrieve your hacked account.
Check for Multiple Accounts
There is a possibility that you misconfigured your email address and created multiple accounts. If you have used a different email address to sign up for OnlyFans, try logging in with that address. Merge any additional accounts you find or select one to be your primary account if you discover others.
Clear Browser Cookies and Cache
You can resolve the Account Already Connected to Another User problem, including login issues on websites like OnlyFans, by clearing your browser cookies and cache. To clear cookies and cache in popular web browsers, follow these steps:
Google Chrome:
- On your computer, launch the Google Chrome browser.
- Thereafter, in the top-right corner, click on the three dots to open the menu.
- From the dropdown menu, select “Settings.”
- Afterward, click on “Privacy and security” in the left sidebar.
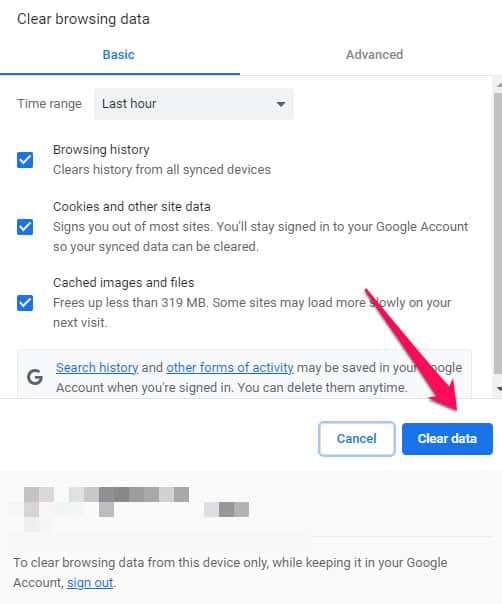
- Now, in the “Privacy and Security” section, click “Clear browsing data.”

- Select a time range. Select “All time” to clean up comprehensively.
- Afterward, select “Cookies and other site data” and “Cached images and files“.
- To delete the selected items, click “Clear data“. You need to close and reopen Chrome.


Mozilla Firefox:
- On your computer, launch the Mozilla Firefox browser.
- To open the menu, click the three horizontal lines in the top-right corner.
- Choose “Options” or “Preferences.”
- On the left sidebar, click “Privacy & Security.”
- Afterwards, in the section “Cookies and Site Data,” click “Clear Data.”
- Thereafter, select “Cookies and Site Data” and “Cached Web Content“.
- To remove the selected data, click “Clear“.

- You will need to close and reopen the Firefox browser.

Some Additional Tips:
- Update Browsers:
- Make sure both browsers are updated to the most recent version. Compatibility issues with outdated browsers may be encountered.
- Use Private or Incognito Mode:
- If your browser has a private mode or incognito mode, try logging in. Generally, this mode avoids storing cookies or cached data.
- Check Browser Extensions:
- You may experience problems logging in if you have installed certain browser extensions or add-ons. To determine if they are causing the problem, temporarily disable them.
ALSO READ:
- How to Find Someone on OnlyFans by Email in 2024
- How to Fix Onlyfans Not Loading Images Issue
- How to Find Local OnlyFans Pages in Nearby Area 2024
- How to Contact OnlyFans Customer Support
- Top 5 Best OnlyFans Search Tools For 2024
- How to Find Someone on OnlyFans with 4 Easy Ways
- How to Get OnlyFans Refund After Canceling Subscription
")
")


