- Windows 10 can quickly consume internet data plans, leaving users puzzled about the cause of high data usage.
- Users can save internet data on Windows 10 by setting a metered connection, turning off background apps, disabling OneDrive, and deactivating PC syncing.
- By following these methods, users can effectively limit internet data usage on Windows 10 and optimize their data consumption.
Sometimes, my Internet data plans were immediately consumed up in minutes by Windows 10. I started wondering what could be producing this? The data just kept disappearing. Eventually, I discovered the best ways to save internet data in Windows 10. I hope you will like these ways to save your internet data usage.
Most of the People in the world are now Using 3G and 4G networks for Internet connection. Because They can’t afford plans and prices of Broadband Plans. And Most of the Networks come with a limited bandwidth that We cannot satisfy in them. As we know, Windows 10 is an upgraded version of Windows 8.1.
After I Install Windows 10 OS on my system, I Notice that “Windows 10 Applications and their features consume more Internet Data as well as Bandwidth on the system”. If you are also facing the same Internet Data consumption problem, you have landed on the right place here. Because In this article I have given Best Methods that will help you save Internet Data on Windows 10.
Limit Internet Data Usage on Windows 10
These four methods listed below will definitely help you to save your internet data in Windows 10/11

Method #1: Set Metered Connection
In this method, you have to set your connection as Metered. By applying this, Windows will never Update automatically. And this will cause more savings for Internet Data. Now, Follow the steps below to set Metered connection.
Step 1 :

First, you have to go Settings Menu. And In settings, you have to select Network & Internet Tab.
Step 2 :
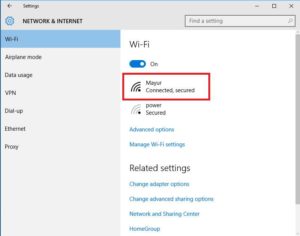
Now you have to go to WiFi settings. Now In WiFi settings, you have to choose your Connection. (In this case, I select a WiFi connection as Mayur)
Step 3 :

Now Click on the Advanced Options menu. Then, Turn on Set as Metered connection.
Also Read: How to Check and Update BIOS on Windows 10
Method #2: Turning OFF Background Apps
Windows 10 contains many Installed Apps running in the background, which causes more consumption of Internet Data. So, In this method, you have to Turn OFF those Background Apps.
Step 1 :
First, you have to go Settings Menu. In Settings, you have to select Privacy Menu.
Step 2 :
In Privacy Menu, you have to Select Background Apps at the bottom of the screen.
Step 3 :

In the Background Apps menu, you have to Turn OFF those Unnecessarily Apps that consume your Internet Data.
Method #3: Disable One Drive
One Drive is a new special feature of Windows 10 that helps you store your important or personal files online securely. If you don’t require any One drive service, then you should Disable service. Because It will consume your Internet data. Now, To disable the One Drive service follow the steps below:

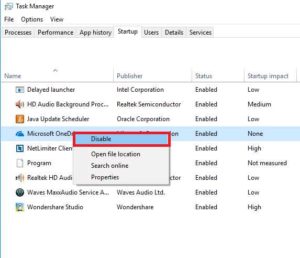
- Press CTR+SHIFT+ESCAPE to open Task Manager.
- Now in Task Manager, You have to tab on Startup Option.
- In Startup Tab, You have to select One Drive.
- Now you have to Right-click on One Drive and Disable it.
Method #4: Disable PC Syncing
PC Syncing is also another feature in Windows 10. If you do not need to sync Things on the system, you should disable PC Sync Service to save your Internet data. After, If you like to need Sync, then you can Easily Turn it on. Follow the below steps to Disable the PC sync service on your Windows.

- First, Go to Settings and then select the Account menu.
- In the Account menu, you have to select Sync your system menu.
- Now, In this menu, you have to Turn OFF Sync Settings.
Method 5: Turning OFF Notifications
Windows 10 also included a new feature as Notification, which is available at the screen’s right bottom. Notification service shows you Updates or Notices of Background Apps. If you do not need to see any Notification, you should Turn OFF the Service to save consumption of the Internet. Follow My Instructions below to Turn OFF Notifications.

- You have to go to the Right bottom corner and Right-click on Action Center.
- After, You have to click on Disable.
Also Read: How to Delete Win Log Files in Windows 10
Wrap Up:
All the Above given Methods are Working successfully and will definitely help you save a lot more Internet Data on Windows 10. Suppose you Like our article after reading this. Then don’t forget to share this article with your friends.


")


