- SSDs are faster than HDDs, making PCs slow if Windows is installed on HDD, but installing an NVMe SSD can significantly increase speed.
- To install an NVMe SSD, choose the appropriate drive size, brand, and tools needed, ensure compatibility with your PC or laptop, and follow step-by-step instructions.
- After transferring OS and files to the NVMe SSD, install it by following specific steps for desktops or laptops, ensuring a smooth installation process and improved performance.
SSD is faster than the regular HDD (which old days PCs used to come with). HDD makes our PC slow, and if Windows is installed on HDD, you can expect slow speed and app load time. If you find your PC slow, installing an NVME SSD would mean a great jump in speed.
Not only this, but NVMe SSD is also faster than traditional SSD. There would be a significant jump in the speed, be it boot time or the app load speed, if you install NVMe SSD. But how can I install NVME SSD on my PC? This beginner-friendly guide will help you install NVME SSD on your Desktop or Laptop.
How to Install An NVMe M.2 SSD On Your PC?
Installing the NVMe on your desktop or laptop can be a hassle, especially if you don’t have any prior experience doing anything. If this is your first time installing an NVMe SSD on your PC, and you don’t know how to do it, then the steps below will help you.
Choose The Right Drive

First, you must choose the right NVMe SSD to install on your PC. For that, the steps given below will help you-
- Check whether your PC’s motherboard has the NVMe M.2 slot. You will have to check your motherboard’s guide or your laptop’s specs to know whether NVMe SSD is supported.
- If your PC does not have an NVMe M.2 slot, you must buy an M.2 SSD to 2.5 SATA caddy/adapter.
- Choose the storage size of the NVMe SSD, i.e., 128GB, 256GB, 512GB, or more, as per preference.
- Know what brand you want to go for. You will find NVMe SSD from various brands like Samsung, Crucial, Western Digital, Sandisk, etc. We suggest Samsung for the best results, but you can also choose other brands.
- Also, buy the tools you will need for installing the SSD. All you need are different types of screwdrivers. You will need the screwdriver to open the case of your PC or the back panel of your laptop and tighten the screw on the SSD. So get a screwdriver that’s compatible with the screw on your PC, as well as the SSD.
Transfer An Operating System And Files
You will have to use an NVMe adapter to connect your NVMe to your PC externally and then clone your old drive to NVMe. To do so, follow the steps given below-
- Connect your NVMe to your PC through the NVMe connector.
- Press Windows + X key combo and then click on Disk Management.
- You will need a new disk here with unallocated space. Right-click on the unallocated space and then click on New Simple Volume.

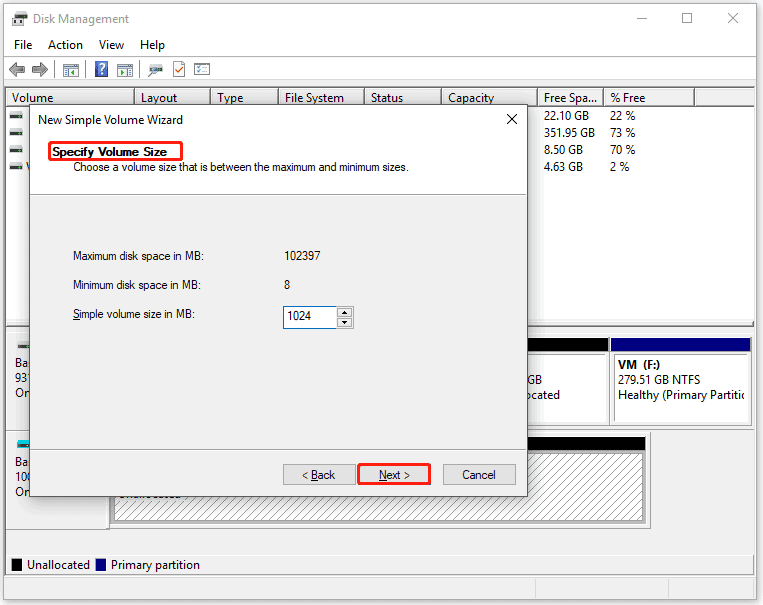
- In the New Simple Volume Wizard, click on Next.
- You will have to specify the size of the new volume. You can use the whole unallocated space or enter the size you want the new volume to be. Once done, click on Next.
- You will have to assign the drive letter. Select the letter to be assigned to the volume and then click on Next.

- Next, select Format this volume with the following settings option. Click on the drop-down menu next to File System and select NTFS.

- Set the allocation unit size and volume label and then click on Next.
- Click on Finish, and the new simple volume will be created.
- Click on this link to head to the Macrium Reflect download page. Download the Macrium Reflect and then install it on your PC.
- Open the Macrium Reflect on your PC now.
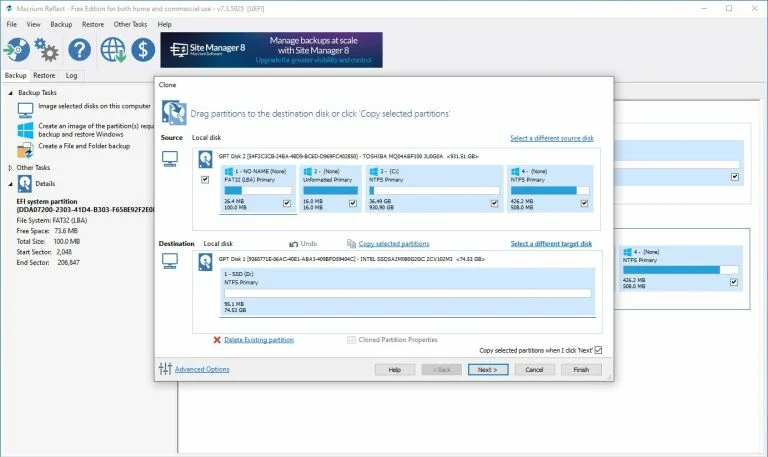
- Select your current Windows installation partition from the list of partitions, and then click on Clone this disk.

- You will now have to choose the destination drive where you want your disk to be cloned. Click on Select a disk to clone, select the destination drive, and then click on Next.
- Wait till the Windows is cloned; the process may take some time, depending on the apps and files on disk.
Note- If you keep the NVMe and the old storage drive, you can follow this step afterward.
Install The NVMe SSD
Now that you have the NVMe SSD and are done with cloning your OS to the new SSD, it’s time to install it on your PC. Before continuing this process, ensure you have transferred your data to an external storage device. To install the NVMe SSD, follow the steps given below-
On Desktop
- Turn off your desktop PC; wait till all the power is drained.
- Now, disconnect the desktop PC from the power source.
- Disconnect all the accessories from your PC.
- Remove the side panel of your PC. You will have to unscrew the screw of the panel to remove the panel.
- Unscrew the screw on the NVMe M. 2 slot, and remove your old SSD.
Note- For PCs with a hybrid storage option, you can keep HDD along with your new SSD. Also, if your PC has an unoccupied NVMe slot, you can install NVMe SSD without removing the old SSD.
- Now, slide the new NVMe SSD into the slot with slight pressure.
- Once the SSD is in the slot, push it down gently and tighten the screw. Be careful because the screw will be small, so it can fall inside the CPU and be difficult to get out.
- Put the side panel back in its right place and tighten the screen.
- Connect all the accessories to the PC and connect your PC to the power source.
On Laptop
- Turn off your laptop and also disconnect the charger and all the accessories connected to it.
- Unscrew the back panel of your laptop and remove the back panel.
- Next, disconnect your battery to avoid any short circuits during the process.
- There will be a small screw on the NVMe M.2 slot; unscrew it and remove the old SSD.
Note- If your laptop has the option for hybrid storage, i.e., HDD + SSD, then you can install NVMe alongside the HDD. If your laptop has an extra NVMe slot that is not occupied, you can install SSD while keeping the old one.
- Gently push the SSD into the NVMe M.2 slot.
- Push down the SSD to let it sit on the motherboard. Do it gently with your finger.
- Now tighten the screw while holding the SSD.
- Once done, connect your laptop battery.
- Put the back panel and tighten the screws.
Note- If your desktop PC or laptop does not have the NVMe SSD slot, you must use an NVMe M.2 caddy and replace your HDD. Simply connect your NVMe SSD to the NVMe M.2 caddy, disconnect your HDD, and connect the caddy with NVMe SSD.
Reboot From New Drive
Once you have installed the NVMe, you will have to boot your PC from it. To do so, follow the steps given below-
- Press the Power button on your laptop or desktop to turn it on.
- Press the BIOS key on your keyboard when you see the brand logo.
Note- The boot key can vary for different motherboards and laptops, so check your laptop or your motherboard guide. Generally the BIOS key will be F1, F7,F8,F9,F10,F11, Del, or Esc.
- You will have to look for the Boot sequence option. Select it and then set your NVMe as the boot sequence.
- Once done, reboot your PC, which will boot with the new SSD.
The steps will vary for different motherboards, so you must refer to your motherboard guide to change the boot sequence.
Final Words
An SSD is a storage device that we use on laptops and computers. But it works much faster than a hard disk. It can also be called an advanced version of a pen drive and microchip. NVMe M.2 is its fastest version. We covered all the necessary steps and processes in this article about what we should do to install the NVMe M.2 drive. If you see Any problem related to that, you can get help from it, and the issues will be solved.
ALSO READ:
- How To Fix SSD Not Showing Up in Windows 11
- Activate TBS.com on Roku, Fire TV, Apple, Android TV, and Xbox
- How To Fix Msvcr110.dll Missing Errors In Windows 11
- Windows 11 Media Creation Tool: How to Install/Upgrade
- How to Fix Windows 11 Not Detecting Second Monitor
- Fix Start PXE Over IPv4 Error Message While Booting in Windows 11
")


")
