- Many iPhone users face the issue of Do Not Disturb turning on automatically, causing missed notifications.
- To fix this, check scheduled DND settings, turn off DND from the Control Center, and restart your iPhone.
- Additional methods include disabling notifications, updating iOS, and seeking help from Apple Support if needed.
Are you constantly asking yourself, “Why does my do not disturb keep turning on?” You’re not alone. Many iPhone users have faced this strange issue where their device’s Do Not Disturb (DND) mode turns on automatically. If you’re in a hurry and need a quick fix, try these steps: Check your scheduled DND settings, turn off DND from the Control Center, and restart your iPhone. For a more in-depth guide, keep reading!
There’s nothing more puzzling than missing important calls or notifications because your iPhone’s Do Not Disturb feature keeps turning on unexpectedly. “Why does do not disturb keep turning on?” is a question that has confused many. This article dive into various methods to fix this issue and ensure that your iPhone’s DND settings function as arranged.

Fix Do Not Disturb Keeps Turning ON iPhone Automatically
1. Check Scheduled Do Not Disturb Settings
This method addresses the possibility that Do Not Disturb is turning on automatically due to a schedule that you may have set previously. iPhones allow users to schedule DND to activate and deactivate at specific times, which can be easy to forget.
- Open your iPhone’s ‘Settings‘ app.

- Scroll and tap on ‘Focus > Do not Disturb.’

- Look for the ‘Scheduled‘ option. If it’s on, you’ll see the scheduled times next to it.

- To stop automatic activation, turn off the ‘Scheduled‘ option. Alternatively, adjust the time settings to fit your schedule.
2. Turn Off/On Notifications in Do Not Disturb in iOS 17
In iOS 17, managing notifications while in Do Not Disturb mode has become more intuitive and customizable. This feature is particularly useful for users who want to ensure that certain notifications still come through even when DND is activated. This method allows you to fine-tune which notifications are allowed or silenced during DND.
- Open ‘Settings‘ on your iPhone.
- Tap on ‘Focus,’ then select ‘Do Not Disturb.’

- Under ‘Notifications,’ you’ll find options to customize which notifications are allowed. You can choose to allow notifications from specific people or apps.
- To silence notifications, disable the toggles next to the people or apps you want to silence during DND.


3. Turn Off Do Not Disturb from Control Center
The Control Center provides quick access to various settings, including Do Not Disturb. This method is useful if DND was accidentally enabled or if you want to quickly toggle it off.
- Access the Control Center by swiping down from the top-right corner of your screen (for iPhone X and later) or swiping up from the bottom edge (for older models).

- Look for the crescent moon icon.

- Tap on the icon to deactivate Do Not Disturb.

4. Restart Your iPhone
Restarting your iPhone can resolve minor software glitches and refresh your device’s operations, which may fix unexpected activation of DND.
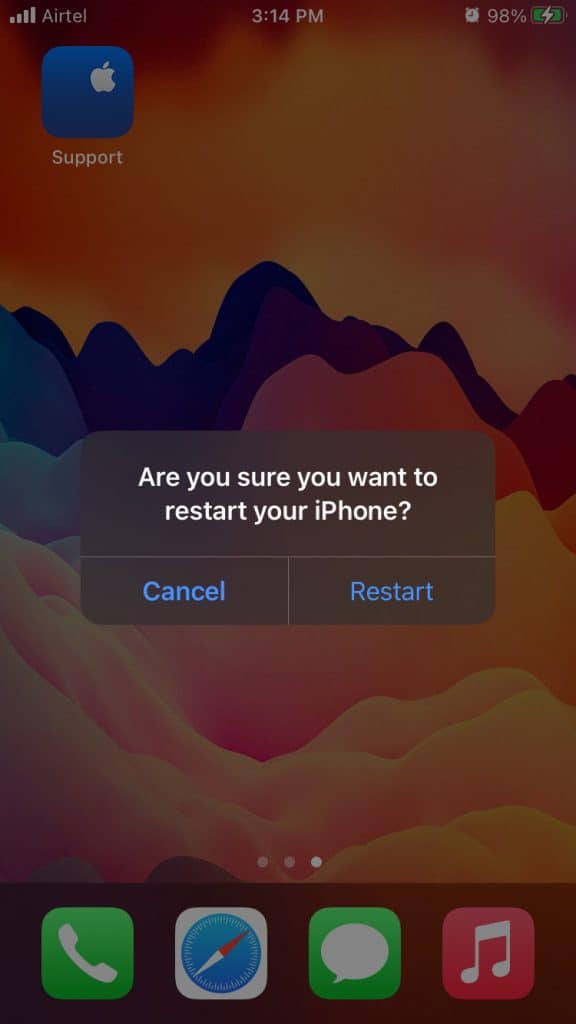
- Press and hold the side button or the volume button until two sliding buttons appear.
- Drag the slider to power off your iPhone.
- After the device has shut down, press and hold the side button again until the Apple logo appears.
5. Reset All Settings
Resetting all settings on your iPhone can be an effective way to fix various issues, including DND turning on by itself. This method will reset all system settings to their default values but won’t delete your personal data.
- Navigate to ‘Settings’ > ‘General’ > ‘Reset.’

- Tap on ‘Reset All Settings’ and enter your passcode if prompted.
- Confirm your choice, and your iPhone will restart with default settings.

6. Update iOS
Keeping your iPhone up to date with the latest iOS version is crucial for fixing bugs and improving performance. An outdated iOS might be causing the DND issue.
- Go to ‘Settings’ > ‘General’ > ‘Software Update.’
- If there’s an update available, tap ‘Download and Install.’

- Follow the on-screen instructions to complete the update.

If you use multiple Apple devices linked with the same Apple ID, your DND settings might sync across devices. Disabling this feature can prevent DND from turning on unexpectedly.
- Open ‘Settings’ and tap on ‘Focus.’
- Select ‘Do Not Disturb.’
- Turn off the ‘Share Across Devices‘ option.
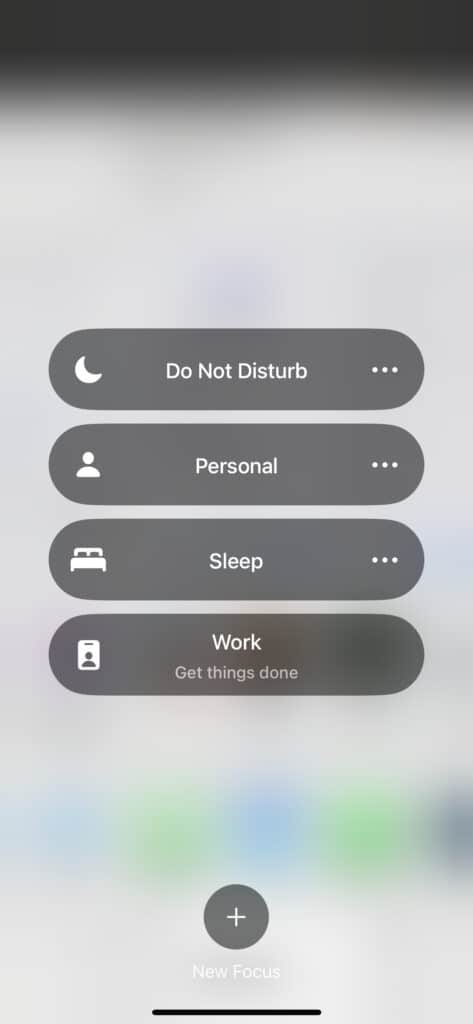
8. Unlink Focus from Lock Screen
In iOS 15 and later, you can link Focus modes to specific Lock Screens. If DND is linked to a Lock Screen, it might activate automatically when you switch to that Lock Screen.
- Go to ‘Settings‘ and select ‘Focus.’
- Choose ‘Do Not Disturb.‘
- Under ‘Lock Screen,’ turn off any linked Lock Screens that activate DND.
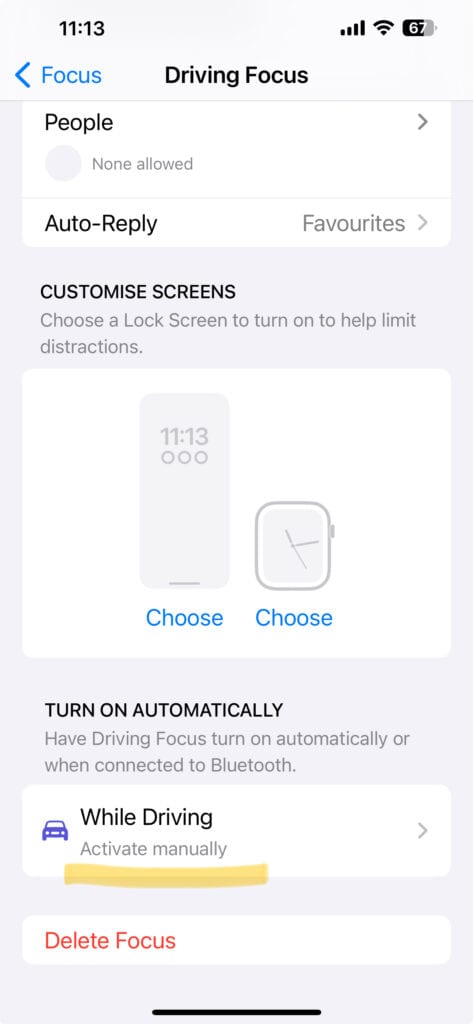
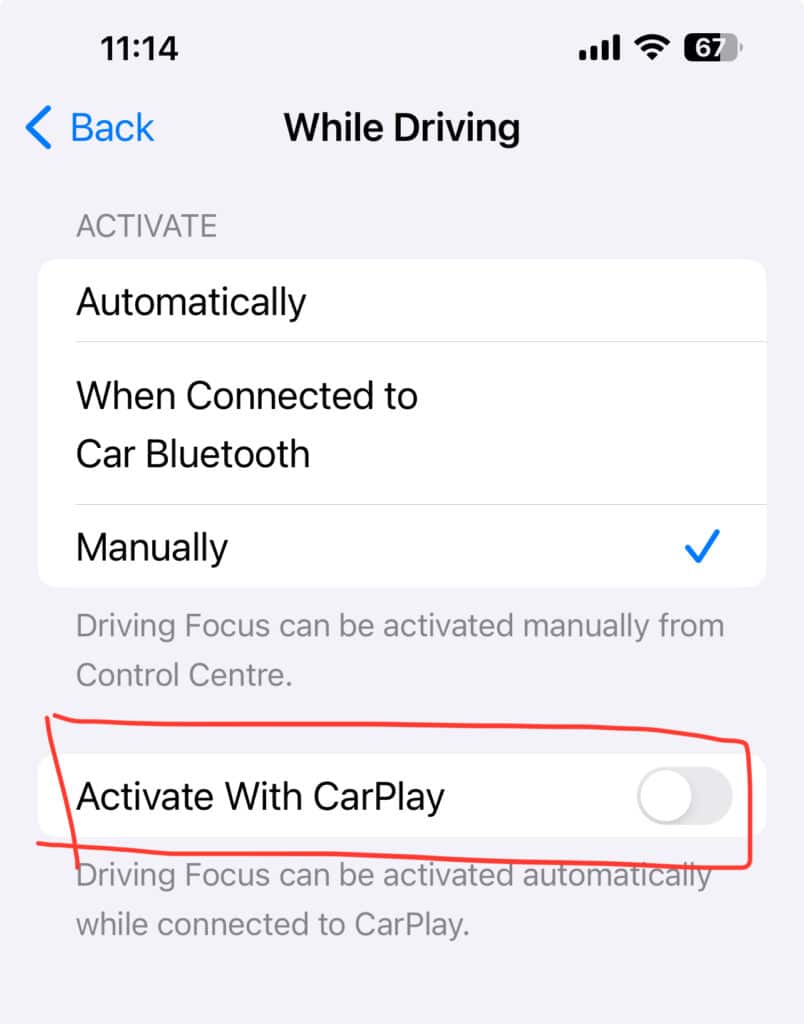
9. Disable DND when connected to CarPlay
For those who use Apple CarPlay, DND can be set to turn on automatically to avoid distractions. If this is not desirable, you can disable this setting.
- Open ‘Settings‘ on your iPhone and tap on ‘Focus.’
- Select ‘Driving’ to access settings related to driving modes, including CarPlay.
- Find the section labeled ‘While Driving.’
- Change the activation setting from ‘Automatically’ or ‘When Connected to Car Bluetooth’ to ‘Manually.’
- Ensure the ‘Activate With CarPlay‘ option is turned off.

10. Turn off DND when connected to Car Bluetooth
Similar to CarPlay, some iPhones automatically enable DND when connected to a car’s Bluetooth. This can be disabled if you prefer to stay connected while driving.
- Go to ‘Settings’ > ‘Focus.’
- Select ‘Driving.’ (If not there, click on “+” icon at top right corner)
- Turn off any Bluetooth connection settings, particularly those associated with your car.


11. Delete Driving Focus
The Driving Focus mode on iPhones is designed to reduce distractions while driving by enabling DND. If this is causing issues, you can delete the Driving Focus.
- Open ‘Settings‘ and go to ‘Focus.’
- Find ‘Driving‘ and select it.
- Scroll down and tap ‘Delete Focus.’
12. Delete the Lock Screen – iOS 17 Steps
In iOS 17, users can customize multiple Lock Screens, each with its own set of widgets and Focus settings. If a specific Lock Screen is linked to DND, deleting it can solve the issue.
- Unlock your iPhone and press and hold on to the current Lock Screen to enter the wallpaper gallery.
- Swipe to the Lock Screen you want to delete.
- Swipe upwards on the Lock Screen thumbnail and select ‘Delete.’
13. Disable Focus Mode Automation
This is particularly useful for those who have set up automation in the newer iOS versions under Focus mode, which includes Do Not Disturb.
- Open ‘Settings‘ and tap on ‘Focus.’
- Select ‘Do Not Disturb.’
- Scroll down to find any automation you might have set. This could include automation based on time, location, or app activity.

- If you find any automation that’s causing DND to turn on, you can either modify it to better suit your needs or delete it entirely.

14. Check for Shortcuts Automation
This method is beneficial for those who love experimenting with the Shortcuts app but might have created a shortcut that inadvertently activates Do Not Disturb.
- Open the ‘Shortcuts’ app on your iPhone.

- Tap on the ‘Automation’ tab at the bottom.
- Go through your automation to see if any are set to enable Do Not Disturb.

- Edit or delete the automation as needed to prevent unintended DND activation.


15. Contact Apple Support
If you’ve tried everything and the issue persists, it might be time to seek professional help. This step is for those who need technical assistance beyond basic troubleshooting.
- Visit the Apple Support website or use the Apple Support app.
- You can start a chat or schedule a call with an Apple expert.
- Alternatively, you can book an appointment at an Apple Store or an authorized service provider for in-person assistance.
Conclusion
Remember, your iPhone is designed to make your life easier, not more complicated. By taking control of the settings and understanding how they interact with each other, you can ensure that your device works in harmony with your daily routine rather than disrupting it. So, go ahead and try these methods and reclaim the peace of mind that comes with a well-behaved iPhone. Happy fixing, and here’s to uninterrupted days and nights! 📱🌟
ALSO READ:
- How to See WiFi Password on iPhone or iPad
- How To Fix SOS Only Issues on iPhone
- How to Fix AirDrop Not Working On iPhone
- How to Fix You have a New Message Gmail Notification on iPhone
- 5 Ways to Fix Battery Health Dropping After Updating to iOS 17.1.1
- Fix: This Message Has Not Been Downloaded from Server Error iOS 17


![Fix Phone Screen Unresponsive Touch on Android & iPhone [Step-by-Step]](https://itechhacks.com/wp-content/uploads/2025/10/Fix-Phone-Screen-Unresponsive-Touch-150x150.jpg "Fix Phone Screen Unresponsive Touch on Android & iPhone [Step-by-Step]")

