- External SSDs are disconnecting or are not recognized on macOS Sonoma. This issue is often due to compatibility problems, power supply issues, or file system corruption.
- Solutions include checking USB cables and ports, adjusting sleep settings, and ensuring macOS Sonoma is updated.
- Reformatting and downgrade to Ventura.
Many users are facing an issue where their external SSD works perfectly on an iPhone but is not recognized or accessible on a Mac running macOS Sonoma. This problem can be frustrating, especially if you rely on external storage for important files. The good news is that you’re not alone, and there are solutions that can help fix this problem.
In this article, we will go over the reasons behind this issue and provide simple, easy-to-follow steps to help you resolve it. Whether you’re a tech-savvy user or someone who is new to macOS, we will guide you through everything in plain English.
Why do External Drives Disconnect after updating to Sonoma?
Before diving into the solutions, it’s important to understand the possible reasons why your external SSD may not be working on macOS Sonoma, but functions well on an iPhone.
- macOS Update Compatibility Issues: Many users have reported issues with external drives disconnecting or not showing up after updating to macOS Sonoma.
- APFS Version Mismatch: If the drive is formatted in a version of the APFS file system that isn’t fully supported by macOS, this can cause access issues.
- Power Supply Issues: In some cases, the drive doesn’t receive enough power through the USB ports on a Mac, but works fine on an iPhone, which uses a different power management system.
- Corrupted File System: If the file system on the SSD is corrupted, macOS might not mount it properly.
External Hard Drives is Accessible on iPhone but Not on Mac Sonoma✅ Step-by-Step Solutions
Check the USB Cable and Ports:
Sometimes the problem could be as simple as a faulty cable or port. Try using a different USB cable to connect the external SSD to your Mac. Also, try plugging the SSD into different USB ports on the Mac.
- Disconnect the SSD from your Mac.
- Use a different USB cable if available.
- Plug the SSD into another USB port on your Mac.
- Check if the SSD is now detected.
Changing Lock Screen and Sleep Settings
macOS Sonoma’s new power management settings may be causing external drives to disconnect during sleep or idle periods. Adjusting lock screen and sleep settings can help resolve the issue.
- Click the Apple menu and select System Settings.

- Navigate to Lock Screen in the sidebar.
- Look for the Turn Display Off After Inactivity option.
- Set the time to Never or to a longer period like 30 minutes to prevent the system from going to sleep too quickly.
- In the same menu, find the Prevent automatic sleeping when the display is off option.
- Turn this setting ON to ensure that macOS doesn’t put the external drives to sleep when your display is inactive.

- After making these changes, reconnect your external drive and check if it remains connected and active even during periods of inactivity.

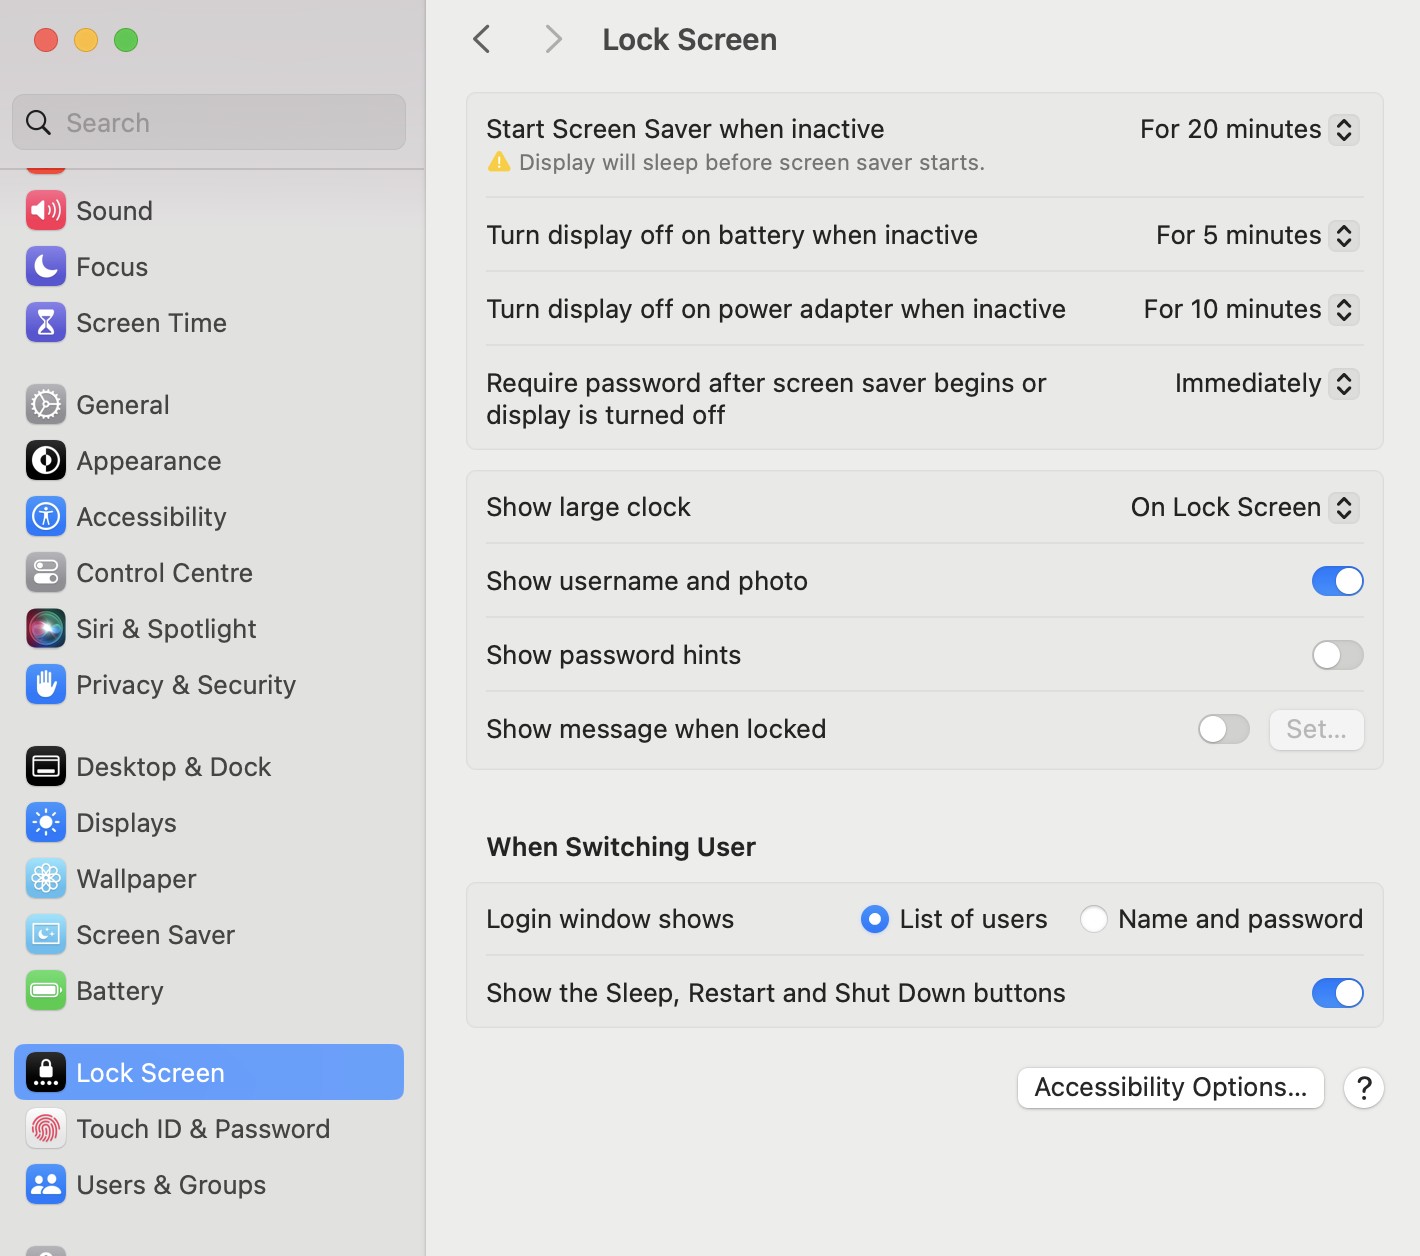
This adjustment has worked for some users experiencing disconnect issues after upgrading to Sonoma.
Reformatting and Downgrading to Ventura
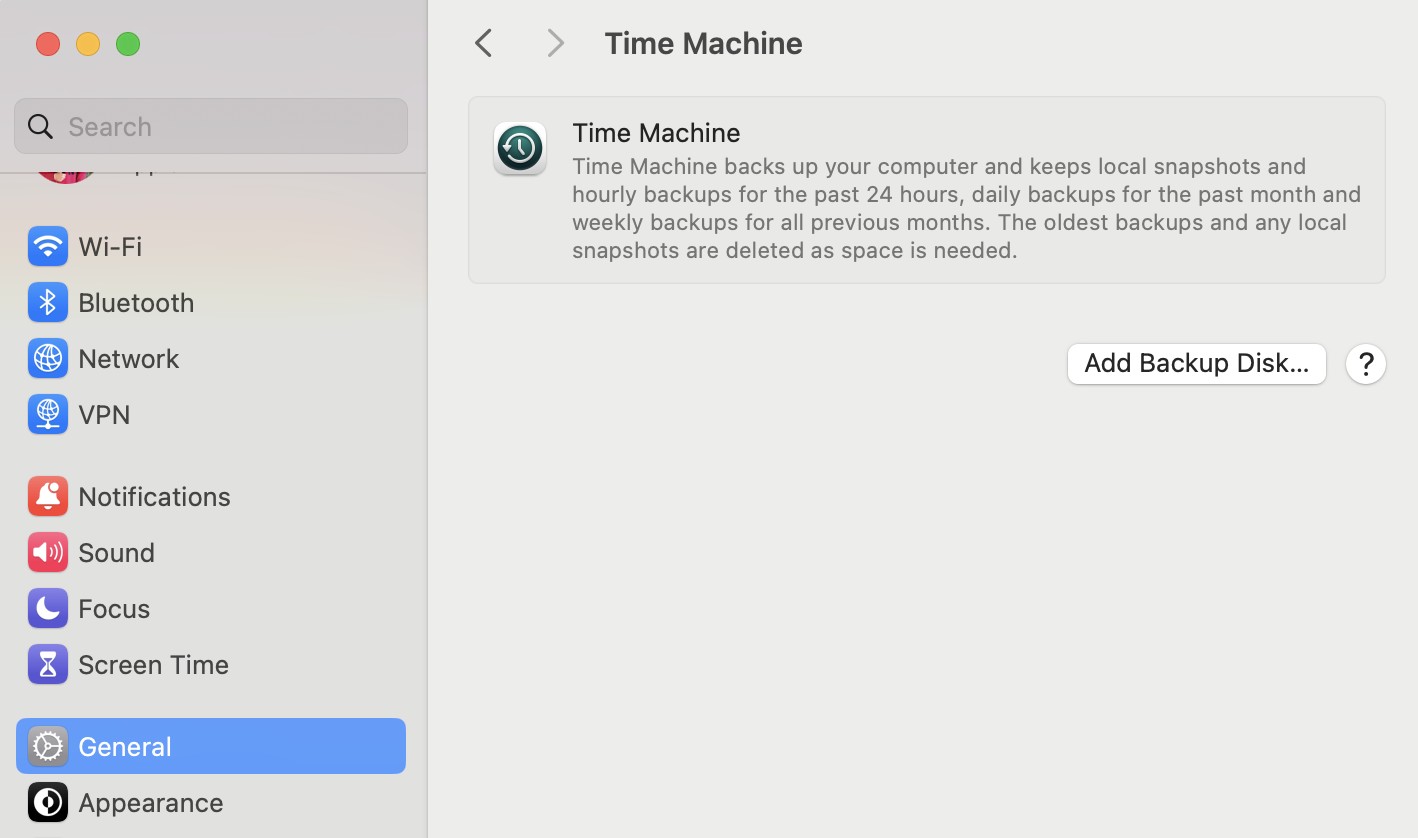
If you’re experiencing persistent issues with external SSDs or drives on macOS Sonoma, downgrading to macOS Ventura may help restore compatibility. Here’s how to reformat your system and downgrade:
- Before downgrading, ensure all your important files and data are backed up to an external drive, iCloud, or another backup solution.
- Use Time Machine to back up your system (Apple menu > System Settings > General > Time Machine).

- Go to the macOS Ventura download page on the Apple website.
- Download the macOS Ventura installer.
- Insert an empty USB drive (at least 16GB).
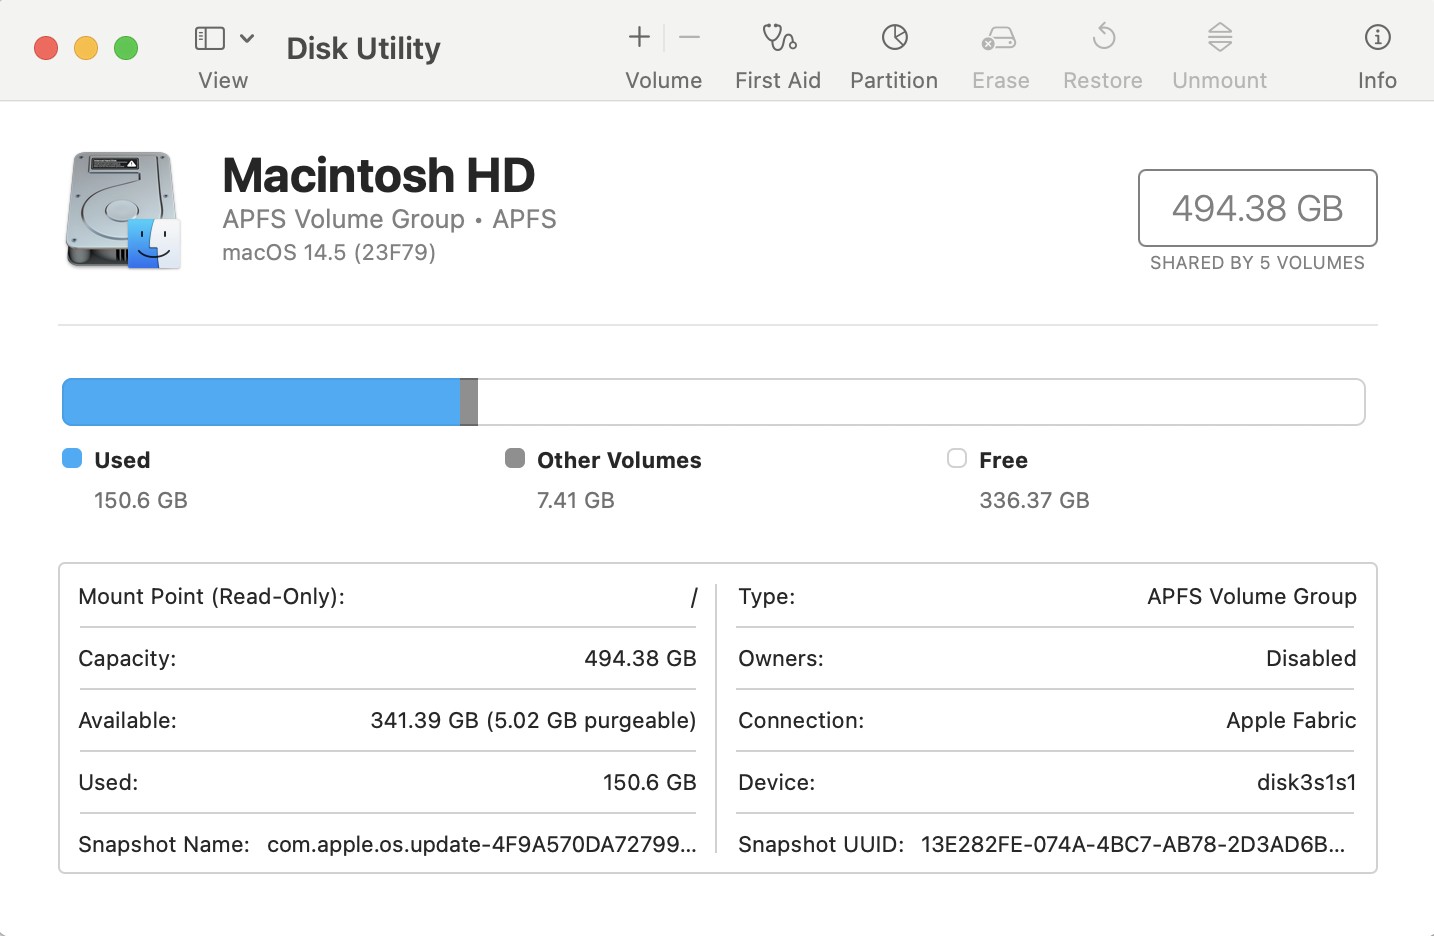
- Open Disk Utility (Applications > Utilities > Disk Utility), and format the USB drive to Mac OS Extended (Journaled) and GUID Partition Map.
- Open Terminal and type the following command to create the bootable installer:
sudo /Applications/Install\ macOS\ Ventura.app/Contents/Resources/createinstallmedia --volume /Volumes/MyVolume
- Restart your Mac and hold the Option key during startup.
- Choose the bootable USB drive from the startup options.
- When the macOS Utilities screen appears, choose Disk Utility.
- Select your internal drive and click Erase, formatting it as APFS.
- After erasing, exit Disk Utility and choose Reinstall macOS from the Utilities menu to begin installing Ventura.
- Once macOS Ventura is installed, you can restore your data from the Time Machine backup or manually transfer your files back.
Try a Different File System Format
One possible issue could be the file system used on the SSD. If the drive is formatted with a version of APFS (Apple File System) that the Mac is struggling to handle, consider reformatting the drive using exFAT, which is more universally supported across devices, including iPhones and Macs.
- BACK UP YOUR DATA first by accessing the SSD through your iPhone.
- Connect the SSD to your Mac.
- Open Disk Utility (Applications > Utilities > Disk Utility).

- Select the external SSD in the sidebar.
- Click the “Erase” button, and choose exFAT as the file system format.
- Click “Erase” to reformat the SSD.
Reset macOS System Settings (SMC/PRAM)
Sometimes, resetting your Mac’s system settings can help resolve hardware recognition issues. This includes resetting the System Management Controller (SMC) and PRAM (parameter RAM).
Steps to Reset SMC:
- Shut down your Mac.
- On Intel-based Macs: Press and hold Shift + Control + Option on the left side of the keyboard, along with the power button, for 10 seconds. Release all keys and turn on your Mac.
- For Apple Silicon Macs: Shut down your Mac, wait 10 seconds, and then turn it back on.
Steps to Reset PRAM:
- Shut down your Mac.
- Turn it on and immediately press and hold Option + Command + P + R keys for 20 seconds. This will reset certain system settings and might help with the mounting issue.
Check macOS Sonoma for Compatibility Updates
If the issue started after updating to macOS Sonoma, the problem might be due to bugs in the OS. Apple is often quick to release updates that address compatibility problems.
- Open System Settings > Software Update.

- Check if any updates or patches are available.
- Install the updates and restart your Mac.
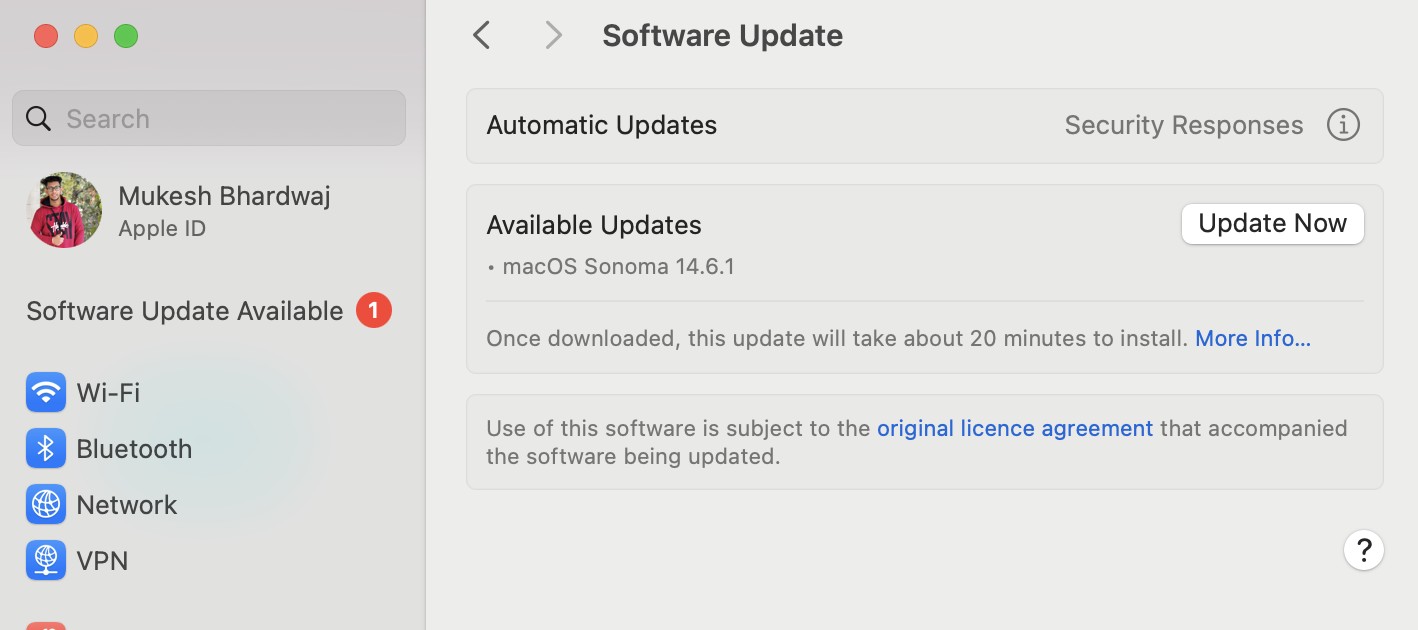
Some users have found that Apple is aware of the issue and is expected to release a fix in future updates.
Reformat Using an iPhone and Third-Party Apps
Some users have successfully managed external drives by reformatting them through their iPhones using third-party apps that support file system management. Apps like FileBrowser allow better control over external storage devices connected to an iPhone.
- Download and install a third-party file management app (e.g., FileBrowser).
- Connect your SSD to the iPhone.
- Use the app to manage or reformat the drive to a format compatible with macOS (exFAT).
Once the SSD is reformatted using the iPhone, it should work seamlessly across both devices.
Conclusion:
These workarounds address different potential causes of why your external SSD is accessible on an iPhone but not on macOS Sonoma. Whether it’s a formatting issue, power management, or a macOS bug, trying these methods should help you resolve the issue. If nothing works, staying updated with Apple’s fixes or using a third-party repair tool might be the best option.
ALSO READ:


