People of all ages use PCs and laptops for various tasks, requiring easy access to specific programs and apps.
Adding programs to startup in Windows 10 can save time and effort by allowing quick access to frequently used apps.
Methods such as using the common startup folder, creating a shortcut, or using a desktop shortcut can help add programs to startup in Windows easily.
In Short Hacks: Most of the people use a PC or a laptop in their daily life to make presentations or to search for various information from the internet. In short, people from all the age groups require a PC/laptop to meet their daily needs. Hence, there are specific programs and apps which people need to access from time to time on their PC/laptop. Searching these apps deep inside their storage area is quite hectic and time-consuming. Let’s Add program to startup Now!
How to Add Programs to Startup in Windows?
The most appropriate solution to this problem is to add those frequently needed programs and apps in the startup to save time and effort. Windows 10 is the latest operating system for the PCs and laptops. Thus, we are going to discuss the different methods using which you can add programs and apps to the startup of your Windows 10 easily. So let’s get started with the detailed explanation of each method and the steps required to execute to add programs to startup in windows
How to Add a Program to Startup in Windows 7,8 and Windows 10
Well, Adding Programs, Files and Folders to Startup is a very easy task. All you need to follow the below steps carefully.
Method #1: This method is for adding an app for all users
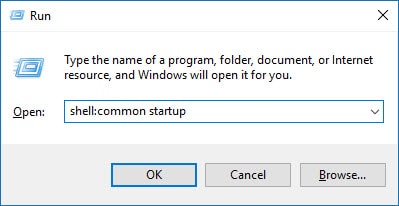
Here, we are going to use common startup folder for the program to run for all users account. You will find it at its default location which is ‘C:\ProgramData\Microsoft\Windows\Start Menu\Programs\StartUp.’
Step 1- On the keyboard of your PC/laptop, press the ‘Win‘ key and ‘R‘ key simultaneously.
Step 2- In the dialog box which appears on your screen, type in ‘shell:Common Startup‘ and hit Enter or click on ‘OK‘ option.
Step 3- Copy the executive file or document of the program or app which you want to add to startup in the common startup folder whose default address is listed above.
That’s all you need to do to add a program to run in all users accounts using the common startup folder.
Method #2: An alternative method to perform the same task is
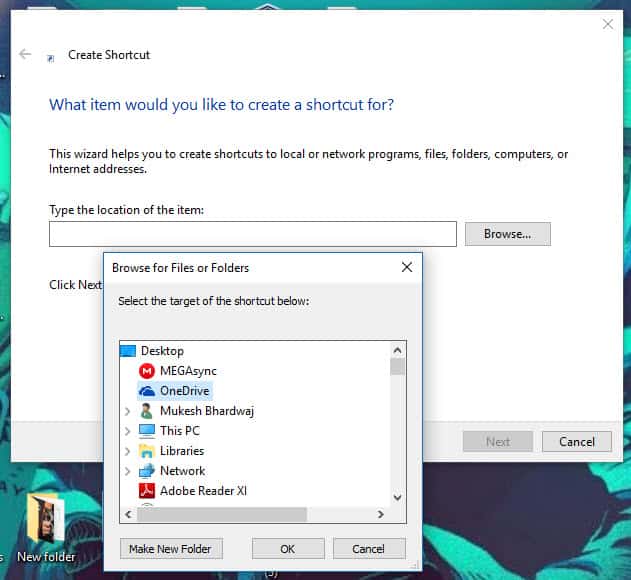
Step 1- Right-click on any empty area in your PC/laptop and go to ‘New‘ in the drop-down box. And then select ‘Shortcut‘ from the other list of options which appear on your screen.
Step 2- In the dialog box which appears on your screen, you can browse the file/folder or enter the URL of the program or app which you wish to add in the startup. Then, press the ‘Next‘ option located at the bottom of the dialog box.
Step 3- You will then be asked to name the new shortcut which is to be formed. Enter any name of your choice in the field and click on ‘Finish’ to terminate the process.
A shortcut will be successfully added to the startup which you can access immediately any time you wish to!
Wrap Up: On executing the steps listed above, you will successfully add your desired program or app to your startup in Windows 10. In fact, This method isn’t very advanced or very difficult but any moderate user of the computer could quickly apply this method and hence set up the custom startup Apps or Files for Windows 7, Windows 8 and Windows 10 as well. If you have any queries regarding the method or the steps, then please let us know in the comments section below.
A phone screen unresponsive touch issue can be frustrating, especially when you rely on your smartphone for everything from work to payments. Whether the...
If you've recently updated your MacBook to macOS Sequoia and are suddenly finding that Chrome won’t load websites, you're not alone. Many users have...


![Fix Phone Screen Unresponsive Touch on Android & iPhone [Step-by-Step]](https://itechhacks.com/wp-content/uploads/2025/10/Fix-Phone-Screen-Unresponsive-Touch-150x150.jpg "Fix Phone Screen Unresponsive Touch on Android & iPhone [Step-by-Step]")


