- When you see "This Device Cannot Start (Code 10)" error in Windows, it means the computer can't talk to the Wi-Fi or Ethernet card properly, but usually, it's because of software issues, not broken hardware.
- You can fix this issue by doing things like unplugging your computer to reset it, using an older driver version, or reinstalling your network card driver to replace bad software.
- You can also fix power settings to keep the network card active, reset network settings using Command Prompt, check for registry problems, or use system restore to go back to a time when everything was working well.
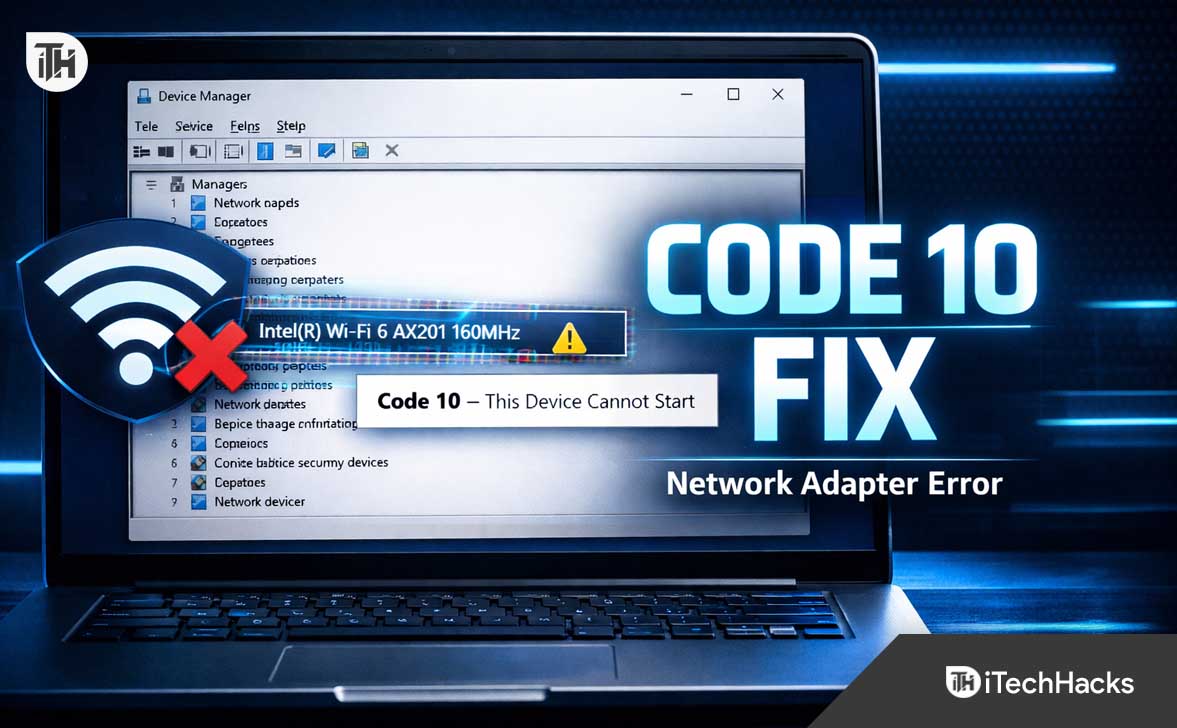
You sit down at your computer ready to work, stream, or browse, but the Wi-Fi or Ethernet icon in your taskbar has a dreaded yellow triangle or a red “X” over it. You open the Windows Device Manager hoping for a quick toggle switch, only to be greeted by a frustrating error message under your network settings: Network Adapter ‘This device cannot start. (code 10)’. This cryptic system warning essentially means that your operating system is unable to establish a basic communication handshake with your physical networking hardware, leaving your machine completely severed from the internet.
While it might look like your internal Wi-Fi card or your motherboard’s Ethernet port has permanently short-circuited, a Code 10 error is almost always a software-level communication failure, a corrupted driver file, or a tangled registry entry. Whether a recent background Windows update quietly scrambled your network settings or an outdated manufacturer driver finally gave out, this issue can usually be resolved without needing to buy replacement hardware.
Fix “This Device Cannot Start (Code 10)” Wi-Fi Adapter Error in Windows
Before diving into the fixes, it helps to understand what your computer is actually complaining about. Windows relies on a “Hardware Abstraction Layer” and specific software drivers to translate physical electrical signals from your Wi-Fi card into digital data that your web browser can understand.
When you see a Network Adapter ‘This device cannot start. (code 10)’ error, Windows is essentially saying, “I know there is a piece of hardware plugged into the motherboard, but when I try to send it the startup command, it does not respond correctly.” Because the error is a generic fallback code for “driver failed to load,” the solution requires methodically clearing out old software configurations, draining residual hardware power, and forcing the system to re-learn how to talk to the adapter.
1. Perform a Hard Power Cycle (The Power Drain)
Sometimes, the hardware adapter gets stuck in a suspended, unresponsive power state. A simple restart via the Windows Start menu does not actually cut power to the motherboard; it merely reloads the software. You need to drain the residual electricity from the motherboard’s capacitors to force the network card to completely reset its physical state.
- Turn off your computer completely using the Start menu.
- If you are using a desktop PC, reach around to the back and unplug the thick power cable from the power supply unit. If you have a physical switch on the power supply, flip it to the “Off” (O) position.
- If you are using a laptop with a removable battery, take the battery out. If the battery is internal, simply unplug the AC adapter from the wall.
- Press and hold the physical Power Button on the front of your computer or laptop for a full 30 to 60 seconds. Do not rush this step. Holding the button forces the motherboard to try and turn on, which drains all remaining stored electricity from the components.
- Release the power button.
- Plug the power cable back in (or reinsert the battery/turn the power supply switch back on).
- Turn the computer on normally and log into Windows.
- Open Device Manager to see if the yellow warning triangle has disappeared and your connection is restored.
2. Roll Back to a Previous Driver Version
The most frequent culprit behind a Network Adapter ‘This device cannot start. (code 10)’ error is a forced Windows Update. Microsoft often pushes generic network drivers to computers to keep them secure, but these generic drivers can occasionally conflict with the specific, proprietary hardware manufactured by companies like Intel, Realtek, or Broadcom. Rolling back the driver reverts the software to the last known configuration that actually worked.
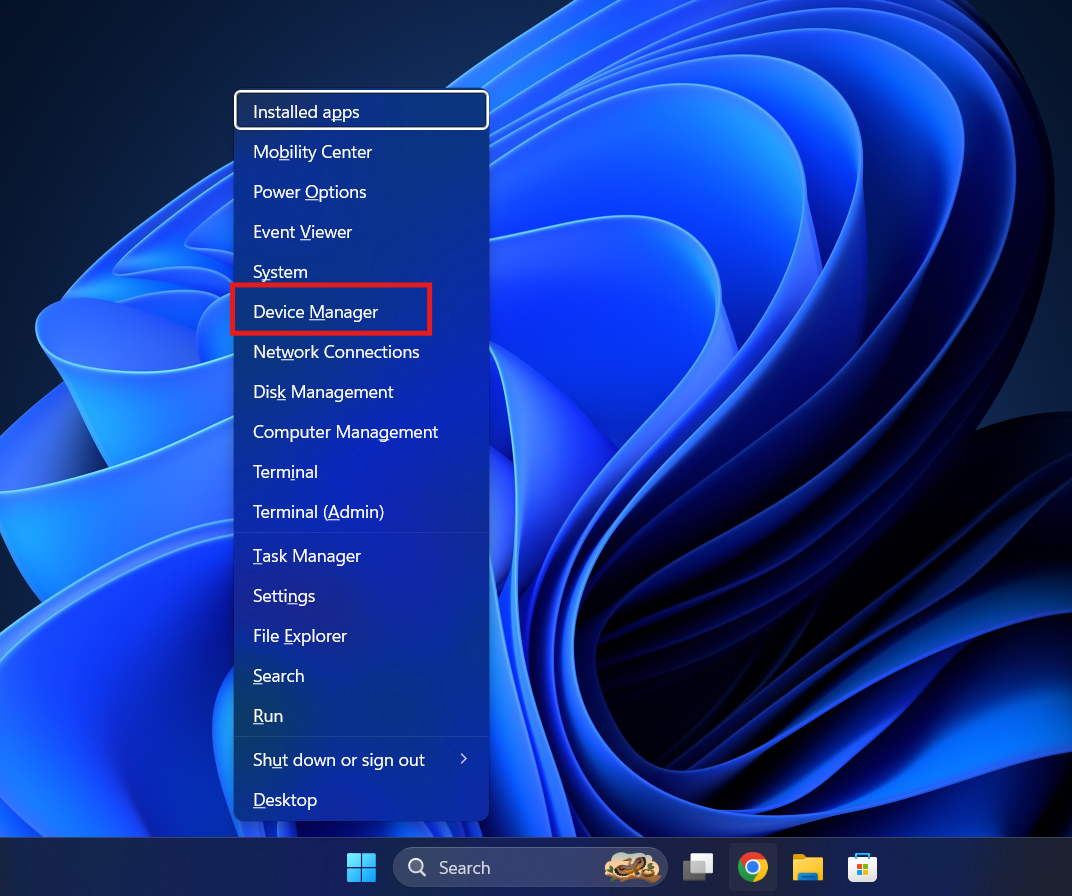
- Press the Windows Key + X simultaneously on your keyboard.
- Select Device Manager from the administrative menu that appears on the left side of your screen.

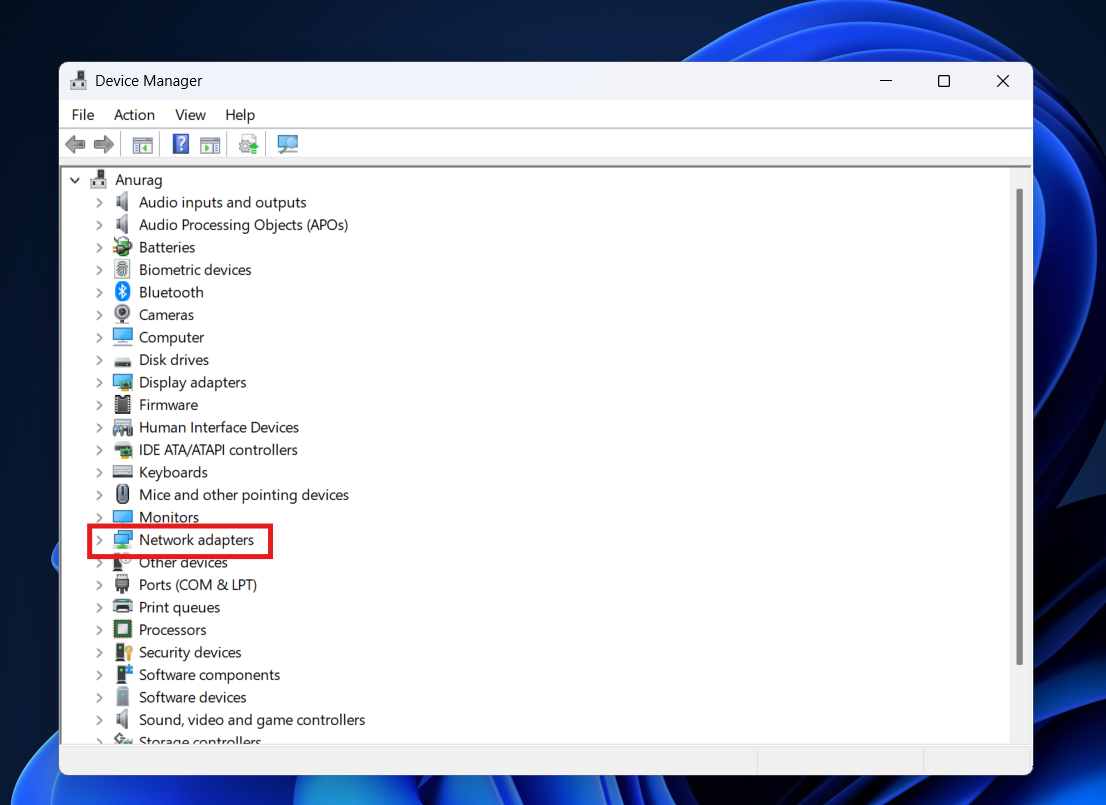
- Locate the category named Network Adapters and click the small arrow next to it to expand the list.

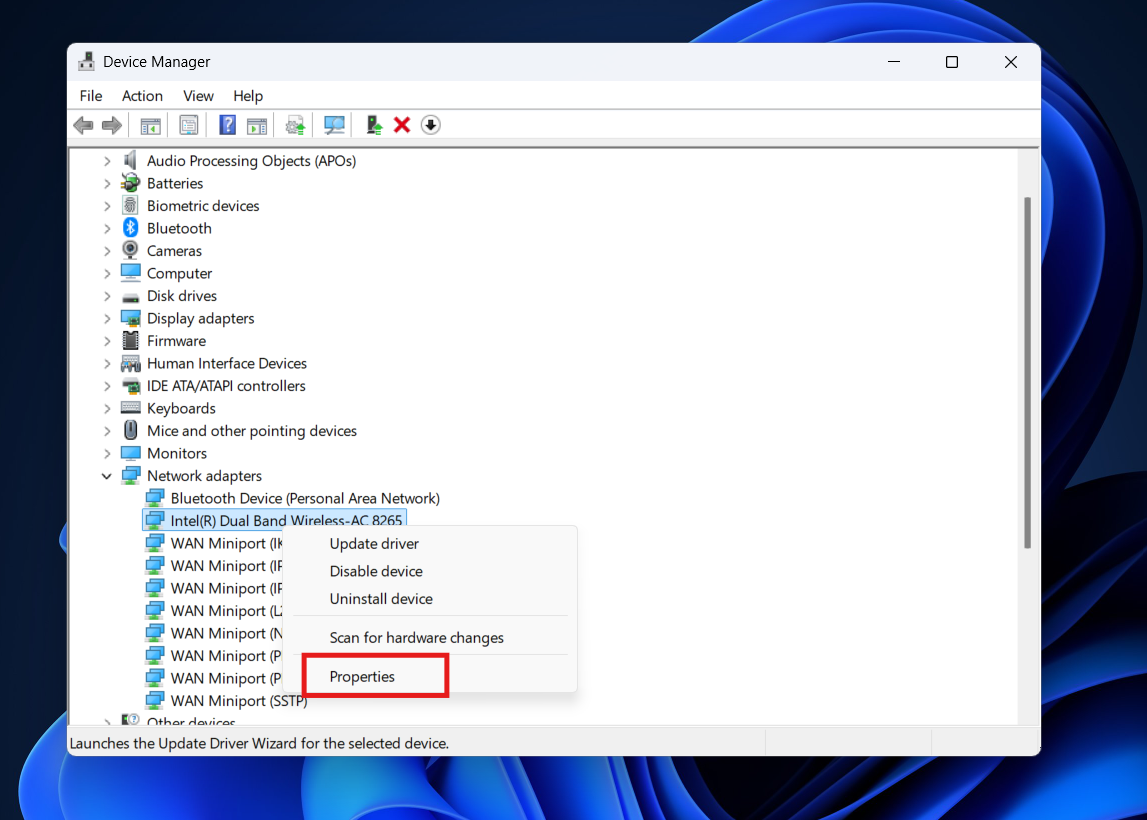
- You will see your Wi-Fi or Ethernet adapter (it will likely have a yellow exclamation mark). Right-click it and select Properties.

- Click on the Driver tab located at the top of the properties window.

- Look for the Roll Back Driver button. If it is clickable, click it immediately. Windows will ask you why you are rolling back; select any reason and confirm.

- The screen may flash, and your network adapter will reload using the older software.
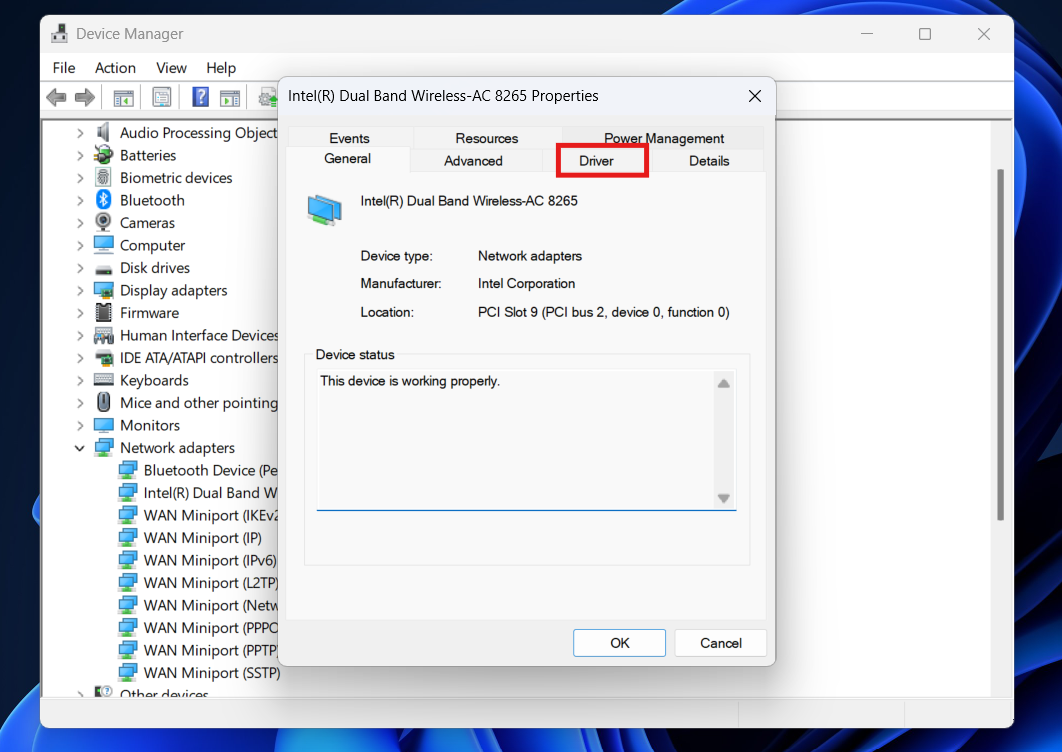
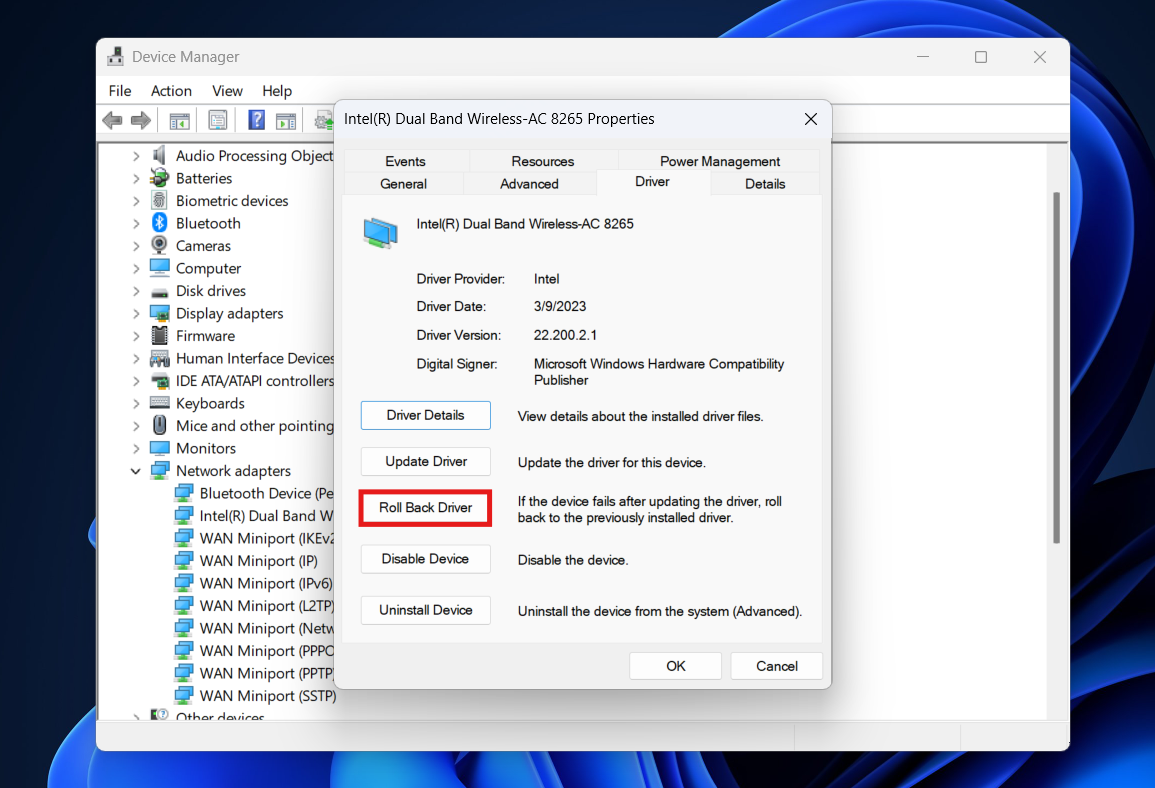
Note- If the Roll Back Driver button is grayed out and unclickable, it means Windows does not have previous driver files saved in its backup cache. You will need to move on to the next step.
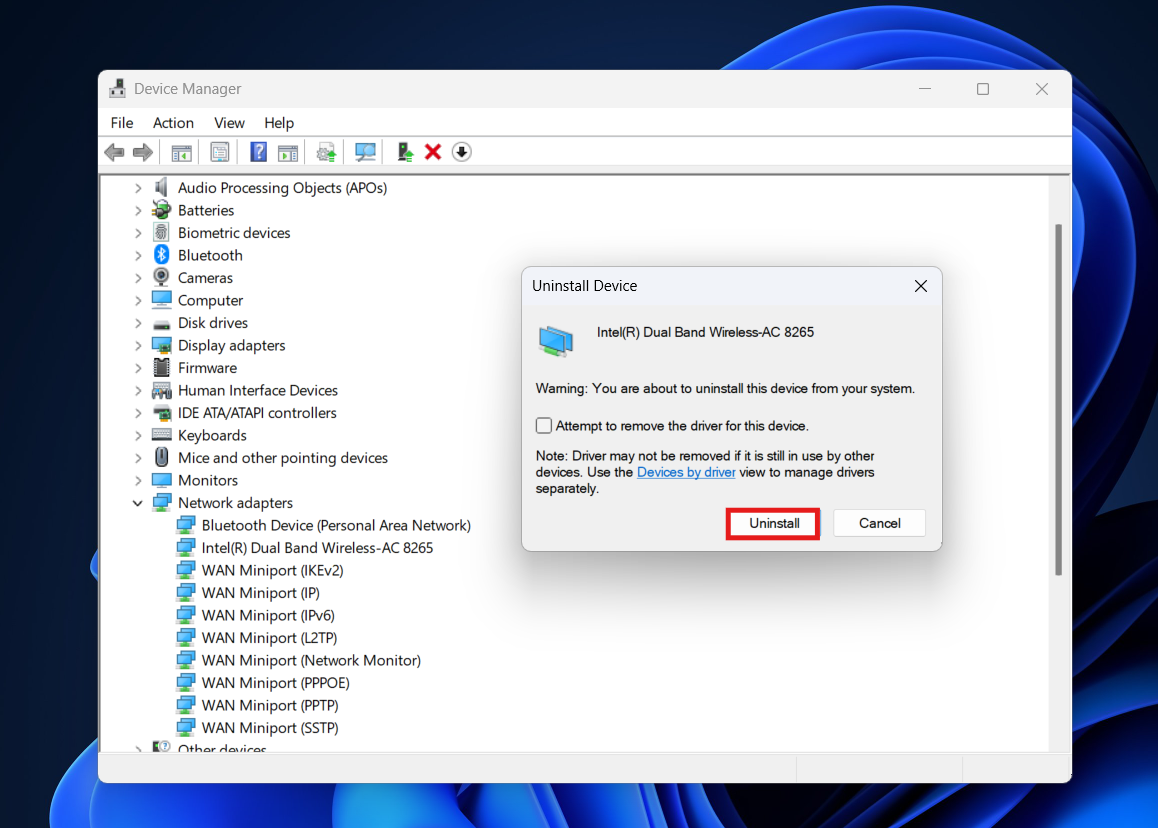
3. Complete Driver Uninstall and Clean Reinstall
If rolling back is not an option, the current driver file is likely deeply corrupted. You must force Windows to completely delete the bad software from the “Driver Store” and reinstall a fresh, default version upon restarting.
- Open Device Manager and expand the Network adapters section.
- Right-click your malfunctioning network adapter and select Uninstall device.

- A warning dialogue box will pop up. Crucial Step: Look for a checkbox that says “Attempt to remove the driver software for this device” (or similar wording depending on your Windows version). Check this box. This ensures Windows deletes the corrupted files rather than just hiding them.
- Click Uninstall. The adapter will completely disappear from the Device Manager list.

- Restart your computer completely.
- When Windows boots back up, its “Plug and Play” service will automatically detect the physical hardware sitting in the motherboard. Realizing it has no software, Windows will pull a clean, native driver from its internal repository and install it.
- Check your taskbar to see if the Wi-Fi or Ethernet icon has returned to normal.

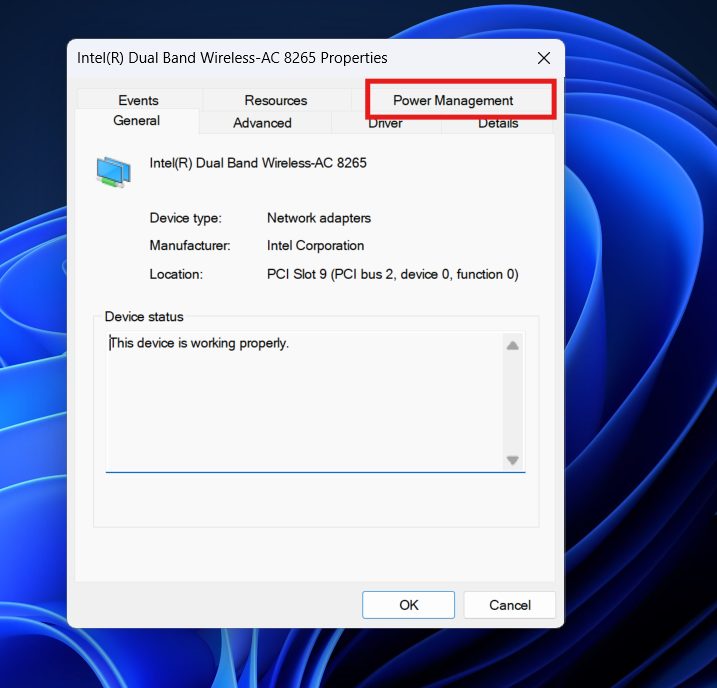
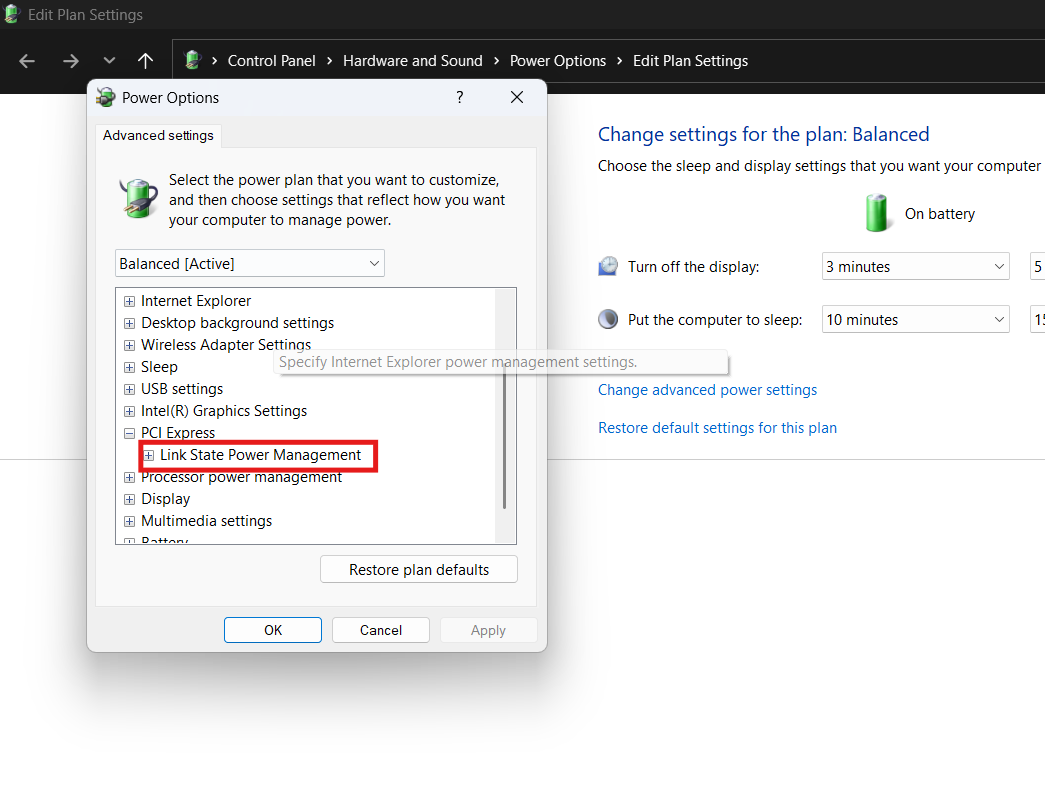
4. Disable PCIe Link State Power Management
Windows features aggressive power-saving protocols, especially on laptops, designed to turn off unused hardware to preserve battery life. Sometimes, a bug prevents the system from waking the network adapter back up when you need the internet, triggering the startup failure. You must tell Windows to stop managing the power for this specific piece of hardware.
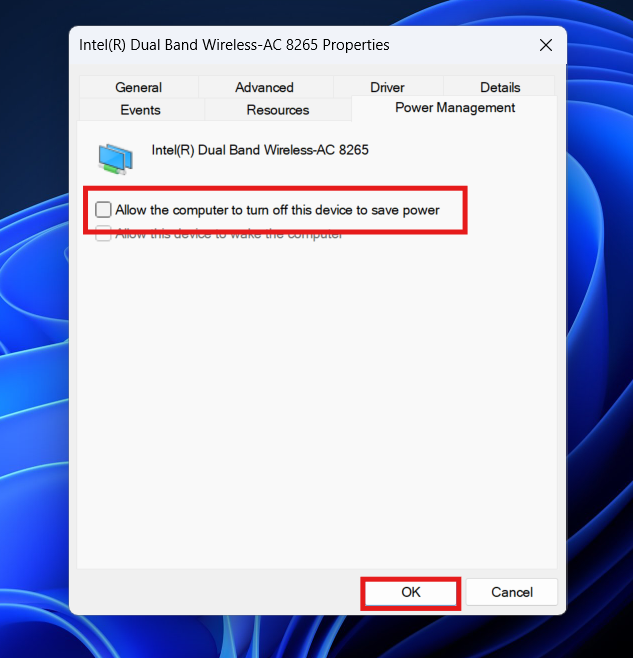
- Open Device Manager, right-click your Network Adapter, and choose Properties.
- Look for a tab at the top labeled Power Management.

- Uncheck the box that says Allow the computer to turn off this device to save power.

- Click OK.
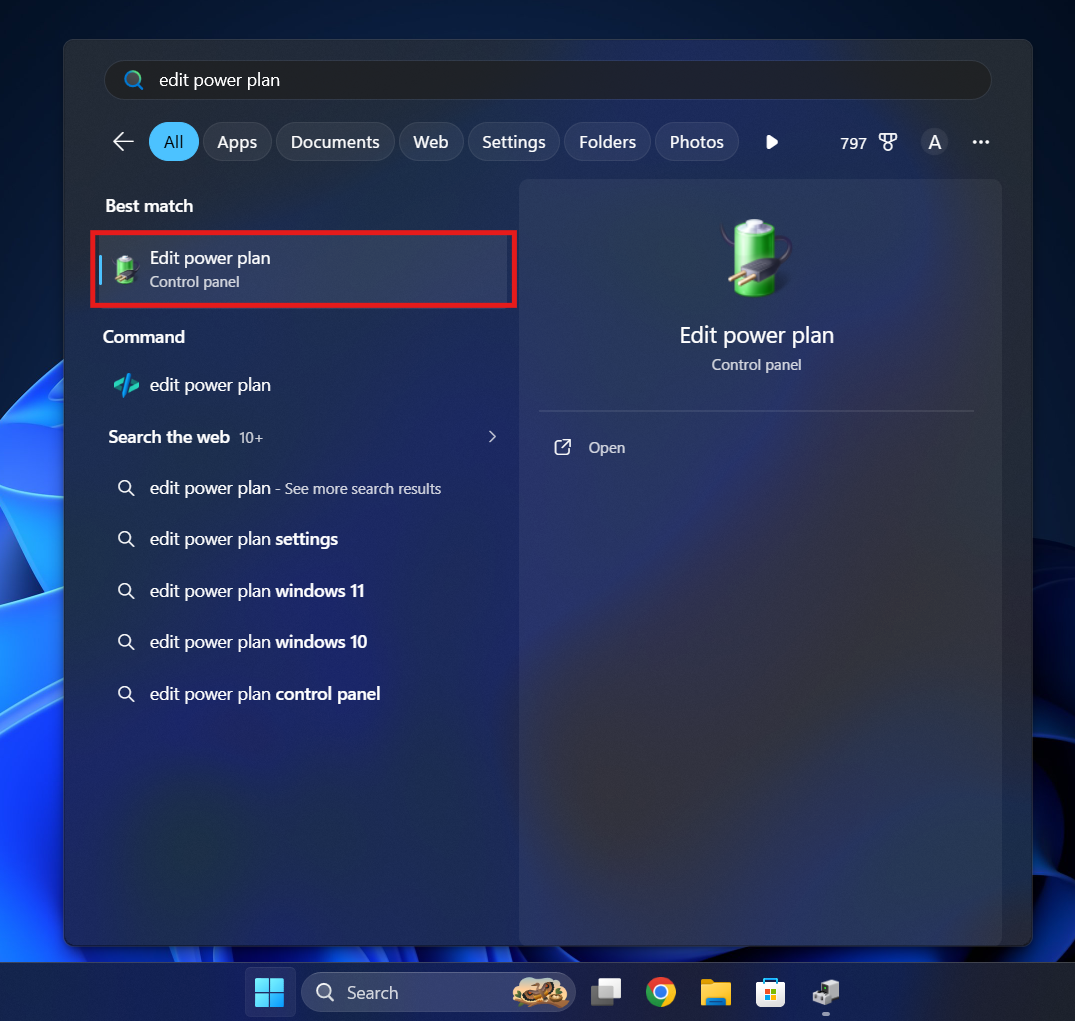
- Next, you need to adjust the system-wide power plan. Click the Start button and type Edit power plan, then hit Enter.

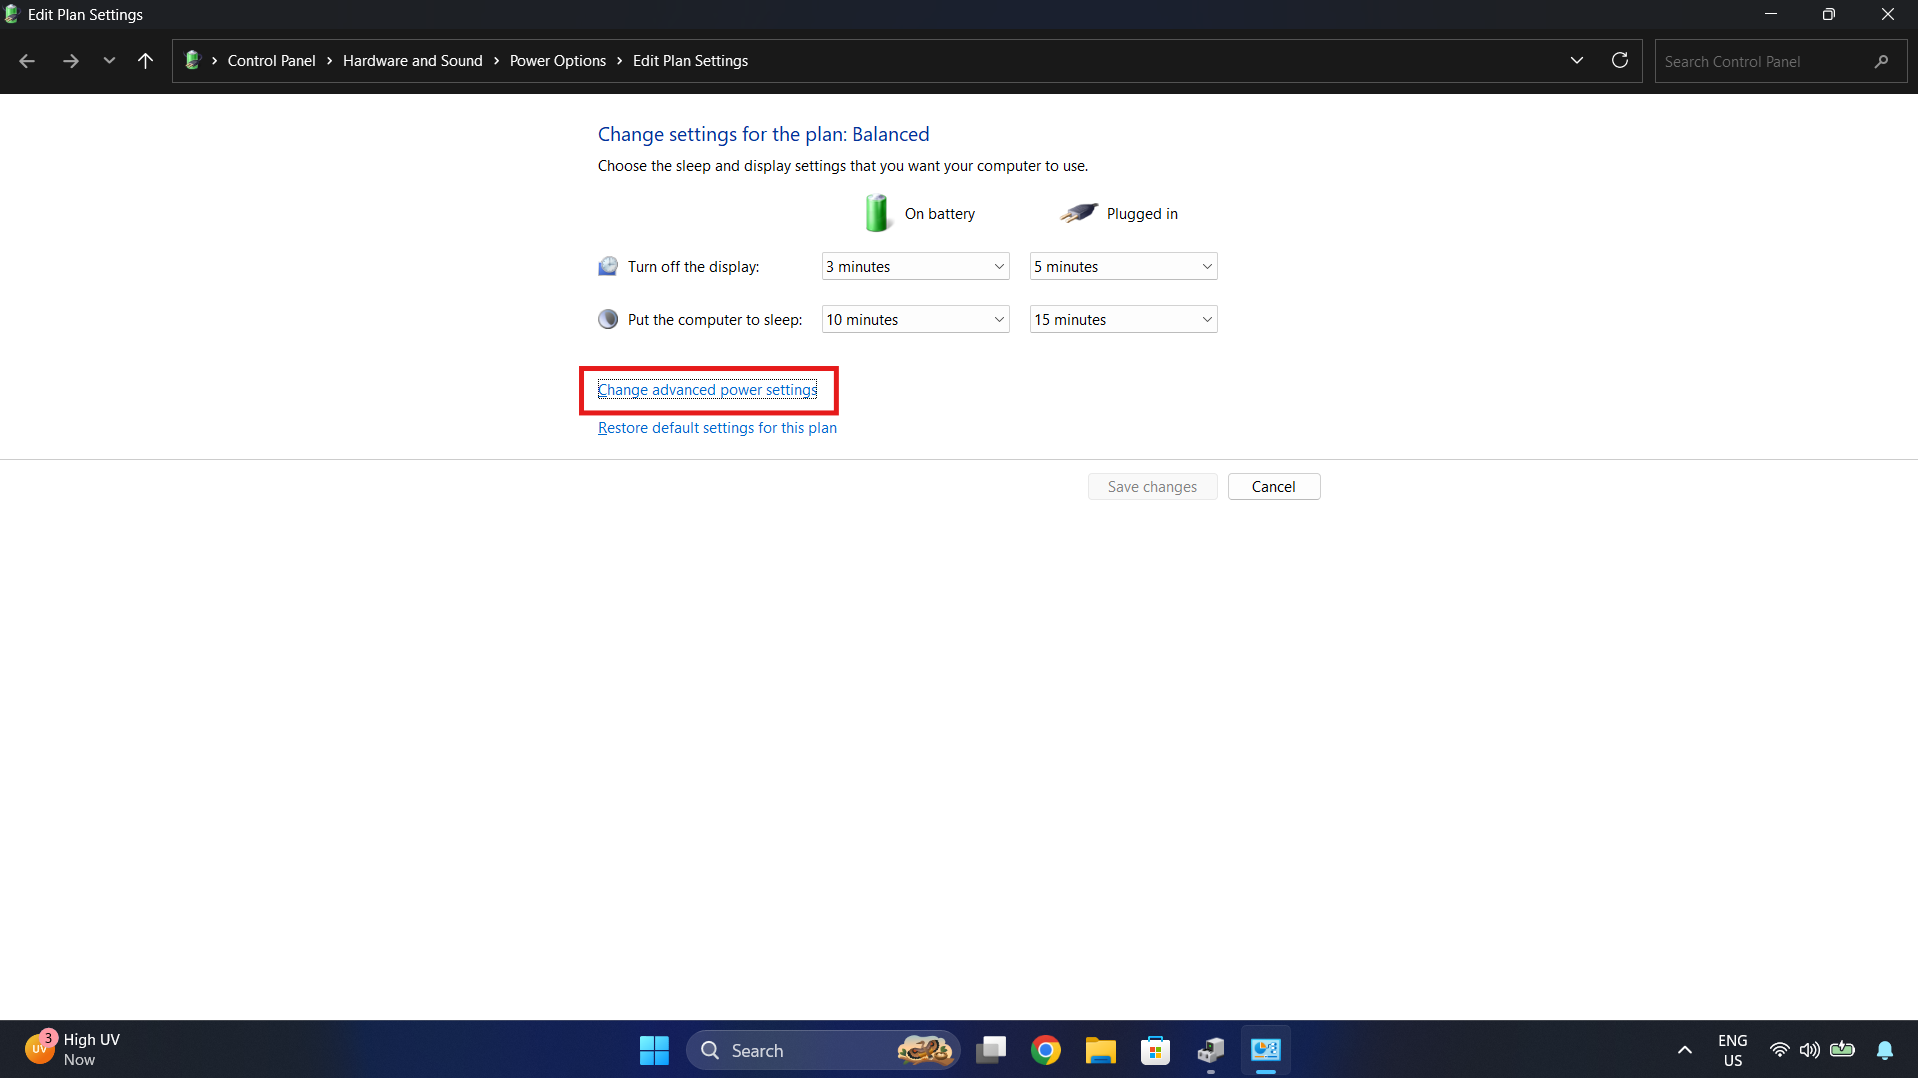
- Click on Change advanced power settings.

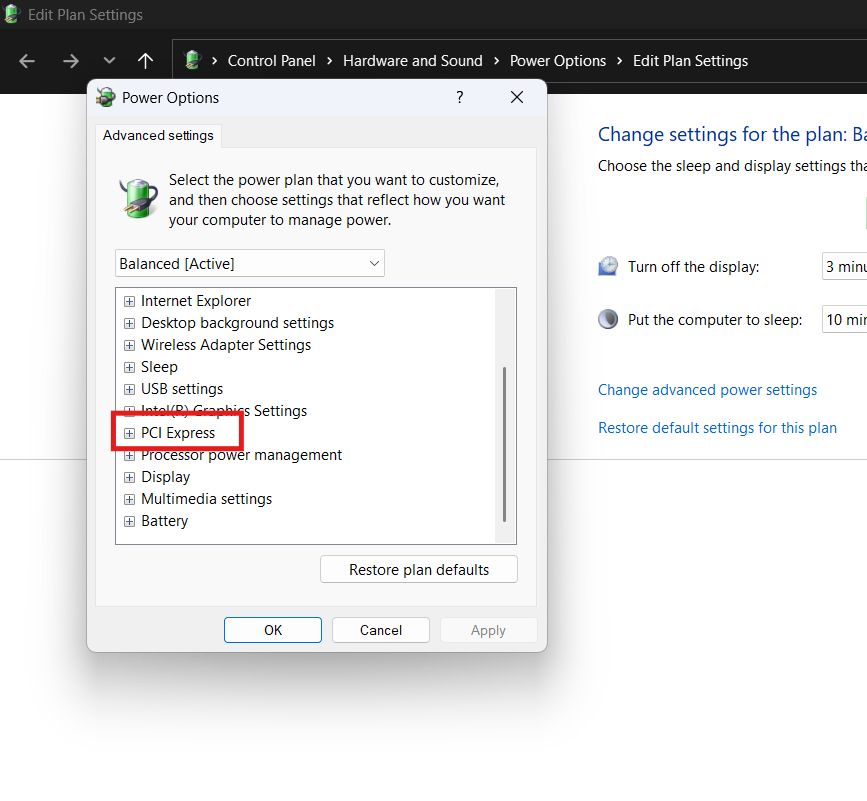
- A new window will open. Scroll down the list and expand PCI Express.

- Expand Link State Power Management.

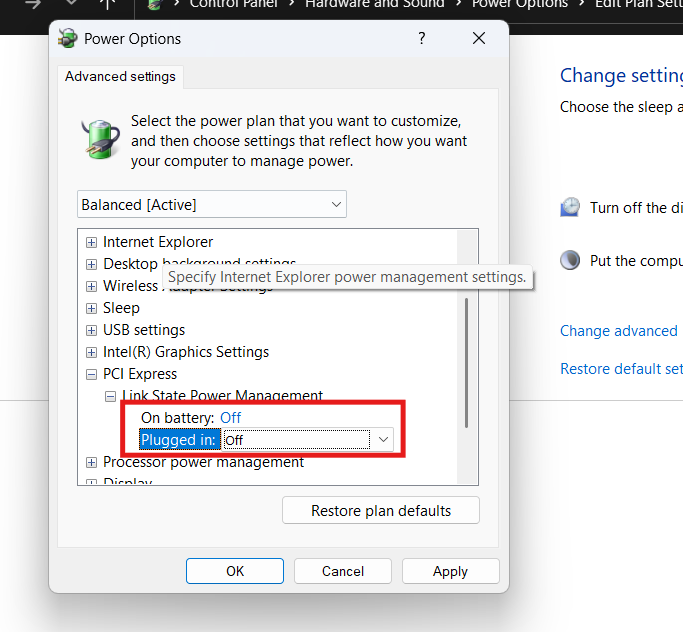
- Change the setting to Off for both “On battery” and “Plugged in“.

- Click Apply, then OK, and restart your computer to lock in the new power rules.
5. Reset the TCP/IP and Winsock Network Stack
If the physical adapter is fine and the drivers are clean, the Windows networking protocols themselves might be tangled. The TCP/IP stack and the Windows Sockets API (Winsock) handle how your computer requests and receives data. If these background services crash, the hardware cannot establish a connection. You can use the Command Prompt to flush out the old network configurations and rebuild the stack entirely from scratch.
- Click the Start button and type cmd into the search bar.
- Do not just press Enter. You must right-click on the Command Prompt app result and select Run as administrator. If you do not run it with admin privileges, the commands will be denied.
- A black text window will open. You need to type the following exact commands, pressing the Enter key after every single line. Wait for the success message before typing the next command:
- Type netsh winsock reset and press Enter. (This resets the socket APIs).
- Type netsh int ip reset and press Enter. (This rebuilds the TCP/IP stack).
- Type ipconfig /release and press Enter. (This drops your current, broken IP address).
- Type ipconfig /renew and press Enter. (This requests a fresh IP address from your router).
- Type ipconfig /flushdns and press Enter. (This clears any corrupted web routing caches).
- Close the Command Prompt window and perform a full system reboot for the network reset to take full effect.
6. Delete Upper and Lower Registry Filters (Advanced)
If you have tried all the standard fixes and the Network Adapter ‘This device cannot start. (code 10)’ error is stubbornly persisting, the Windows Registry might contain corrupted filter keys. Device classes in Windows use “UpperFilters” and “LowerFilters” to modify device behavior, and third-party antivirus software or VPNs can sometimes corrupt these keys, locking out the hardware.
Disclaimer: Editing the Windows Registry can cause system instability if done incorrectly. Follow these steps exactly and do not delete anything else.
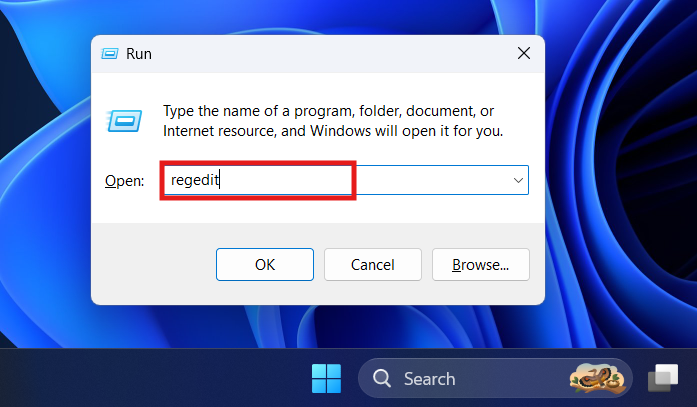
- Press the Windows Key + R to open the Run dialogue box.
- Type regedit and press Enter. Click Yes if the User Account Control prompts you.

- The Registry Editor will open. You need to navigate through the folder tree on the left pane exactly to this path:
HKEY_LOCAL_MACHINE\SYSTEM\CurrentControlSet\Control\Class\{4d36e972-e325-11ce-bfc1-08002be10318} - Once you click on the folder starting with {4d36e972…} (which is the specific class identifier for Network Adapters), look at the right side of the window.
- Look for files named UpperFilters and LowerFilters.

- If you see either of these files, right-click them and select Delete. Confirm the deletion.
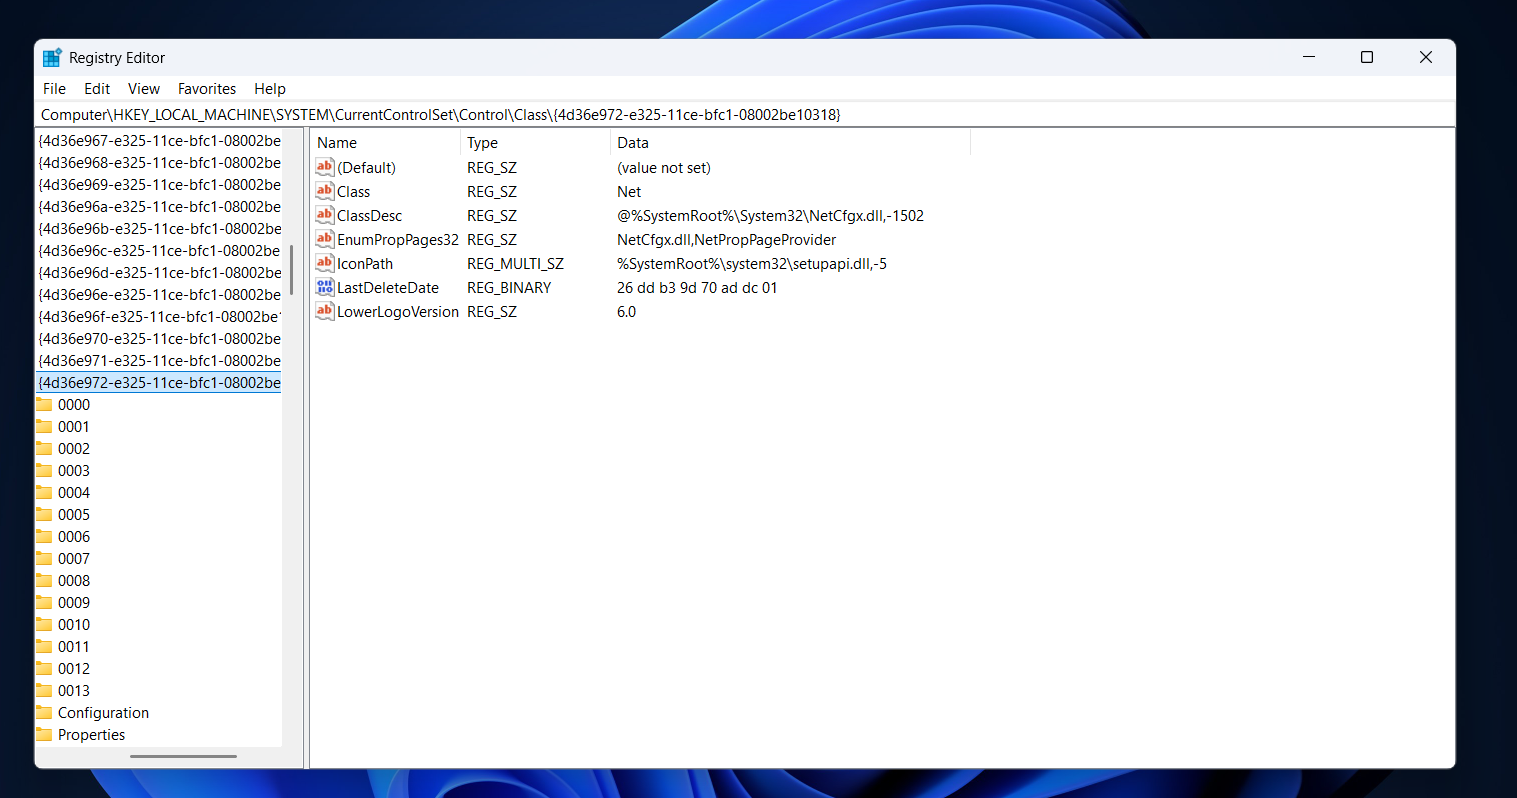
Note: If you do not see these specific files in the right pane, do not delete anything else. Simply close the Registry Editor.
- If you deleted the filters, close the Registry Editor and restart your computer immediately to rebuild clean hardware filters.
7. Perform a System Restore
If this network error started happening completely out of the blue—perhaps after installing a new piece of software or waking up to a forced Windows update—your best option might be to simply turn back the clock. Windows automatically creates “Restore Points” before major system changes, allowing you to revert your operating system’s settings back to a day when the internet was working perfectly, without deleting your personal files or documents.
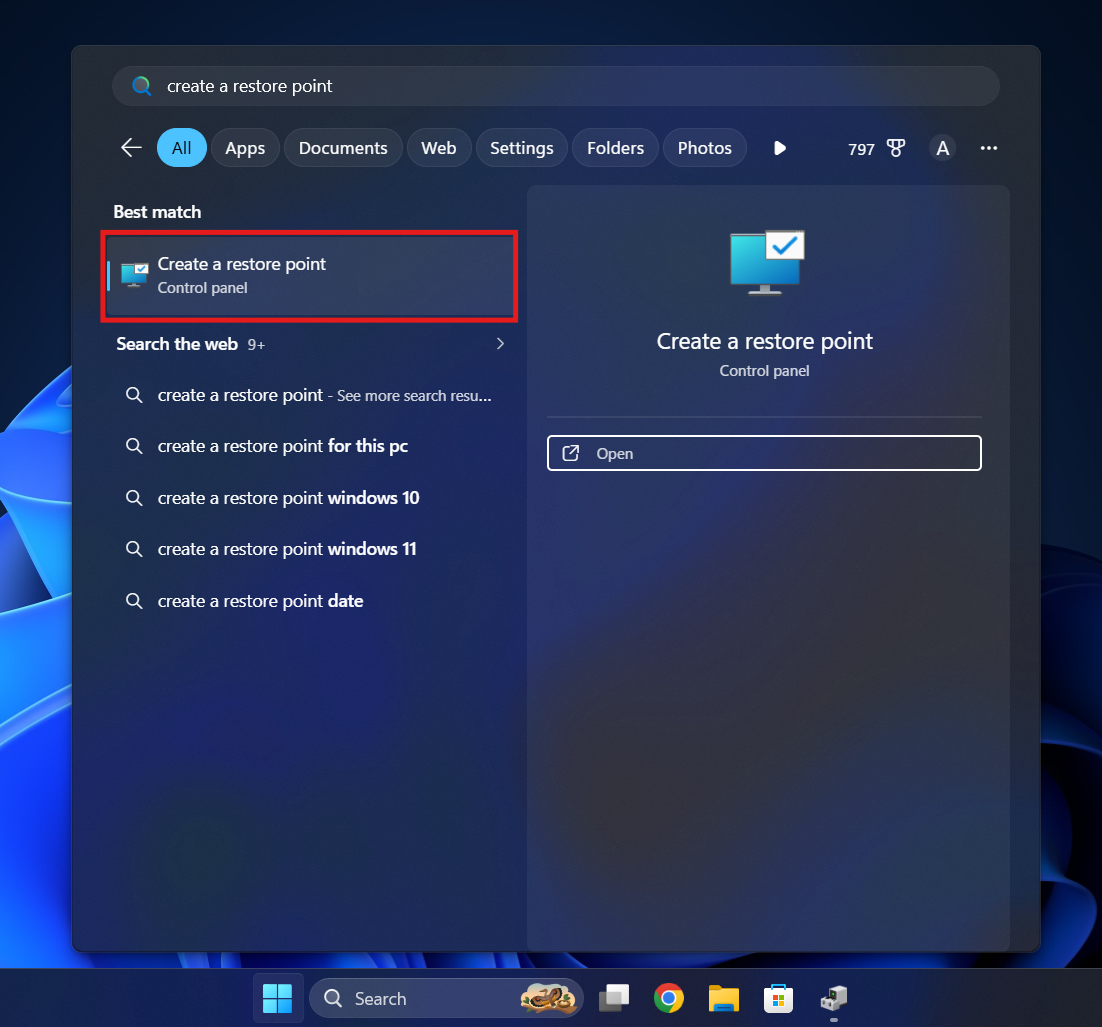
- Click the Windows Start button and type Create a restore point, then press Enter.

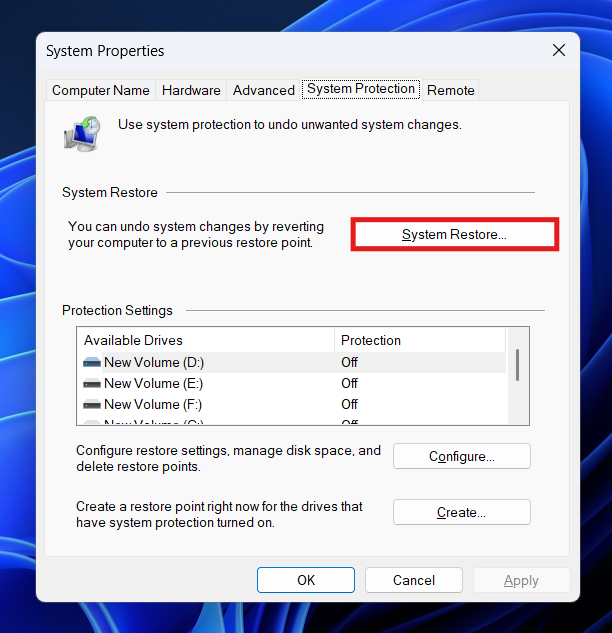
- In the System Properties window that opens, click the button labeled System Restore…

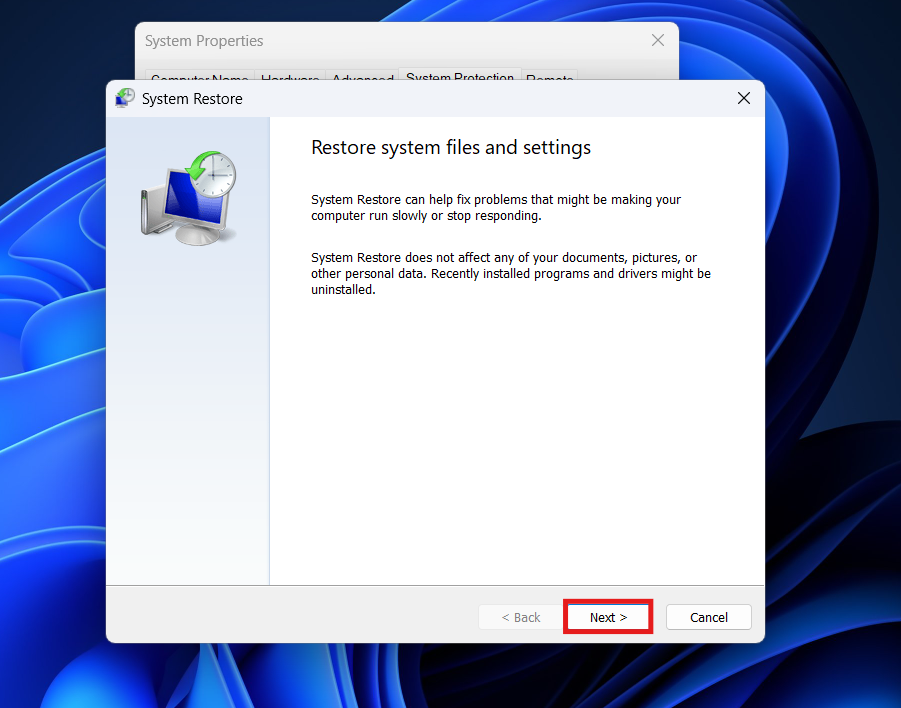
- A wizard will appear. Click Next.

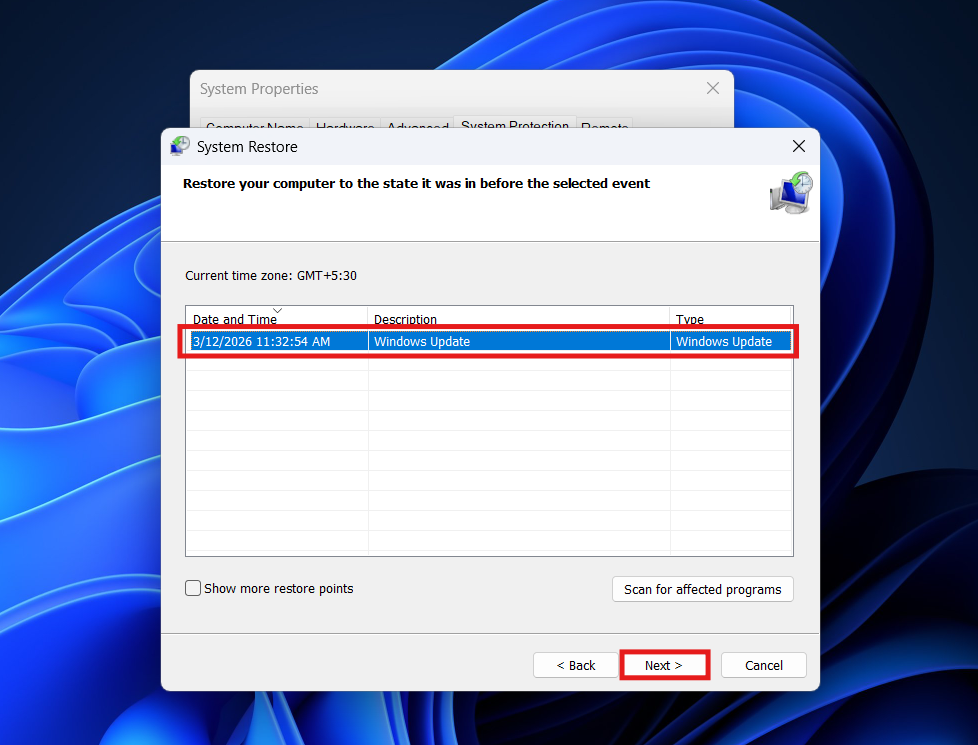
- You will see a list of recent restore points with dates and timestamps. Look for a date right before your internet stopped working.

- Select that specific restore point and click Next.
- Click Finish to confirm.
- Your computer will restart and begin the restoration process. This can take anywhere from 10 to 30 minutes. Do not turn off your computer during this time. Once it boots back to the desktop, check your network adapter.
8. Hardware Reseating and BIOS Updates
If every single software fix fails, you must consider physical and firmware-level interventions. While rare, physical components can become slightly unseated due to thermal expansion (the computer heating up and cooling down over years) or moving the PC chassis.
- For Desktop PCs: Turn off the computer, unplug it, and open the side panel. If you are using a dedicated PCIe Wi-Fi card, unscrew it, pull it out of the motherboard slot, and firmly push it back in to ensure the gold pins are making perfect contact.
- For USB Adapters: If you are using an external USB Wi-Fi dongle, unplug it and move it to a different USB port, preferably one on the back of the motherboard rather than the front panel, as rear ports deliver more stable power.
- BIOS Update: Your motherboard’s basic input/output system (BIOS) might have a bug handling modern network protocols. Because you have no internet, you will need to use a second, working computer to download the latest BIOS update from your motherboard manufacturer’s website onto a USB flash drive. Plug that flash drive into your broken PC, reboot into the BIOS menu, and flash the new firmware to ensure maximum hardware compatibility.
Final Words
Being locked out of your internet connection is incredibly stressful, especially because it isolates you from the web searches and downloads you usually rely on to fix computer problems. However, a Code 10 error is a classic communication failure, not a death sentence for your hardware. By methodically draining the residual system power, clearing out corrupted driver files in the Device Manager, resetting your internal TCP/IP network stack via the command line, and ensuring Windows isn’t aggressively cutting power to the card, you can force the operating system to re-establish a clean, stable connection.
Remember, your computer relies on perfect, uncorrupted software handshakes to operate its physical hardware components. The steps outlined above are specifically designed to break a bad handshake and initiate a fresh one. Once you successfully apply these fixes, you can go back to browsing, streaming, and working soundly, knowing your hardware is communicating flawlessly exactly as it should.
ALSO READ:


 Error: Full Fix Guide")

