- XPS files are important for document fidelity, archiving, and security features like digital signatures.
- Methods to open XPS files in Windows 10 include installing XPS viewer from Windows Settings, Run, or Command Prompt.
- Alternatively, XPS files can be converted to PDF format using online converters for easy access on Windows 10.
In today’s digital age, handling various file formats efficiently is crucial for both personal and professional tasks. Among these formats, XPS files stand out as a unique and sometimes challenging type to work with, especially for Windows 10 users. This comprehensive guide will walk you through the process of viewing XPS files and documents in Windows 10, ensuring a seamless and user-friendly experience.
Before diving into the specifics of viewing XPS files, it’s essential to understand what they are. XPS, or XML Paper Specification, is a file format developed by Microsoft. It’s similar to PDF but is based on XML instead of the PostScript language. XPS files are primarily used for document sharing and printing, as they preserve the layout and formatting of the original document.

Why Use XPS Files?
XPS files are beneficial for several reasons. They maintain document fidelity, ensuring that the file appears the same on any device. This format is also ideal for document archiving, as it’s less likely to become obsolete or unsupported. Additionally, XPS offers robust security features, including digital signatures and rights management.
View XPS Files and Documents in Windows 10
There are several methods that you can use to install and activate XPS viewer on your Windows 10 PC.
Method 1: From Windows Settings.
Step 1- Open Settings on your Windows 10 PC.
Step 2- Here, search and click on Apps >> Apps & features.
Step 3- Under the ‘Apps & features‘ section, click on the ‘Manage optional features‘ link.

Step 4- Now, click on the ‘Add a feature‘ option.
Step 5- Search and select ‘XPS Viewer‘ from the list and then, click on the ‘Install‘ option.

XPS Viewer will be successfully installed on your Windows 10 PC. You can now view all your XPS documents on your Windows 10 PC.
Method 2: Install the XPS Viewer app from Run
Step 1- Press the Windows key and R key on your keyboard simultaneously.
Step 2- Type ‘xpsrchvw‘ in the text box and hit Enter.
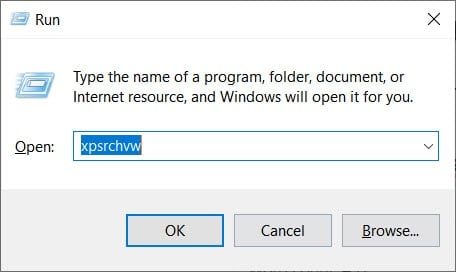
You will notice that XPS viewer is activated on your Windows 10 PC. You can start accessing XPS files on your PC.
Method 3: Install the XPS Viewer Via Command Prompt.
Step 1- Open Command Prompt on your Windows 10 PC.
Step 2- Type ‘xpsrchvw‘ and hit Enter.
This will turn on the XPS viewer on your Windows 10 PC.
Method 4: Convert XPS to PDF format
As you know, PDF is one of the most user-friendly file formats. Thus, you can convert your XPS file to PDF and access it on your Windows 10 PC.
There are several websites available on the internet which will help you in successfully converting the XPS files to PDF format.
You can either convert XPS files using an XPS converter or you can go with some websites that will help you to convert your files to PDF.
- xpstopdf.com
- online2pdf.com/convert-xps-to-pdf
ALSO READ: SOLVED: System Thread Exception Not Handled Windows 10
Some Frequently Asked Questions include:
Q1. How do I view XPS files?
Since the default XPS file viewer was removed from the Windows 10 new installations in the April 2018 update, you need to install it manually. The methods which you can execute are listed above in detail.
Q2. What is an XPS file?
XPS stands for XML Paper Specification. This file format was introduced by Microsoft Windows as a competitor for PDF file format. However, it did not gain much popularity.
Q3. Is XPS format dead?
Microsoft Windows has officially retired the XPS format in April 2018. It has also removed the XPS viewer from all the new installations. Thus, it is safe to say that the XPS format is dead.
Conclusion:
These are some of the best methods which you can use to access your .XPS Files on your Windows 10 PC. If you know of any better method to access XPS documents on Windows 10, then please let us know about it in the comments section below.


")


