- The IRQL_NOT_LESS_OR_EQUAL error on Windows 10/11 is a type of Blue Screen of Death caused by incorrect memory access often due to faulty drivers, bad RAM, or third-party antivirus software.
- You can fix this error by updating or rolling back device drivers, conducting memory diagnostics, repairing corrupt system files, or uninstalling problematic antivirus programs. Techniques such as running disk checks, disabling overclocking, performing a clean boot, and updating your BIOS can also help.
The “Blue Screen of Death” (BSOD) is every Windows user’s nightmare, and few error codes are as persistent or frustrating as the IRQL_NOT_LESS_OR_EQUAL Blue Screen Error. You are in the middle of working, gaming, or browsing when suddenly, everything freezes. Your screen turns blue, a sad face appears, and your PC forces a restart. If this sounds familiar, you are dealing with a memory access violation that has plagued Windows for years.
“IRQL” stands for Interrupt Request Level. This error occurs when a system process or a device driver attempts to access a memory address that it does not have permission to access. Essentially, a lower-priority driver tries to access memory reserved for the kernel, causing Windows to shut the system down immediately to prevent data corruption. While the name sounds highly technical, the culprit is almost always mundane: a corrupt device driver, a faulty stick of RAM, or interference from third-party antivirus software.
If you are tired of losing your work to random crashes, this guide is for you. We have compiled a comprehensive list of solutions for 2026, ranging from simple software updates to advanced memory diagnostics. By following these steps, you can identify the specific driver or component causing the conflict and banish the IRQL_NOT_LESS_OR_EQUAL Blue Screen Error for good.
Fix IRQL_NOT_LESS_OR_EQUAL BSOD Windows 10/11
This article will list various troubleshooting steps to help fix the IRQL_NOT_LESS_OR_EQUAL Blue Screen Error on Windows 11 and Windows 10. We recommend following them in order, as the earlier steps resolve the most common software conflicts.
1. Identify the Culprit (Analyze the Error)
Before you start randomly updating things, it helps to know what caused the crash. The Blue Screen usually displays a filename next to the error code, such as ntoskrnl.exe, ndis.sys, or nvlddmkm.sys. These filenames are clues.
- ndis.sys / netio.sys: These indicate issues with your Network Drivers (Wi-Fi or Ethernet).
- nvlddmkm.sys / atikmdag.sys: These point to your Graphics Card (NVIDIA or AMD).
- usbohci.sys: This points to USB Controllers.
- ntoskrnl.exe: This is the Windows kernel itself, usually indicating RAM (Memory) issues or general system corruption.
How to find this info after the restart:
- Download a free tool called BlueScreenView (a safe utility by NirSoft).
- Run the program. It automatically reads the “Minidump” files Windows creates when it crashes.
- Look at the “Caused By Driver” column. This will tell you exactly which driver failed, allowing you to target your fix in the steps below.
2. Update or Rollback Drivers
Since this error is primarily caused by drivers attempting to access unauthorized memory addresses, ensuring your drivers are stable is the number one fix.
Updating Drivers:
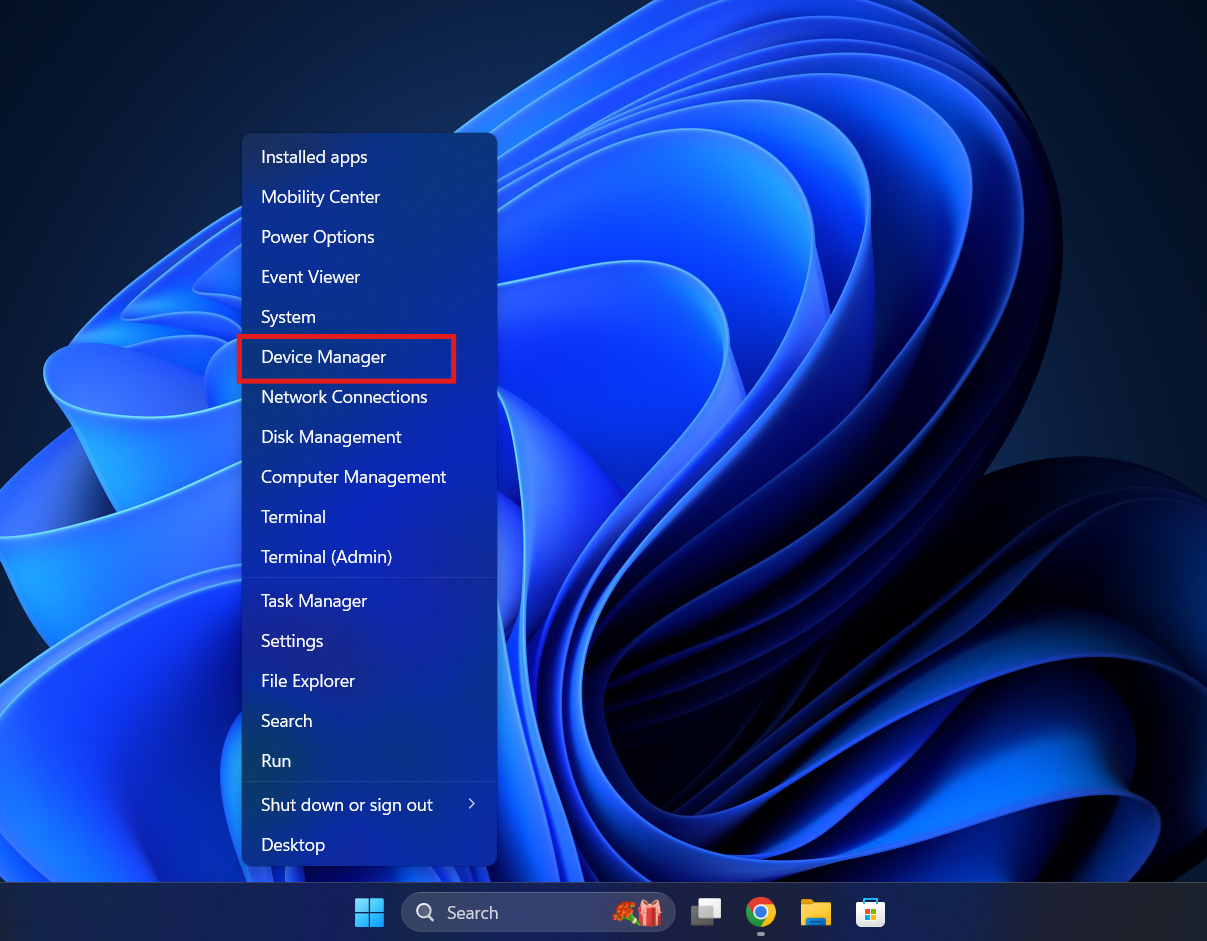
- Press Windows + X and select Device Manager.

- Look for any device with a yellow exclamation mark. This is a red flag. Right-click it and select Update driver.

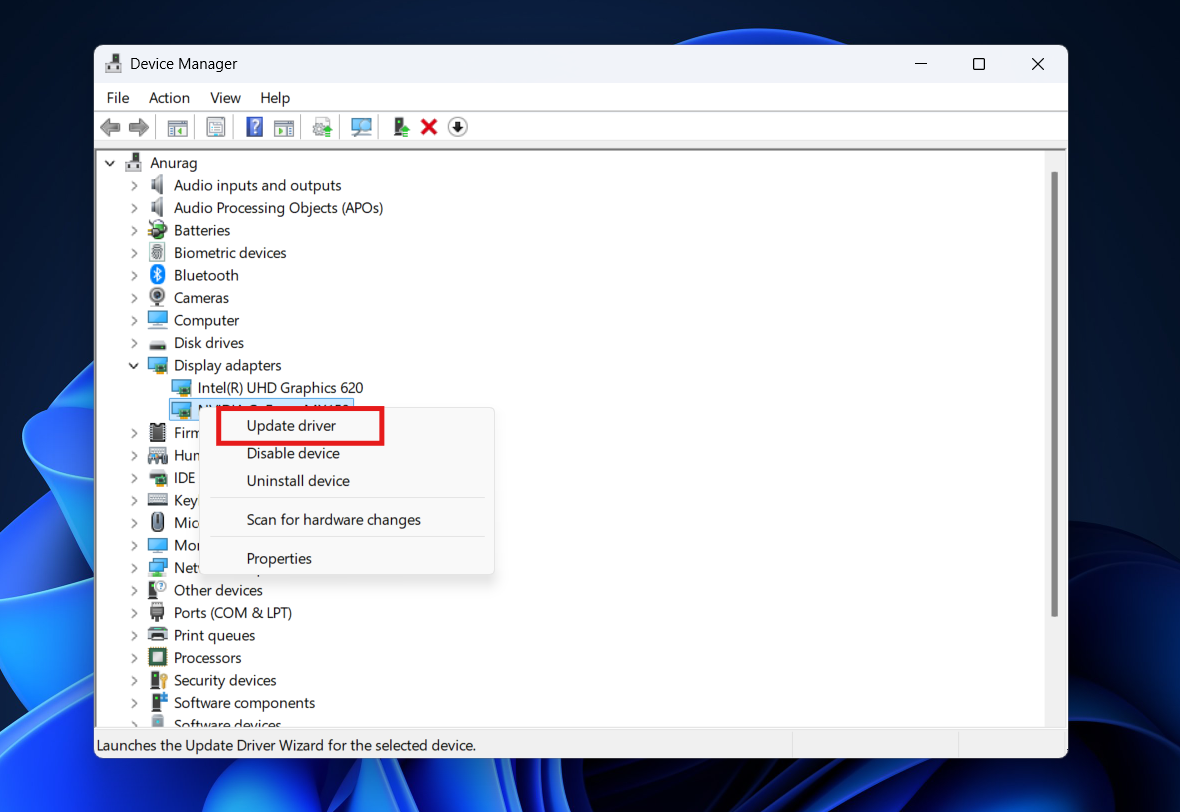
- If no warnings are visible, focus on the most common offenders: Network adapters and Display adapters.
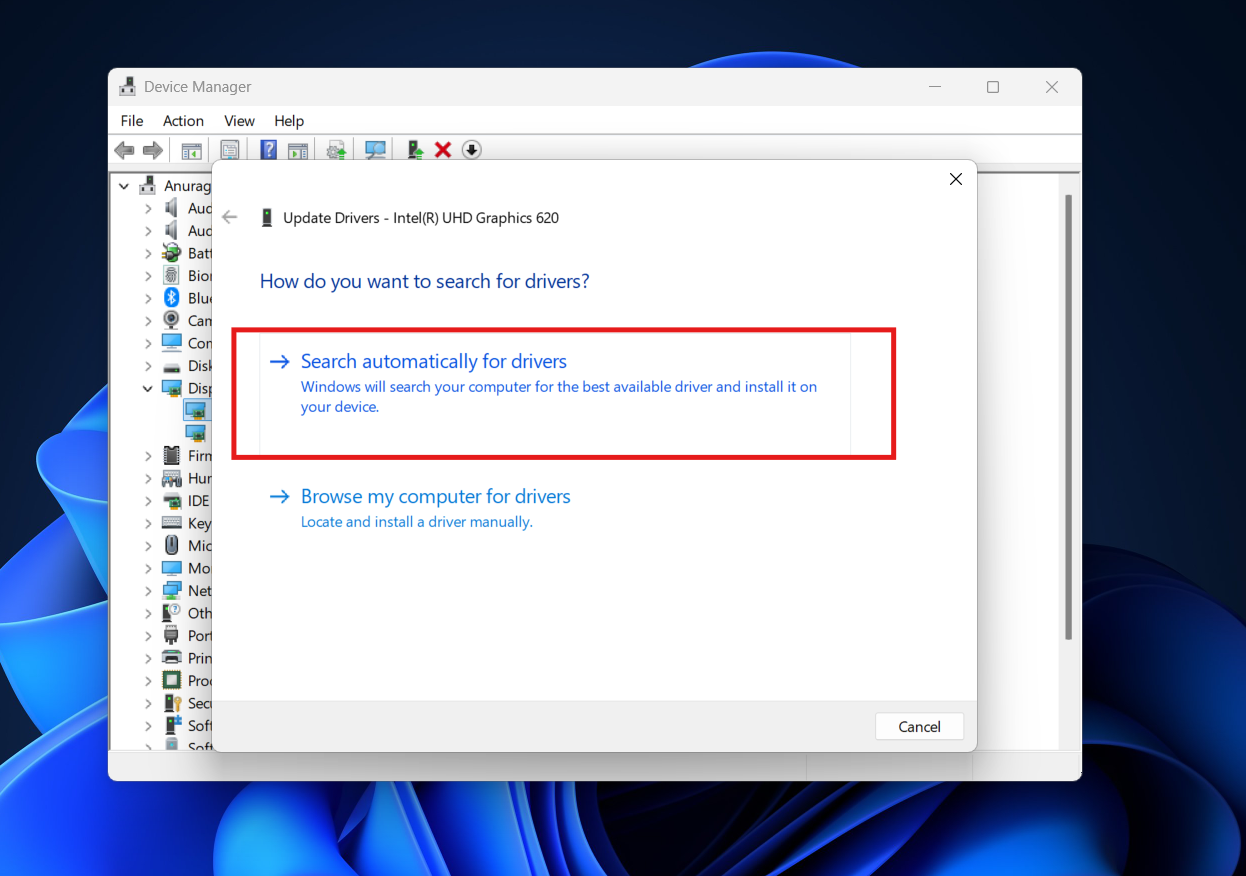
- Expand Network adapters, right-click your main Wi-Fi/Ethernet controller (e.g., Intel, Realtek), and select Update driver > Search automatically for drivers.

- Repeat this for your GPU under Display adapters.
Rolling Back Drivers: If the error started happening immediately after you updated a driver (or after a Windows Update), the new driver is likely the problem.
- Right-click the device in Device Manager and select Properties.
- Go to the Driver tab.
- Click Roll Back Driver if the button is clickable. This reverts the driver to the previous stable version.
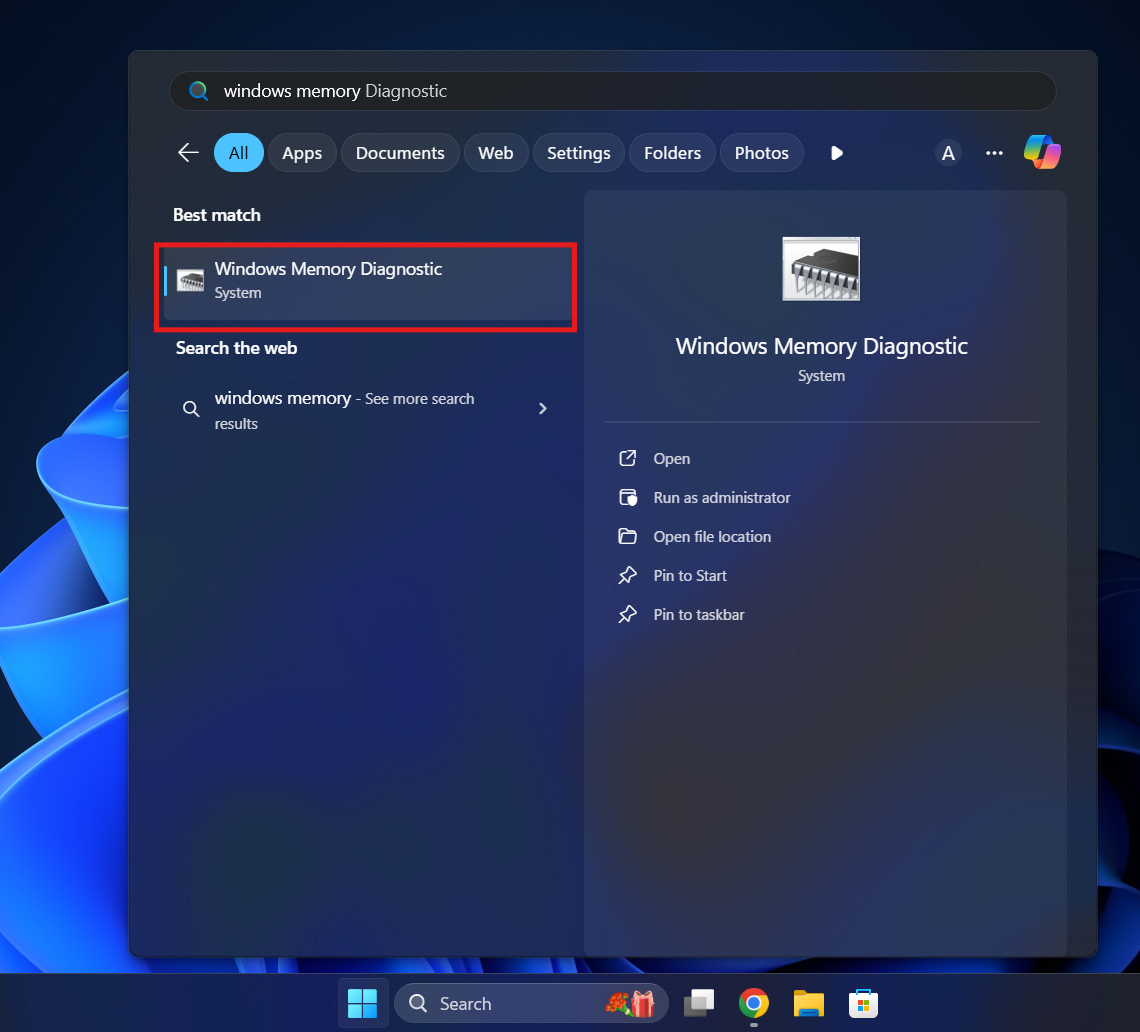
3. Run Windows Memory Diagnostic
If your drivers are fine, the issue might be physical hardware—specifically, your RAM (Random Access Memory). If a stick of RAM is failing, it can report incorrect memory addresses to the CPU, triggering the IRQL crash instantly. Windows has a built-in tool to test this, though it requires a restart.
- Press Windows + S, type Windows Memory Diagnostic, and open it.

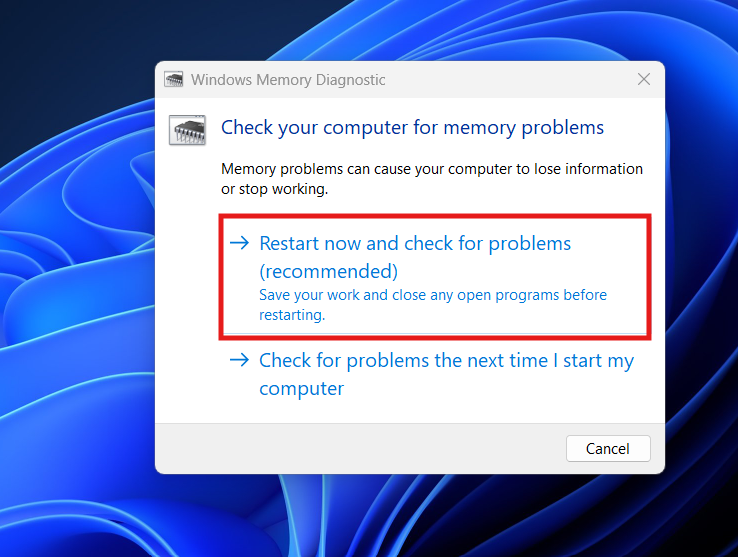
- Select Restart now and check for problems (recommended). Note: Save all your work first!

- Your PC will restart and boot into a blue screen test environment. You will see a progress bar. This process can take 15–45 minutes depending on how much RAM you have. Do not turn off the PC.
- Once finished, Windows will reboot automatically.
- To see the results: Right-click the Start button > Event Viewer > Windows Logs > System. Look for a recent entry titled MemoryDiagnostics-Results.
- The Result: If it says “No memory errors were detected,” your RAM is likely fine. If it finds errors, you likely have a faulty stick of RAM that needs to be replaced.
4. Repair Corrupt System Files (SFC and DISM)
Corrupted Windows system files can lead to the IRQL_NOT_LESS_OR_EQUAL error because the OS itself is trying to execute broken code. The System File Checker (SFC) and Deployment Image Servicing and Management (DISM) tools can automatically scan for and replace these corrupt files with fresh copies from Microsoft’s servers.
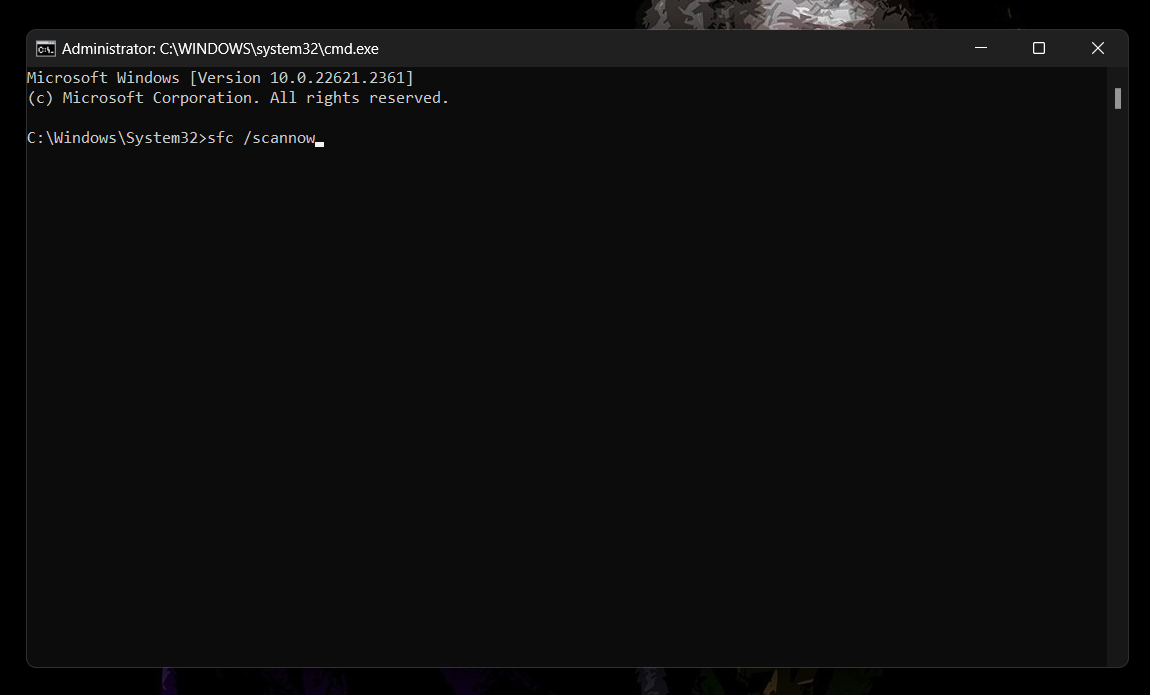
- Press Windows + S, type cmd.
- Right-click on Command Prompt and select Run as administrator.
- Type the coomand sfc /scannow and press Enter.

- Wait for the scan to complete. It will take 5-10 minutes.
- Outcomes:
- “Windows Resource Protection did not find any integrity violations” (System is fine).
- “Windows Resource Protection found corrupt files and successfully repaired them” (Restart your PC, issue might be fixed).
- If errors persist or SFC fails, run the DISM command to repair the actual Windows image: DISM /Online /Cleanup-Image /RestoreHealth
- Let this process run (it may appear stuck at 62.3% or 84.9%—this is normal). Once done, restart your computer.
5. Check Disk for Errors (CHKDSK)
Sometimes the error isn’t in the RAM, but on your storage drive (SSD or HDD). If a sector of your drive is corrupt, Windows might crash when trying to read a driver file located there.
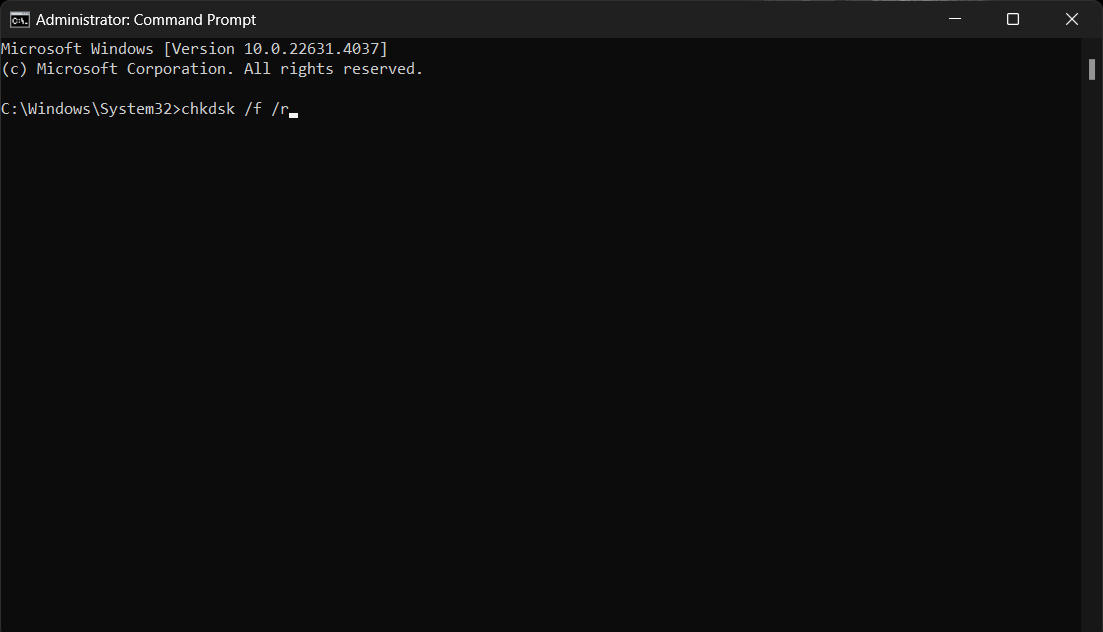
- Open Command Prompt as administrator again.
- Type the command chkdsk /f /r and press Enter.

- You will see a message: “Chkdsk cannot run because the volume is in use… Would you like to schedule this volume to be checked the next time the system restarts? (Y/N)”.
- Type Y and press Enter.
- Restart your PC. Windows will perform a deep scan of your drive during boot. This can take an hour or more for older Hard Drives, so be patient.
6. Uninstall Third-Party Antivirus Software
In 2026, Windows Defender is highly capable and often ranks alongside paid antivirus software in detection rates. However, many users still run third-party suites like McAfee, Avast, Norton, or Kaspersky. Sometimes, the “real-time protection” features of these programs hook into the system kernel too aggressively (to scan for viruses), causing memory conflicts that result in an IRQL error.
- Press Windows + I to open Settings.
- Go to Apps > Installed Apps.
- Find your third-party antivirus software in the list.
- Click the three dots next to it and select Uninstall.
- Restart your PC. Windows Defender will automatically turn on to keep you safe.
- Use your computer for 2-3 days. If the blue screens stop, the antivirus software was the culprit. You can try reinstalling a fresh version or just stick with Defender.
7. Disable Overclocking and XMP
Are you a gamer or power user? If you have overclocked your CPU or enabled XMP (Extreme Memory Profile) in your BIOS to make your RAM run faster, this is a prime suspect. Even if your RAM is rated for 3600MHz, your CPU’s memory controller might struggle to maintain stability at that speed, leading to IRQL errors.
- Restart your PC and enter the BIOS/UEFI (usually F2, Del, or F10).
- Navigate to the OC (Overclocking) or AI Tweaker menu.
- Reset your CPU frequency to Auto or Default.
- Find the XMP (or DOCP/EXPO) setting. Turn it Off or set it to Disabled.
- Save changes and restart.
- Test your PC. If the crashes stop, your overclock was unstable. You may need to slightly increase voltage or lower the frequency to stabilize it.
8. Perform a Clean Boot
If you cannot pinpoint which driver or program is causing the crash, a Clean Boot can help. This starts Windows with a minimal set of drivers and startup programs, allowing you to isolate the problem.
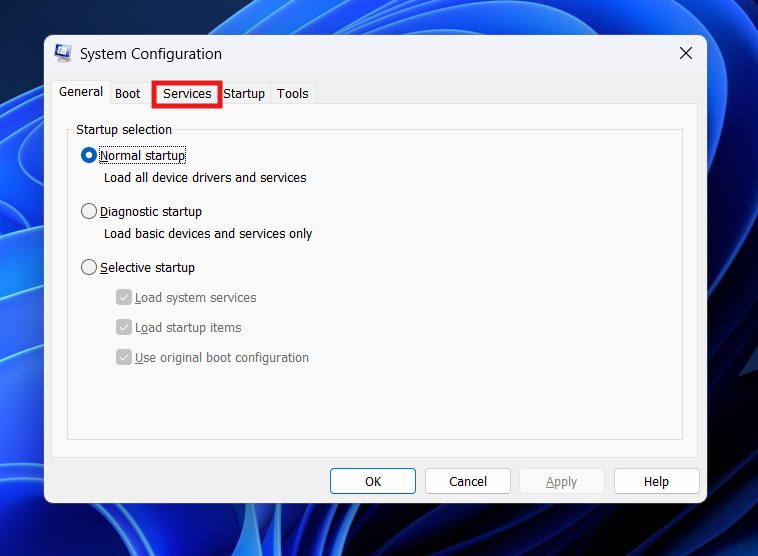
- Press Windows + R, type msconfig, and press Enter.
- Go to the Services tab.

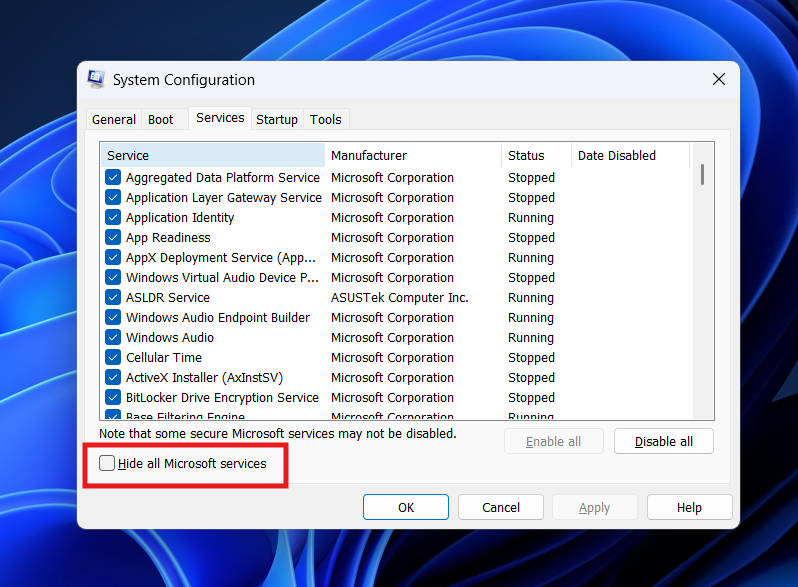
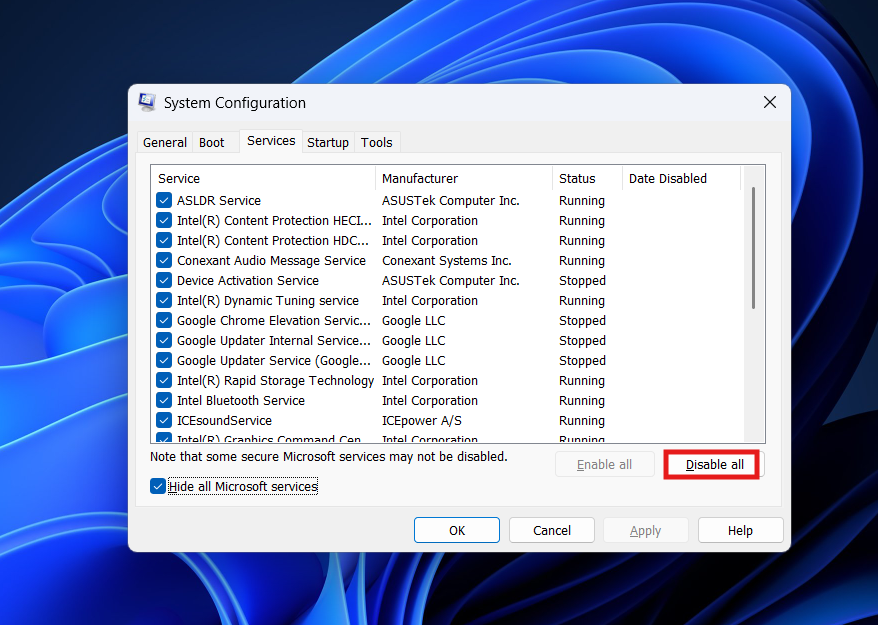
- Crucial Step: Check the box that says Hide all Microsoft services. If you skip this, you might disable essential Windows functions and boot into a broken system.

- Click Disable all.

- Go to the Startup tab and click Open Task Manager.
- Disable all startup apps listed there (Steam, Spotify, Discord, etc.).
- Restart your computer.
- If the IRQL_NOT_LESS_OR_EQUAL error disappears, the issue is caused by one of your installed programs. You can re-enable them one by one to find the offender.
9. Update Your BIOS/UEFI
An outdated motherboard BIOS can cause compatibility issues with newer Windows updates or newer hardware (like NVMe SSDs or modern GPUs). Manufacturers release BIOS updates specifically to improve “System Stability” and memory compatibility.
- Identify your motherboard model: Press Windows + R, type msinfo32, and look at BaseBoard Product.
- Visit the manufacturer’s website (ASUS, MSI, Gigabyte, Dell, HP, etc.) and search for your model.
- Go to the Support / Drivers page.
- Download the latest BIOS update file.
- Follow the manufacturer’s instructions. This usually involves copying the file to a USB drive, restarting into BIOS, and using the “Flash” utility.
- Warning: Do not turn off your computer during a BIOS update.
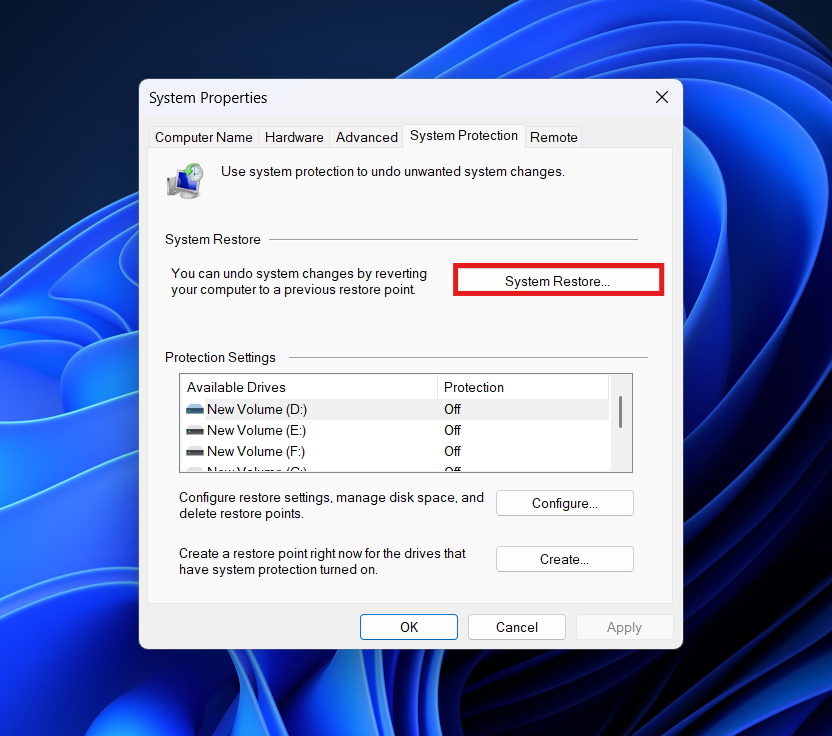
10. Use System Restore (The Time Machine)
If the error started recently—perhaps after installing a new program, a Windows update, or a driver—System Restore can act as a time machine to revert your PC to a state when it was working perfectly. It does not delete your personal files, but it removes apps and drivers installed after the restore point was created.
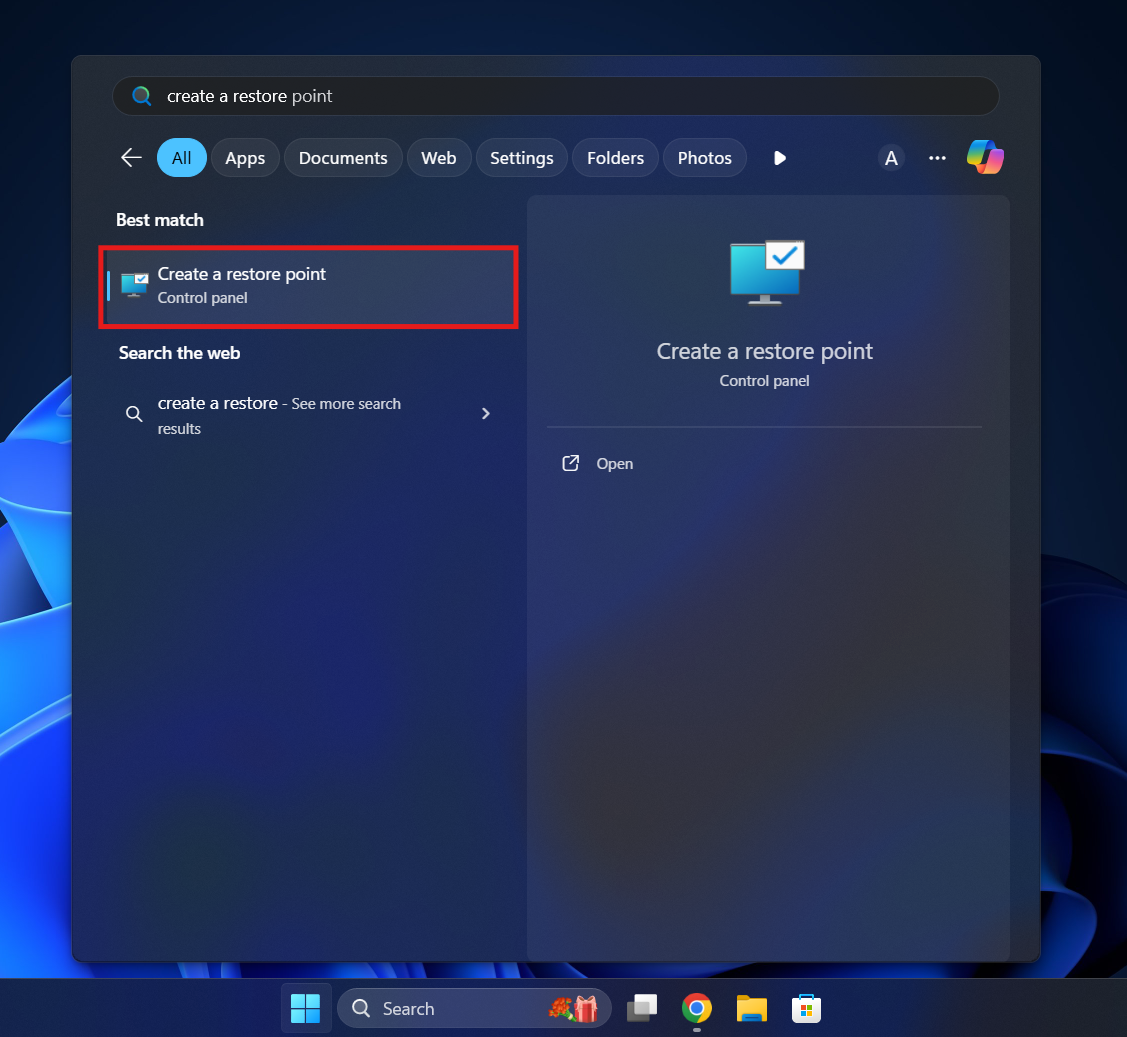
- Press Windows + S and search for Create a restore point.

- Click on System Restore.

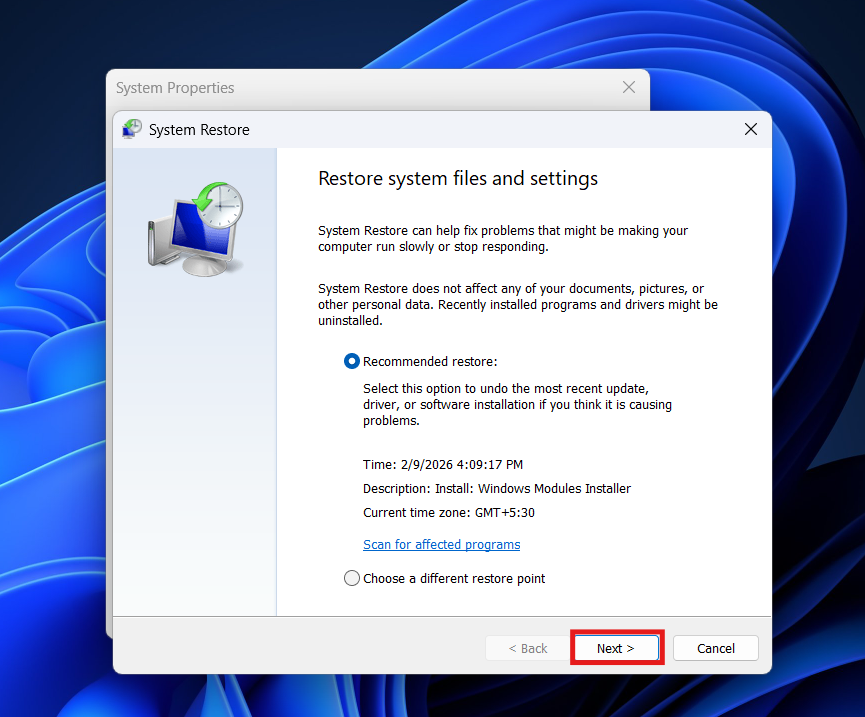
- You will see a list of dates. Select a restore point dated before the blue screen errors began, and click on Next.

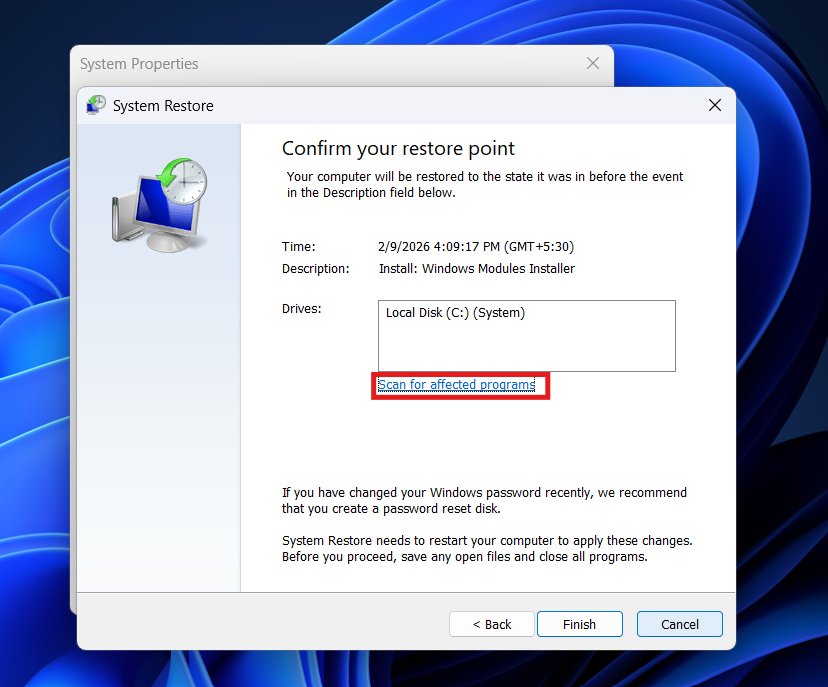
- Click Scan for affected programs to see what will be removed.

- Click Next and Finish.
- Your PC will restart and take some time to roll back the system files.
Final Words
The IRQL_NOT_LESS_OR_EQUAL Blue Screen Error looks intimidating, but it is rarely fatal to your PC hardware. It is essentially a traffic jam in your computer’s memory management where two drivers crashed into each other. By methodically checking your drivers, testing your RAM, and ensuring your system files are intact, you can clear the blockage.
In our experience, updating the Network Driver or removing a conflict-prone Antivirus solves this problem for the vast majority of users. If you have tried everything and still face issues, consider looking into your hardware warranty, as a failing stick of RAM or motherboard might be the root cause. You can follow the steps given in this article above to fix this issue.
ALSO READ:

")


")