- After updating to macOS Sonoma, many Mac users find their internet doesn't work even while connected to Wi-Fi, which can be very frustrating.
- Common causes are corrupted network settings, interference from third-party apps, router compatibility issues, IP address conflicts, and problems with the 5GHz Wi-Fi band.
- Simple solutions include restarting the modem and router, turning off the 5GHz band, forgetting and reconnecting to the Wi-Fi network, disabling VPNs and antivirus software, or resetting network settings.
After updating your Mac to the latest macOS, many users face an unexpected problem — the internet connection stops working, even though the system shows it’s connected to Wi-Fi. This issue has become quite common, especially with the new macOS Sonoma update. In today’s connected world, a working internet connection is essential for most tasks, and facing connectivity issues after an update can be frustrating.
Common Causes of Internet Issues After macOS Update
Issue: Users reported that after updating to macOS Sonoma, their MacBooks appeared to be connected to Wi-Fi, but apps and browsers couldn’t access the internet. Others mentioned they couldn’t connect to the 5GHz Wi-Fi band or were continuously prompted to enter the WPA2 password.
- Corrupted Network Settings: macOS updates can sometimes alter or corrupt existing network settings, preventing the system from connecting to Wi-Fi properly.
- Third-Party Apps Interference: VPNs, antivirus software, and network-monitoring tools like Little Snitch can interfere with your Mac’s network configuration after an update.
- Router Compatibility: Some routers may need to be reset or updated after a macOS update, especially if the new macOS version requires different network protocols.
- IP Address Conflicts: Your Mac might experience IP address conflicts on the network, which can cause connectivity issues.
- Wi-Fi Band Issues: Some users have reported problems specifically with the 5GHz Wi-Fi band after updating macOS, while 2.4GHz networks still work fine.
Internet Not Connecting After macOS Update? Here’s the Fix!
Here are some simple fixes you can try to get your internet connection working again after updating macOS:
1. Restart Your Modem and Router
A quick restart of your modem and router can reset the connection between your devices and your internet service provider (ISP). This is often a simple yet effective solution.
Unplug your modem and router from the power source, wait 30 seconds, then plug them back in. After restarting, try reconnecting your Mac to the Wi-Fi.
2. Turn off the 5GHz Band
Some users find that their Mac has trouble connecting to the 5GHz Wi-Fi band after a macOS update, while the 2.4GHz band works fine. Disabling the 5GHz band temporarily can help resolve the issue.
How to Do It: You will need access to your router settings to disable the 5GHz band. This is usually done by logging into your router’s admin interface through a browser. Look for the wireless settings and disable the 5GHz band, leaving only the 2.4GHz option active. Reconnect your Mac to the Wi-Fi and see if the connection stabilizes.
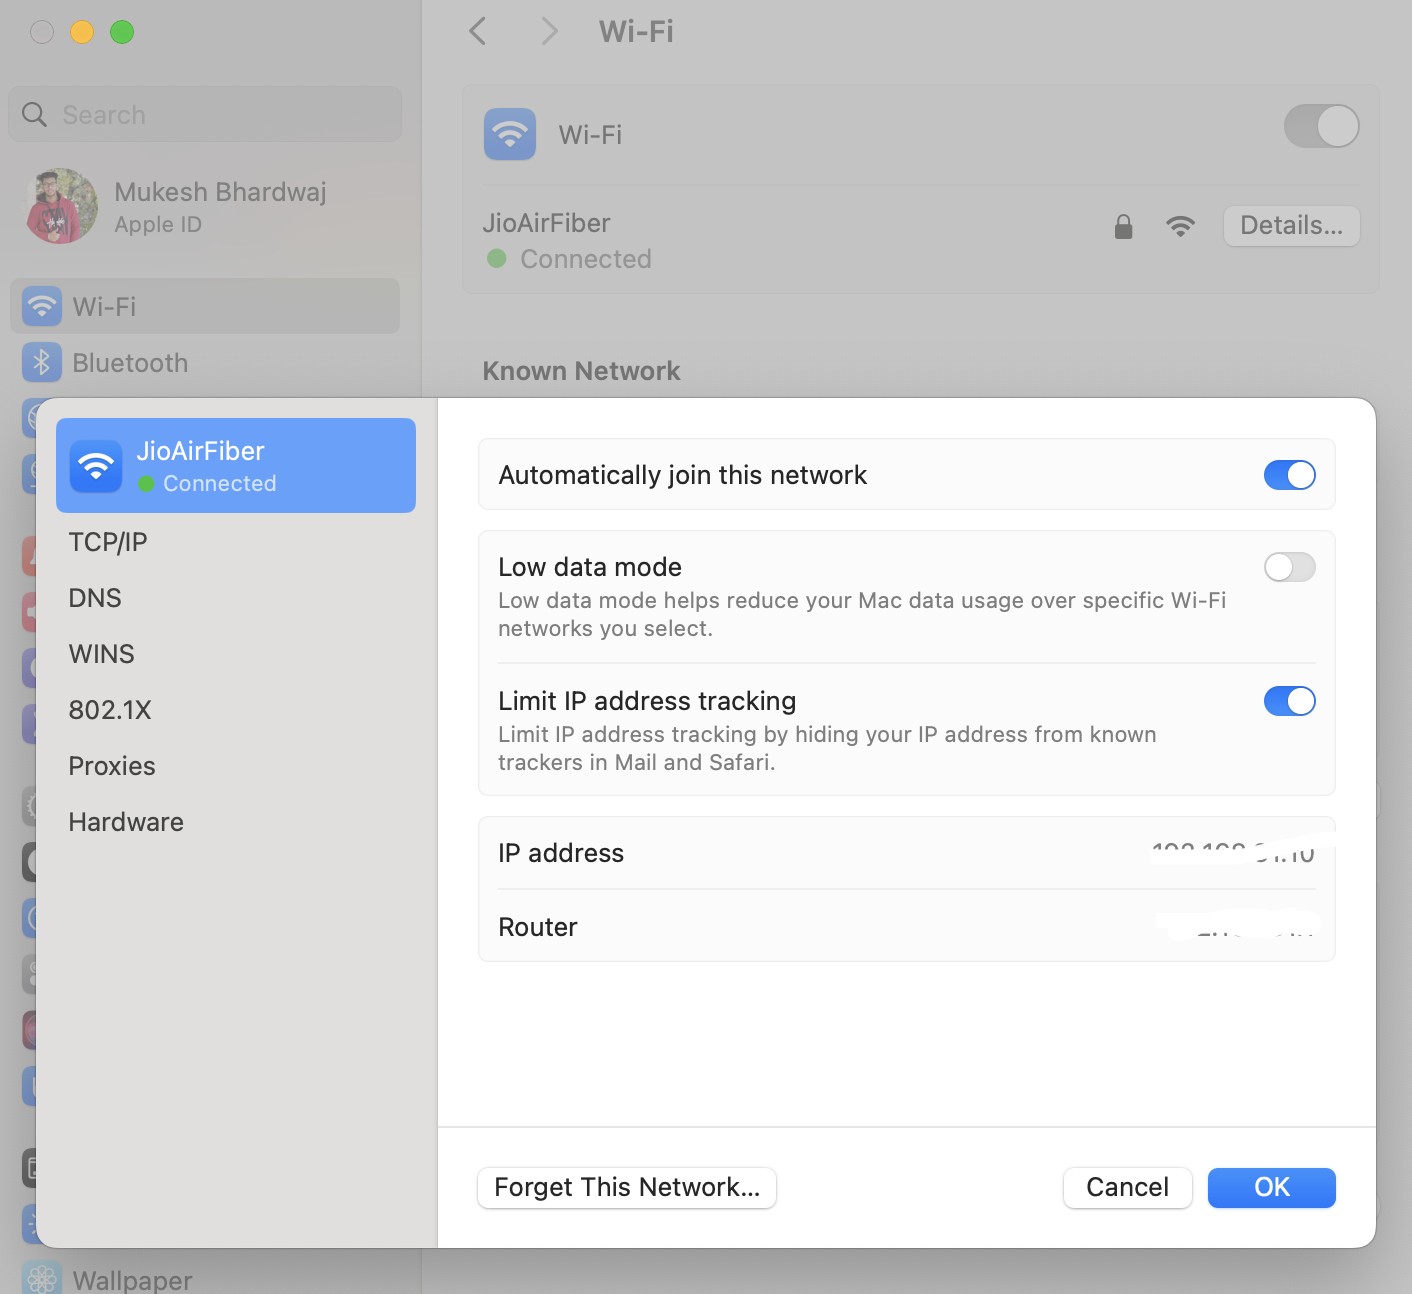
3. Forget and Reconnect to Your Wi-Fi Network
Sometimes, resetting your Wi-Fi connection on the Mac helps to clear any glitches or incorrect settings that may have occurred during the macOS update.
- Click on the Wi-Fi icon in the top right corner of your screen.
- Select Wi-Fi Settings and find the network you’re trying to connect to.

- Click on Details next to your network and then click Forget this Network.
- Reconnect by selecting the network again and entering the Wi-Fi password.
4. Disable VPNs, Antivirus Software, or Third-Party Network Filters
VPNs, antivirus programs, and network filters like Little Snitch can sometimes block or interfere with internet access, especially after an update.
- Turn off any VPNs by going to System Settings > Network > VPN and disabling it.
- For antivirus software, look for the option to temporarily disable it in the app settings.
- If you’re using any network filters, make sure to disable them and try reconnecting to the internet.
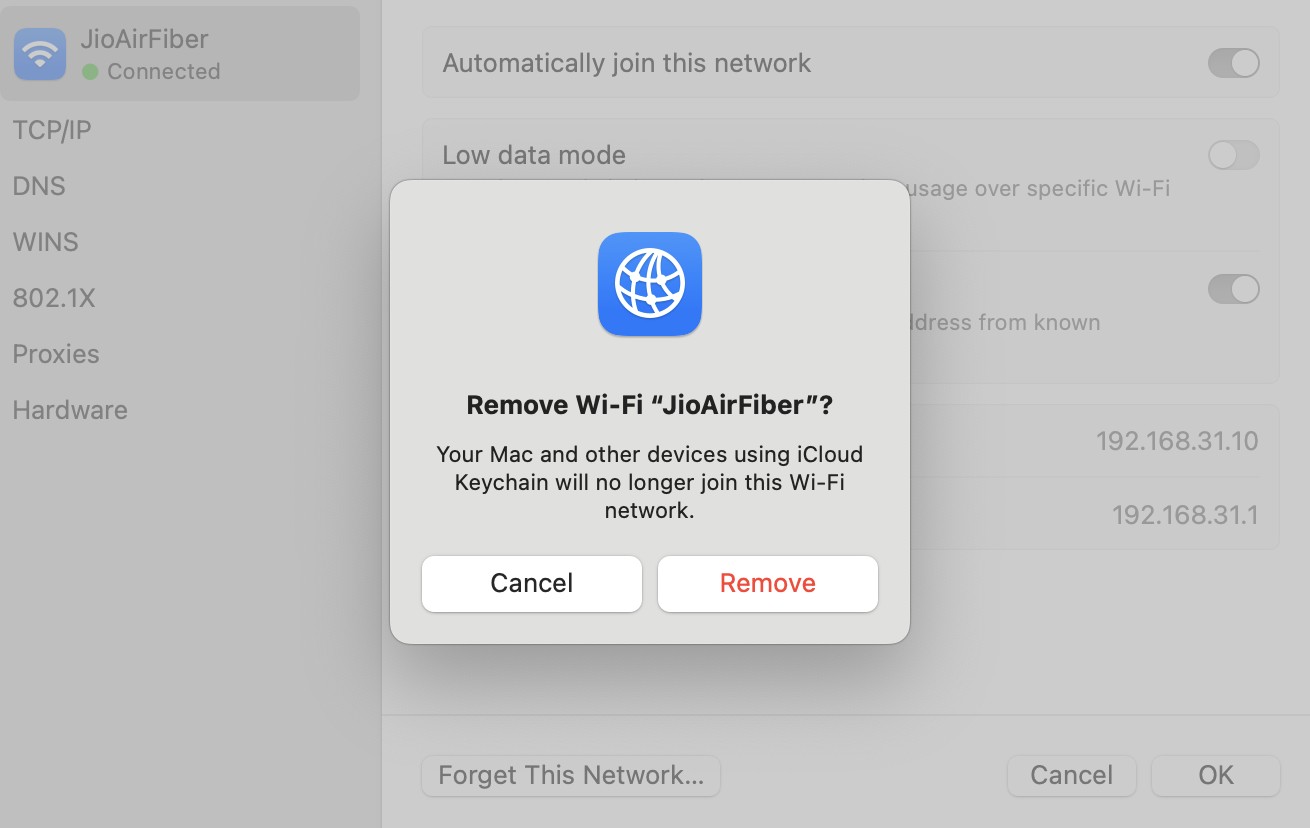
5. Reset Network Settings
If your network settings are corrupted after the update, resetting them can fix the issue.
- Go to System Settings > Network.
- Select Wi-Fi, click on Details, and then forget the network.

- Restart your Mac, reconnect to the Wi-Fi, and enter the password.
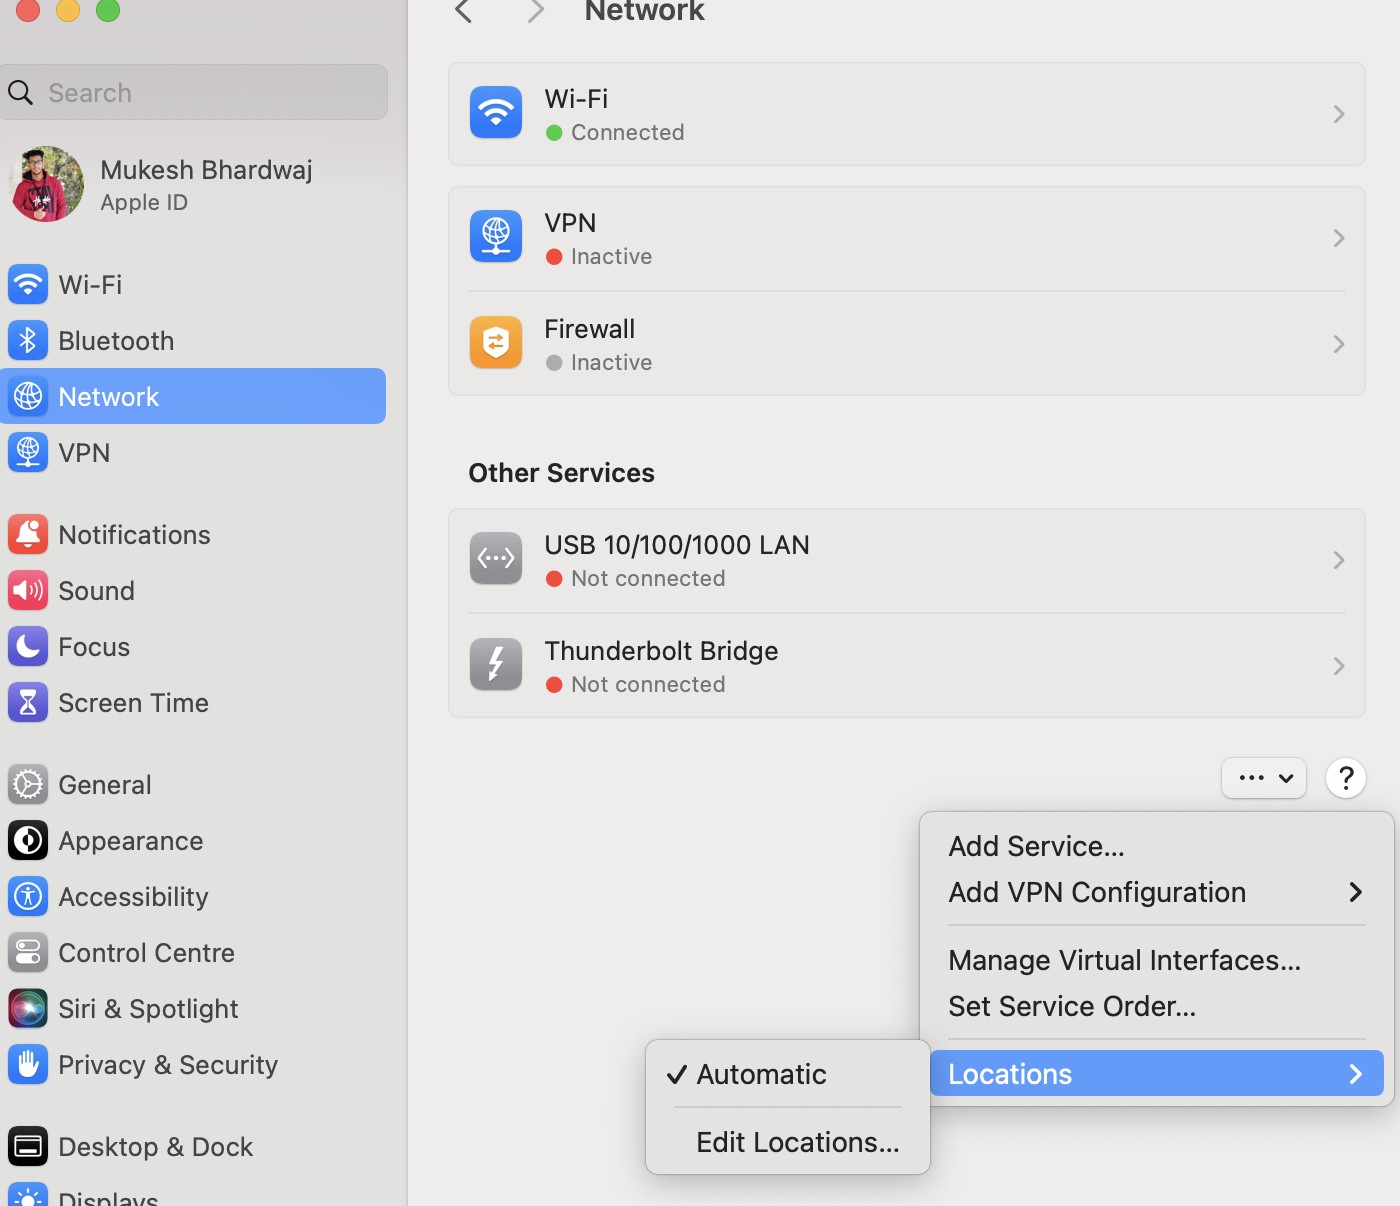
6. Create a New Network Location
If old network configurations don’t work well after a macOS update, creating a new network location gives your Mac a fresh start with network settings.
- Go to System Settings > Network.
- Click the Location drop-down menu and select Edit Locations.

- Click + to add a new location, then reconnect to your Wi-Fi.
Resolved: Internet Not Working After macOS Update
If the basic fixes didn’t solve your internet connection problem, here are some more advanced solutions you can try:
7. Boot into Safe Mode
Safe Mode starts your Mac with only essential system files and services, which can help you determine if third-party apps or services are causing the internet issue.
- On Apple Silicon Macs: Shut down your Mac, hold the Power button until you see the Loading startup options screen, then select Safe Mode.
- On Intel-based Macs: Restart your Mac and hold the Shift key while it boots. Keep holding until you see the login screen.
- Once in Safe Mode, check if your internet connection works. If it does, a third-party app might be causing the issue.
8. Reset Date & Time Settings
Incorrect date and time settings can disrupt your internet connection because macOS needs these settings to synchronize with servers correctly.
- Open the Terminal app from Applications > Utilities.
- Type the following command:
sudo rm /var/db/timed/com.apple.timed.plist
- Press Enter and enter your Mac password if prompted.
- Restart your Mac, then go to System Settings > General > Date & Time and enable Set date and time automatically.
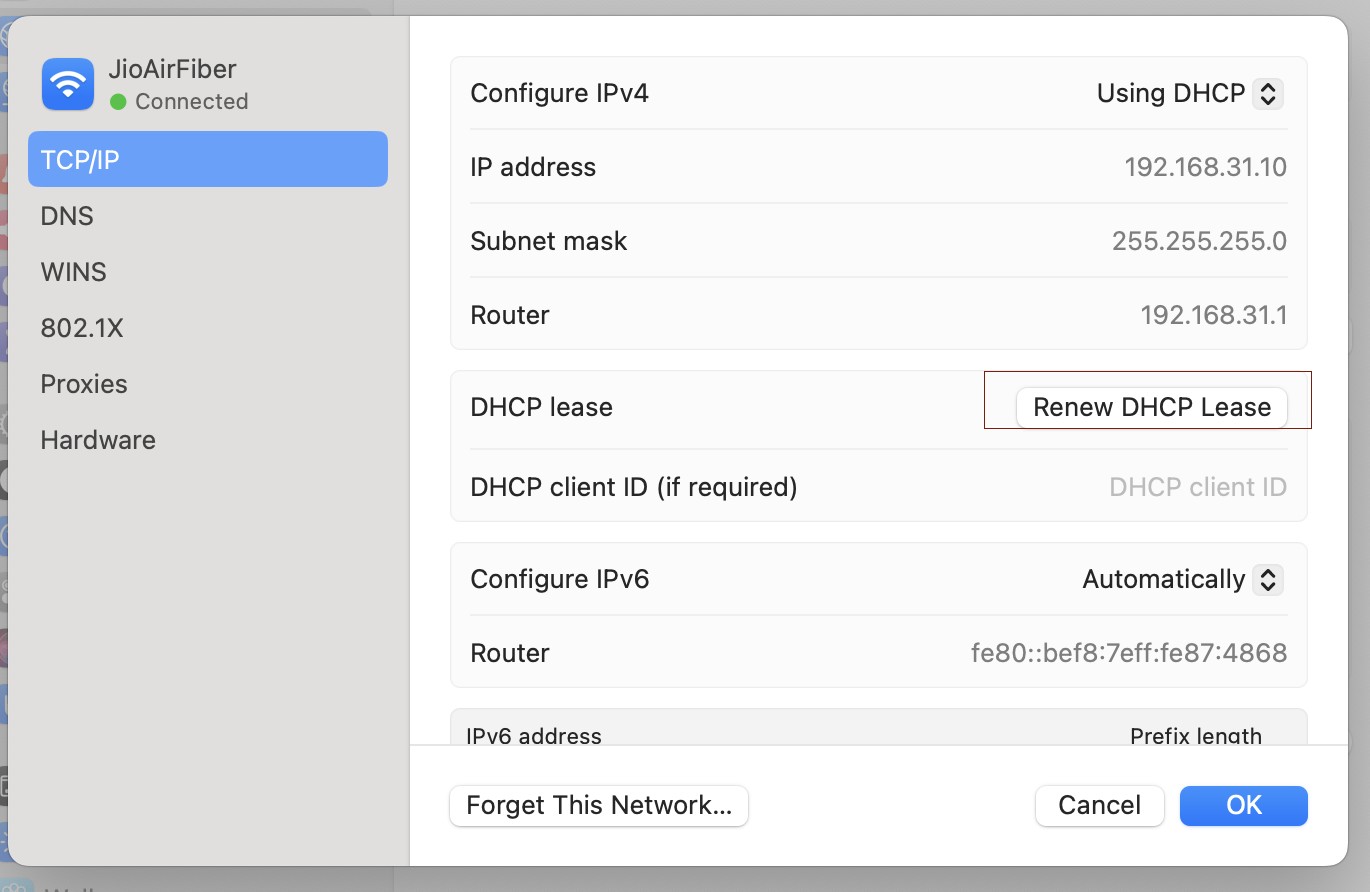
9. Renew DHCP Lease
If your Mac has an IP address conflict or outdated network information, renewing the DHCP lease will request a new IP address from the router, resolving potential conflicts.
- Go to System Settings > Network > Wi-Fi.
- Click on Details next to your Wi-Fi network.
- Select the TCP/IP tab.
- Click Renew DHCP Lease. Your Mac will automatically reconnect with a new IP address.
10. Manually Reset Your Router
In rare cases, the problem might be with your router’s settings, especially if you’ve tried everything else and nothing seems to work.
- Find the Reset button on your router (usually a small hole requiring a pin).
- Press and hold the button for 10-20 seconds to reset the router to factory settings.
- After resetting, set up your Wi-Fi network again and reconnect your Mac.
Conclusion
If your internet stops working after a macOS update, start with simple fixes like restarting your modem, forgetting and reconnecting to Wi-Fi, or disabling VPNs. For persistent issues, advanced steps like Safe Mode or resetting network settings can help. Updating macOS is also important to avoid such problems. If nothing works, contact Apple Support for assistance.
READ ALSO:
- Fix HP Printer Connection Issues After Upgrading to macOS Sonoma
- External Hard Drives SSD Keeps Disconnecting macOS Sonoma, but Accessible on iPhone
- Fixed: WallpaperVideoExtension High RAM and CPU Usage in macOS
- Top 10 Ways to Fix macOS Sonoma Battery Draining Fast Issues
- Touch ID Stopped Working to Unlock by Single Touch in macOS Sonoma


![Fix Phone Screen Unresponsive Touch on Android & iPhone [Step-by-Step]](https://itechhacks.com/wp-content/uploads/2025/10/Fix-Phone-Screen-Unresponsive-Touch-150x150.jpg "Fix Phone Screen Unresponsive Touch on Android & iPhone [Step-by-Step]")

