- Windows 10 comes with Windows Defender, leading to high CPU usage by the Antimalware Service Executable process, causing device slowdown.
- Method 1 involves disabling Windows Defender and using alternative antivirus software, while Method 2 suggests modifying Windows Defender's scheduling options.
- Method 3 involves adding the Antimalware Service Executable to the Windows Defender Exclusion List to prevent system lag caused by self-scans.
Windows is one of the most widely used operating systems for PCs and laptops. It has gained millions of users worldwide due to its remarkable features and rich user-friendly interface.
The latest version of Windows, which is Windows 10, comes with Windows Defender, which is an inbuilt security tool. The Antimalware Service Executable is a part of the Windows Defender. Its process is known as ‘MsMpEng.exe,‘ and it is responsible for scanning all the files and protecting your device from any virus, malware, or spyware.
However, it is observed by many Windows 10 users that Antimalware Service Executable consumes high CPU usage along with other issues, which causes your device to slow down.

Well, You do not need to worry about this. Here we are with the list of some of the best methods, which you can use to fix the high CPU usage by the Antimalware Service Executable process on your Windows 10 PC or laptop.
Also Read: How to Change DNS Server on Windows 10, macOS, Android
Fix Antimalware Service Executable High Memory Usage
Method 1: Disable Windows Defender.
The easiest method to fix this error is to disable Windows Defender on your Windows 10 PC. But, it would be best if you had another antivirus software instated to protect your PC from any threat.
The steps involved in this method are listed below.
Step 1- Press the Windows key + R to launch ‘Run’ on your device.
Step 2- Type ‘regedit‘ in the text box and hit Enter to launch the Registry Editor.

Step 3- From the navigation panel, navigate to HKEY_LOCAL_MACHINE >> SOFTWARE >> Policies >> Microsoft >> Windows Defender.
Step 4- Here, double click on DisableAntiSpyware and set its value data as 1.
If you do not find DisableAntiSpyware, right-click on the navigation panel and select ‘New‘ >> ‘DWORD (32 bit) Value‘ and name this new registry entry as ‘DisableAntiSpyware.’ Then, double click on it and set its value data to 1.
If you do not wish to disable Windows Defender, you can use the next method.
ALSO READ: How to Delete Backup Files in Windows 10
Method 2: Change Windows Defender’s Scheduling Options.
If you schedule the Windows Defender to perform scans when you are less likely to use your PC or laptop, you can fix the high CPU usage error.
The steps you need to execute are explained below.
Step 1- Press Windows key + R simultaneously to open the Run. Type ‘taskschd.msc‘ and hit Enter.
Step 2- From the navigation panel, click on ‘Task Scheduler Library‘ and continue navigating to Library >> Microsoft >> Windows >> Windows Defender.

Step 3- Now that you have reached the Windows Defender folder, double click on ‘Windows Defender Scheduled Scan‘ this file.
Step 4- Then, uncheck the ‘Run with highest privileges‘ checkbox from the properties window.
Step 5- Go to the ‘Conditions‘ tab and uncheck all the options. After, click on ‘OK‘ to save the changes.
Step 5- Double click on ‘Windows Defender Scheduled Scan‘ this file, click on the ‘Triggers‘ tab from the properties window, and click on the ‘New‘ option.
Step 6- Now, you can create your scan schedule such that the CPU usage is balanced. You can select weekly scans for the best results.
Repeat the above method to reschedule scans for Windows Defender Cache Maintenance, Windows Defender Cleanup, and Windows Defender Verification.
Method 3: Add Antimalware Service Executable to Windows Defender Exclusion List.
While scanning, Windows Defender scans each and every file on your PC. Thus, it checks itself too, and it is a common source of system lag. To prevent this from happening, you can add Antimalware Service Executable to the Windows Defender Exclusion list.
Step 1- Press Windows key + I simultaneously to launch the Settings window. Click on ‘Update & Security‘ option from here.
Step 2- Click on ‘Windows Defender‘ and then click on ‘Add an exclusion‘ option in the Exclusions section.
Step 3- Now, Click on ‘Exclude a .exe, .com or .scr process‘ option.
Step 4- Type ‘MsMpEng.exe‘ in the textbox and click on ‘OK‘ to save the changes.
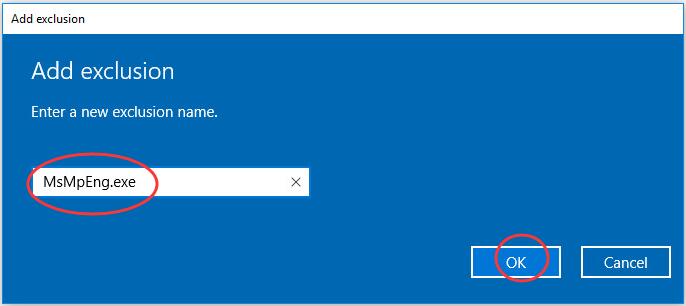
This is all you need to do to add Antimalware Service Executable to Windows Defender Exclusion List.
ALSO READ: 6 Ways to Fix DS4windows Not Working in Windows 10 Games
FAQ – Antimalware Service Executable High Memory
Some FAQs regarding Antimalware Service Executable High Memory usage include:
Q1 Is MsMpEng.exe a virus?
No, MsMpEng.exe is not a virus. It is a process of Antimalware Service Executable, responsible scanning and protecting all the files and folders on you’re Windows 10 device.
Q2 Why MsMpEng.exe using so much CPU?
You might notice high CPU usage as this process is continuously scanning all the files on your device for any threat or virus.
Q3 Do I need Antimalware Service Executable?
Antimalware Service Executable is an antivirus software used to protect your system from viruses, malware, and Spywares. If you are using third-party antivirus software, you can disable the Antimalware Service Executable.
Conclusion:
This is all you need to know about Antimalware Service Executable and how to fix its high CPU usage issue on your Windows 10 PC. The three ways that we discussed above are easy to execute on your devices. If you know of any useful tricks, that are not listed above, please let us know about them in the comments section below.


")
