Changing your Facebook profile name after reaching the limit can be a bit tricky, but it’s not impossible. Here’s a simple, step-by-step guide to help you navigate this process. Remember, Facebook typically imposes a 60-day limit for changing your name to prevent confusion among friends and maintain the authenticity of profiles.

This guide provides a straightforward, updated approach to changing your Facebook profile name in 2023, even if you’ve already reached the name change limit. We’ll walk you through the necessary steps and provide tips to make the process as smooth as possible. Remember, it’s important to adhere to Facebook’s guidelines throughout this process to ensure your account remains in good standing. Let’s dive in and explore how you can update your Facebook profile name, regardless of the standard limitations.
What Happens When You Try To Change Your Facebook Name?
This is a very simple question. You have already tried all things, Right? Ain’t they work? Well, that’s why you are here to know how to change. Right. So here is the procedure to change your Facebook profile name.
#1. Open ‘Facebook Account settings’ and click on ‘Edit name’ and confirm that Limit is currently present or not.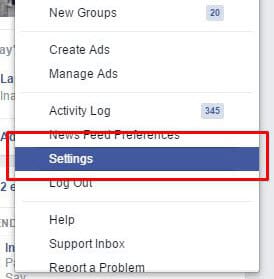
#2. If you find any error there during changing of name process then it might be not changed simply.
Warning: YOU CAN’T CHANGE YOUR NAME RIGHT NOW BECAUSE YOU’VE ALREADY CHANGED IT WITHIN THE LAST 60 DAYS.
So This is the problem you all are facing while changing Facebook Profile Name before 60 days? Right. then here we’re. Now let’s move ahead and see the simple tricks to change your name in 2019. There are 2 Methods to change your Facebook profile name.
Also Read: How to Block Messages Without Blocking Profile on Facebook?
How To Change Facebook Profile Name Before 60 Days
Method 1: Standard Name Change Process
This is the basic method to change your name on Facebook, applicable if you haven’t hit the 60-day limit yet.
- Log into Facebook: Access your Facebook account using your credentials.
- Access Settings: Click on the downward-facing arrow in the top right corner of your Facebook page, and select ‘Settings & Privacy,’ then ‘Settings.’
- Change Your Name: In the ‘General’ section of the settings, you’ll find ‘Name.’ Click ‘Edit’ next to it.
- Enter New Name: Type in your new first, middle (optional), and last name.
- Review and Save: Review your new name and click ‘Review Change.’ Enter your password and click ‘Save Changes.’
Method 2: Contacting Facebook Support
If you’ve hit the 60-day limit, you might need to contact Facebook Support, especially if there’s a significant reason for the change (like a legal name change).
- Visit the Help Center: Go to Facebook’s Help Center.
- Find the Contact Form: Look for a contact form or support option related to account settings or profile name changes.
- Explain Your Situation: Clearly explain why you need to change your name before the 60-day period is up. Be concise and honest.
- Provide Necessary Documentation: If your name change is due to legal reasons, be prepared to provide documentation (like a marriage certificate or court order).
Method 3: Legal Name Change Option
If your name change is due to a legal change, Facebook allows you to update it by submitting documentation.
- Access the Name Change Setting: Follow the same steps as in Method 1 to get to the ‘Name’ section in settings.
- Choose Legal Name Change: Look for an option that mentions legal name changes. This option might ask you to upload documents.
- Upload Documentation: Upload a scanned copy or a clear photograph of your legal document that shows your new name.
- Submit and Wait for Verification: After submitting, wait for Facebook to verify your documents and update your name.
Method 4: Special Circumstances
In cases of special circumstances like a typographical error or a minor name adjustment:
- Document Your Reason: Prepare a brief explanation of why a name change is necessary. If it’s a typo, make that clear.
- Contact Facebook Support: Use the same process as in Method 2 to reach out to Facebook.
- Await Response: Facebook might respond with specific instructions or directly update your name after reviewing your request.
Tips for a Smooth Process
- Accuracy is Key: Ensure the name you want to change to is accurate and adheres to Facebook’s name standards.
- Patience: The review process can take time, especially if it involves manual review by Facebook staff.
- Documentation: Keep any relevant legal documents handy if your name change is for legal reasons.
- Follow Up: If you don’t hear back from Facebook within a reasonable time, follow up on your request.
Conclusion
Changing your Facebook profile name after reaching the limit requires a bit more effort, but it’s certainly achievable. Whether it’s through the standard process, contacting support, or providing legal documentation, understanding and following these detailed steps will help you navigate the name change process on Facebook. Remember to always adhere to Facebook’s guidelines and provide accurate information to ensure a smooth and successful name change.